Breakfast · Cakes · Desserts

Peach and Blueberry Greek Yogurt Cake

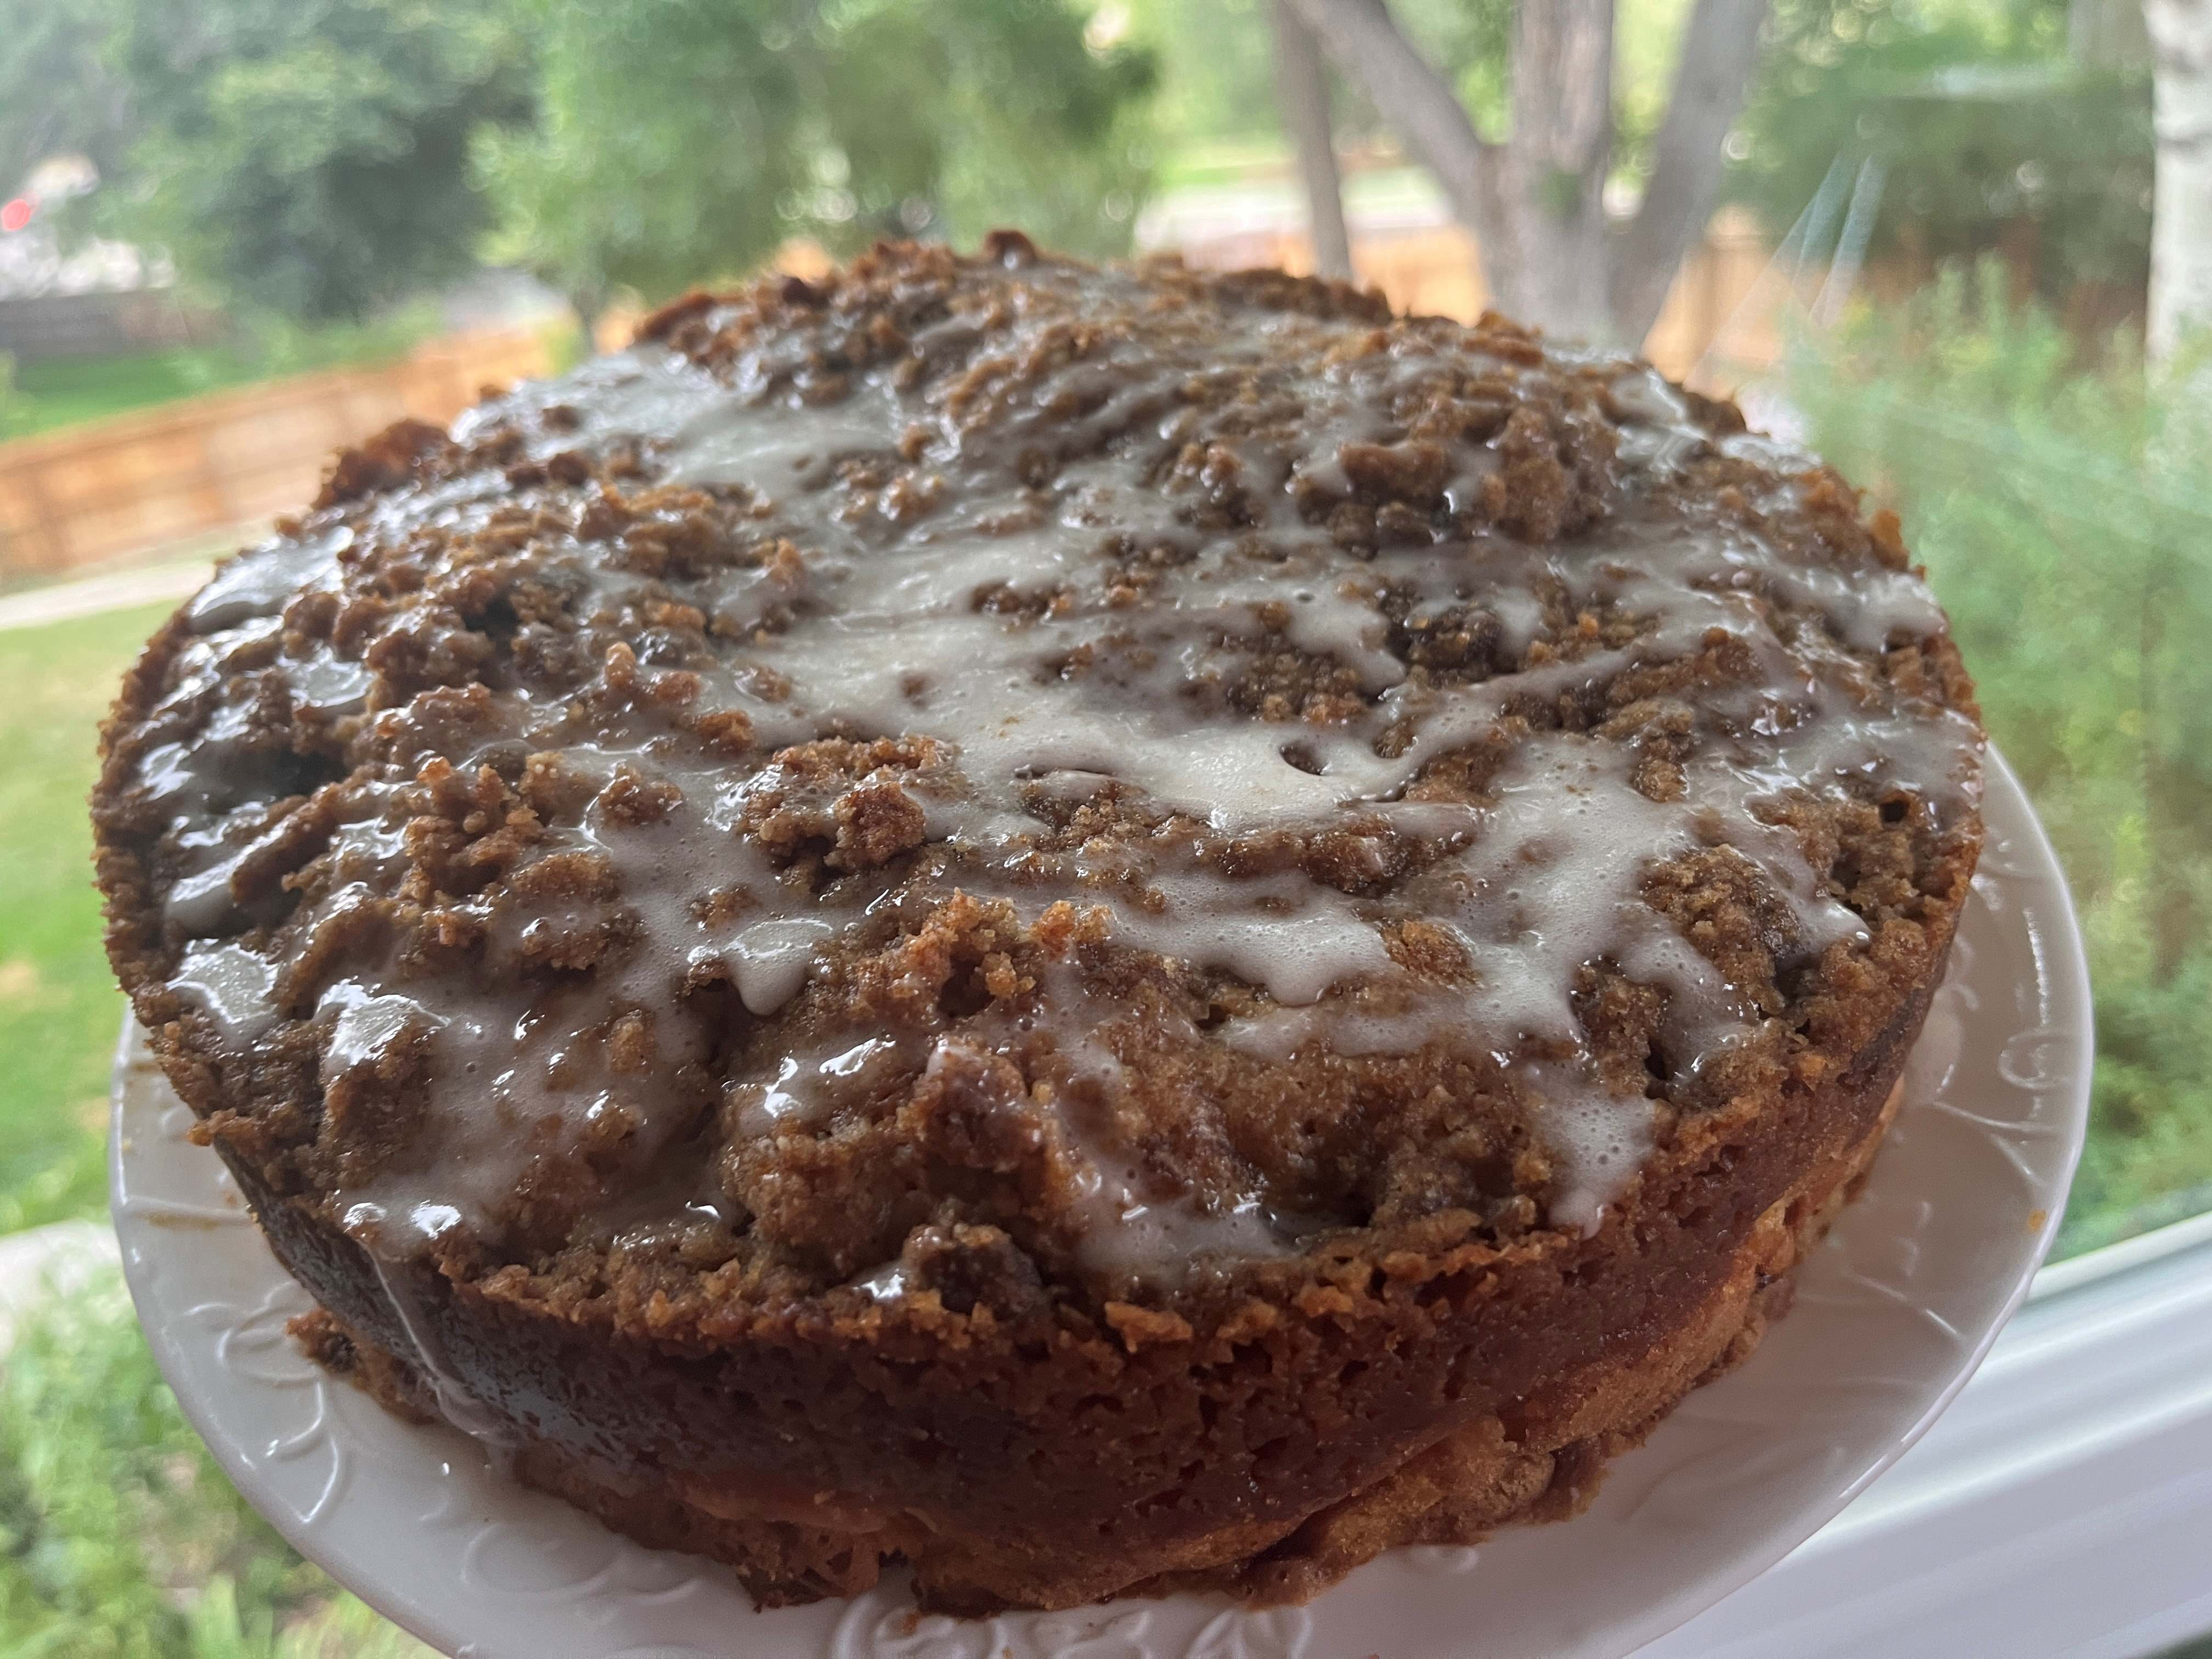
This cake is so delicious. The cake texture and taste is out of this world, not to mention the delicious peaches and blueberries! I can imagine this cake with raspberries and peaches or any other fruit combination. It’s a delicious as a coffee cake or as a dessert. Add some iced cream or whipped cream and you are in heaven!

Peach and Blueberry Greek Yogurt Cake

INGREDIENTS:
  • 1 ½ cups all-purpose flour
  • 1 teaspoon baking powder
  • ½ teaspoon baking soda
  • 4 oz butter softened
  • 1 cup sugar
  • 2 eggs
  • ½ teaspoon vanilla
  • ½ cup Greek yogurt low-fat
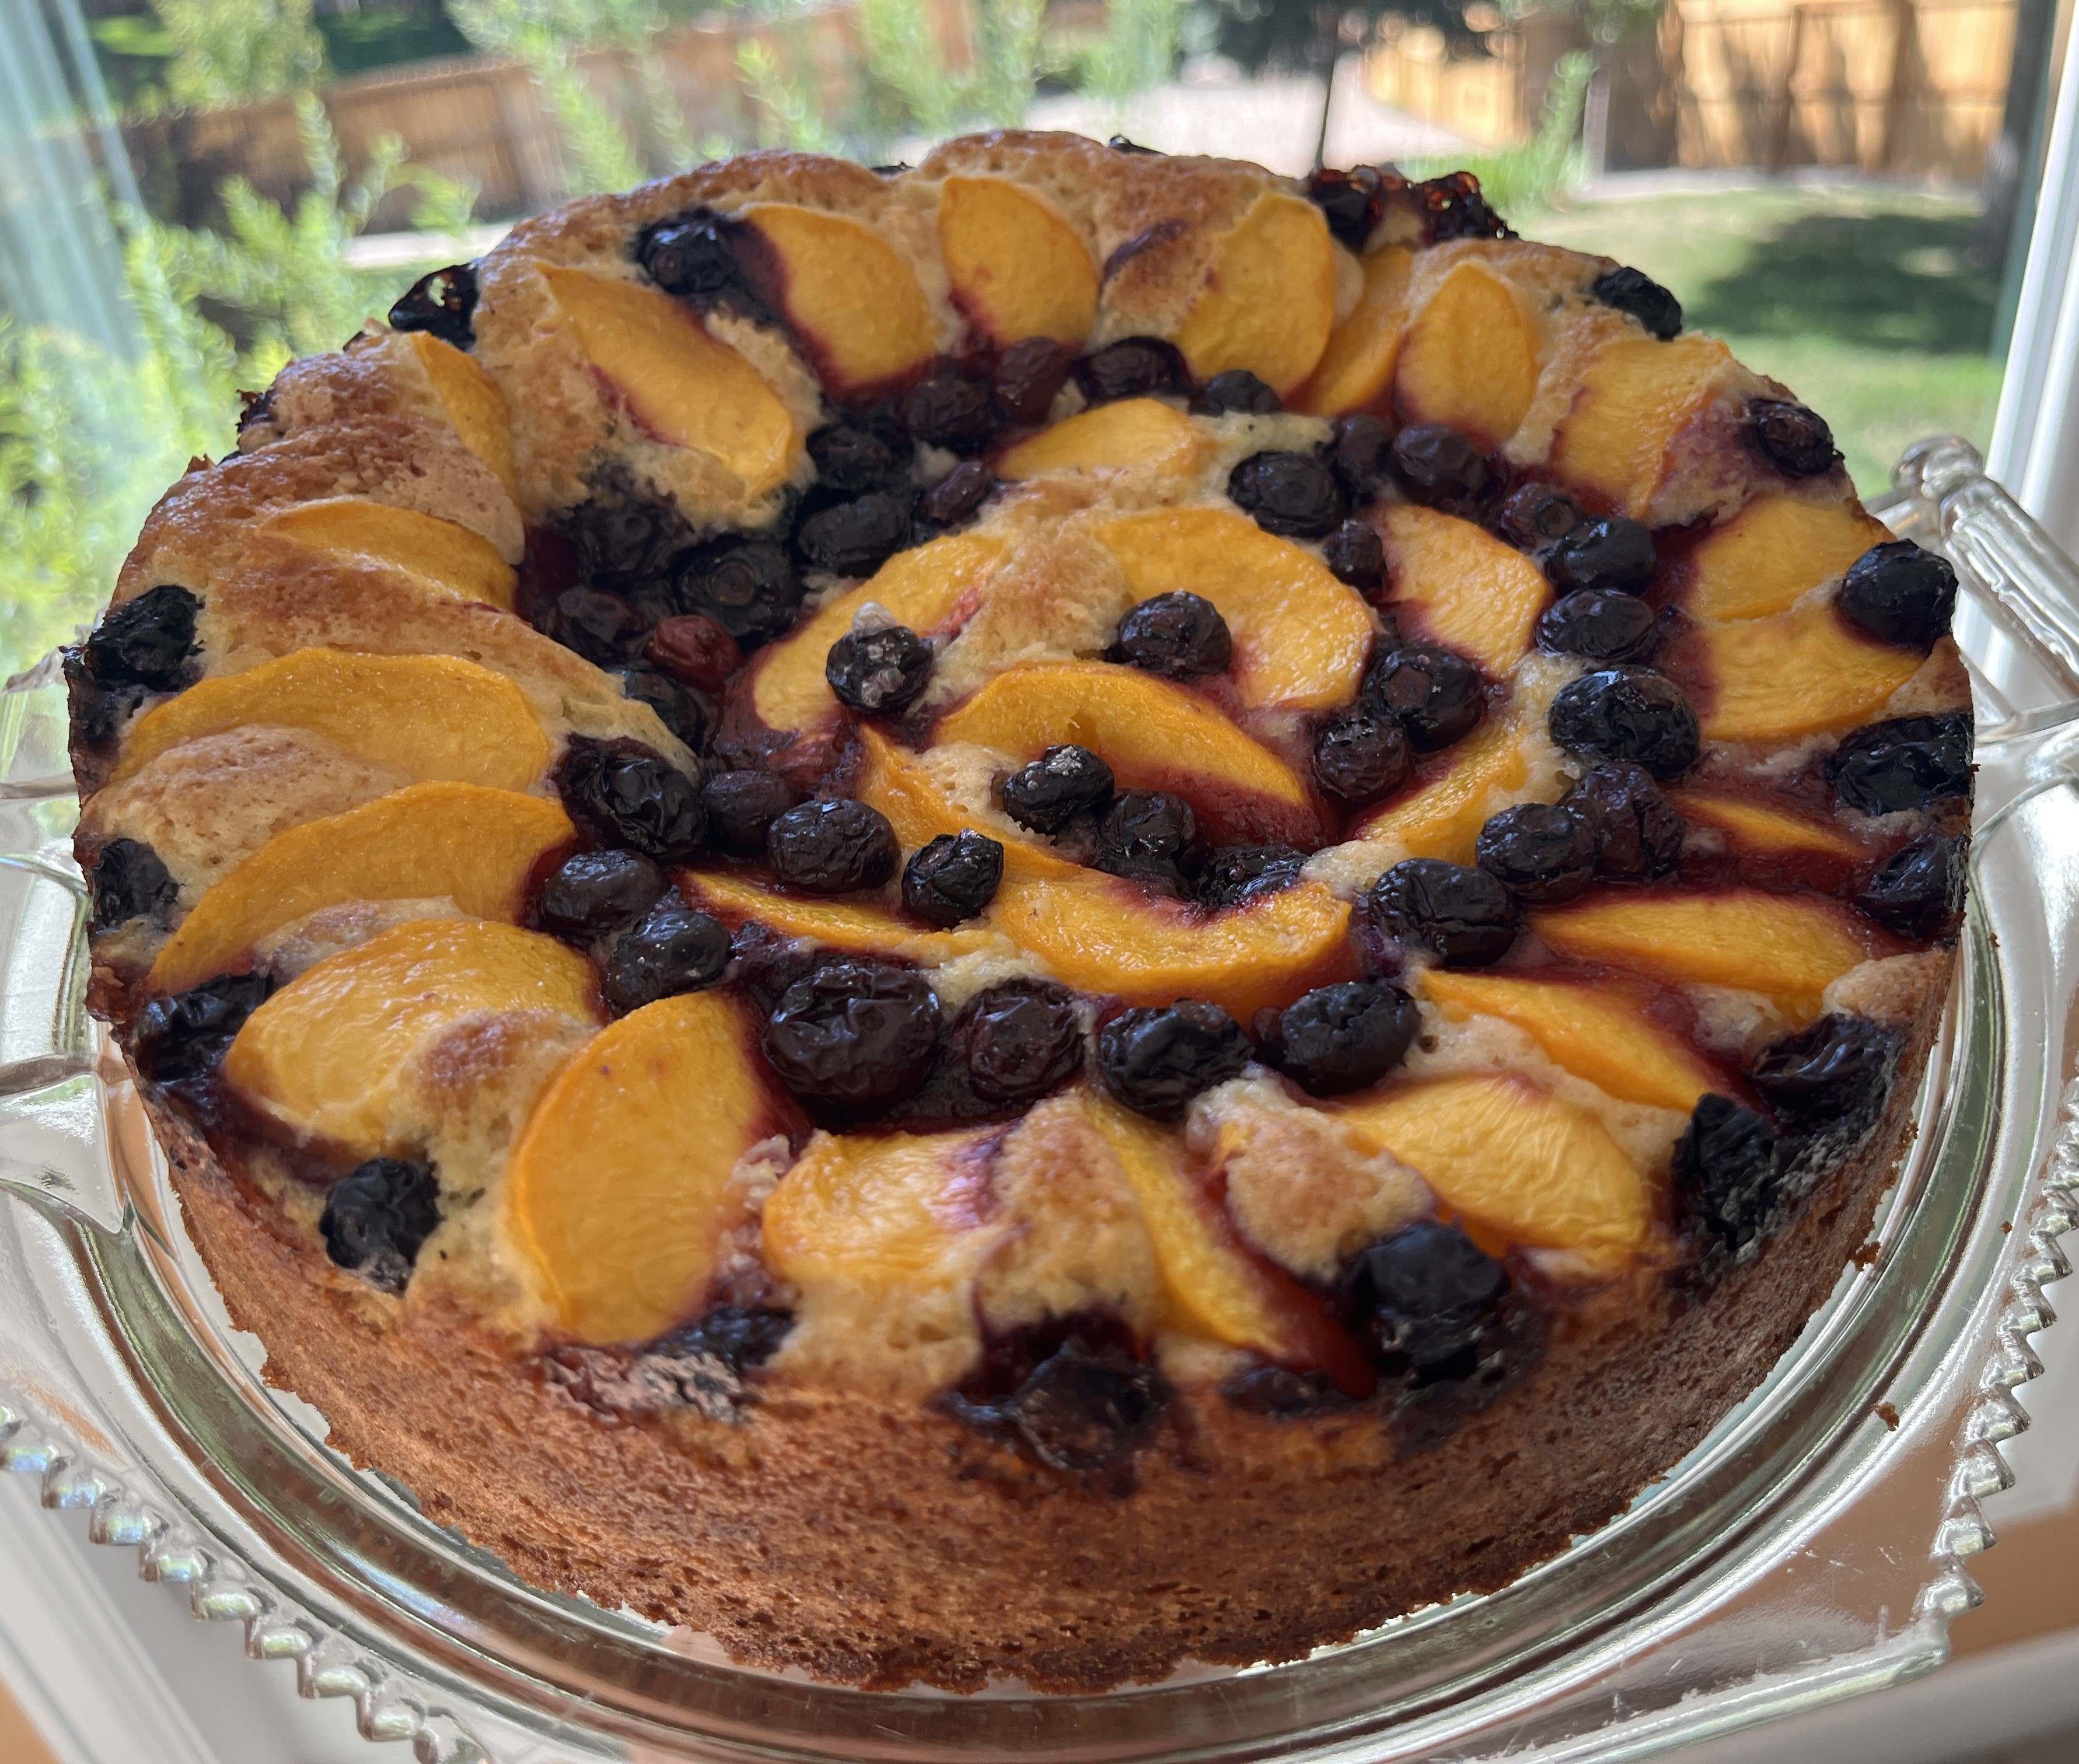
  • 2 peaches sliced into wedges
  • 6 oz blueberries
  • 1 teaspoon granulated sugar
DIRECTIONS:
  1. Use 9×3-inch springform pan.
  2. Preheat oven to 350°F with rack in middle. Grease the side and the bottom of the pan with butter or cooking spray. Line the bottom of a 9×3-inch springform pan (or 9 inch round cake pan) with parchment paper. Grease the parchment paper too.
  3. Sift flour, baking powder, baking soda, together into a medium bowl.
  4. In a separate bowl, beat butter, sugar, and 2 eggs until very light in color and fluffy, 2-3 minutes on high speed. Add vanilla and Greek yogurt and continue beating until very creamy and light in color, for about 1 more minute.
  5. Keeping the mixer speed low, mix in the flour mix until combined. Do not overmix.
  6. Transfer the cake batter to the springform pan. Top with sliced peaches, and scatter blueberries evenly on top in the spaces between the peach slices. Sprinkle the fruit with 1 teaspoon granulated sugar.
  7. Bake until cake turns golden, and the tester comes out clean in the center, about 1 hour, depending on your oven. Midway through baking, I like to put some extra peach slices and extra blueberries on top of the cake for prettiness, and return cake to baking.
  8. When the cake is done baking, let it cool (still in the baking pan) on a wire rack. After cake has cooled for about 40 minutes, release the cake from the springform pan. At this point, if the cake is cool enough, you can slide your hand under the cake, between the parchment paper and the bottom portion of the springform pan and move the cake with the parchment paper attached to its bottom onto a cake plate easily.
  9. If using a 9 inch round cake pan, cook in pan for about 40 minutes or more (up to 1 hour, depending on your oven), then invert onto a plate.

Recipe from Julia’sAlbum

Breakfast · Cakes · Desserts

Peach Cobbler Coffee Cake

Oh glorious peaches! I look forward to peach season each year, and love to try new recipes. The Peach Cobbler Coffee Cake does not disappoint, although I would tweak a few things next time. The crumb topping is so good, you want a piece in each bite, with peaches. Next time I would bake the cake in a rectangle shallow pan, similar to brownie thickness and perhaps add a few more peaches with a splash of lemon juice or lemon zest (or both). I made extra glaze and it was delicious drizzled on the cut piece of cake.

Peach Cobbler Coffee Cake

INGREDIENTS:
  • Cake:
    • 2 cups all purpose flour
    • 2 1/2 teaspoons baking powder
    • 1 teaspoon cinnamon
    • 1/4 cup milk
    • 3/4 cup brown sugar
    • 1/2 cup sour cream
    • 1/4 cup butter, softened
    • 1 egg
    • 1 teaspoon vanilla
    • 2 cup sliced peaches
  • Crumb Topping
    • 1 cup brown sugar
    • 2/3 cup flour
    • 6 Tablespoons softened butter
  • Glaze
    • 1/2 cup powdered sugar
    • 2 1/2 teaspoons milk
    • 1/8 teaspoon cinnamon
DIRECTIONS:
  1. In a medium bowl, combine 2 cups flour, baking powder and cinnamon. Set aside.
  2. Beat 1/4 cup milk, ¾ cup brown sugar, 1/2 cup sour cream, ¼ cup butter, egg, and vanilla until creamy. Add dry ingredients and mix just until blended.
  3. Fold in peaches.
  4. Spoon batter into a 10 inch springform pan and sprinkle with crumble topping (see below).
  5. Crumble Topping: Combine 1 cup brown sugar, ⅔ cup flour in a bowl. Cut in 6 Tablespoons softened butter until mixture is crumbly.
  6. Bake at 350 degrees for 50-55 minutes or until center is set and top is golden brown.
  7. Combine ingredients for glaze and drizzle over baked, cooled coffee cake.

Recipe from LemonTreeDwelling

Desserts

Peach Roll Ups (or are they dumplings?)

This recipe caught my eye and I took a screenshot of it but didn’t save the source. Darn! Anyway, I tried the recipe and made 8 individual rolls or dumplings. They were quite good and the grandboys loved them. I am not a big fan of Crescent rolls so next time I would make them with Pepperidge Farm Puff Pastry.

They were easy and would be great for a quick dessert. I made them with fresh peaches and honey but you could easily substitute canned peach halves or sugar for the honey.

Peach Roll Ups

INGREDIENTS:
  • Pillsbury Crescent Rolls
  • Fresh Peaches, peeled and cut in half (or canned peach halves)
  • butter
  • honey
  • cinnamon
DIRECTIONS:
  1. Preheat oven to 350 degrees F.
  2. Peel and pit fresh peaches, cut in half
  3. Roll out the crescent rolls into rectangles.
  4. Add the half peach, cut side up, on top of crescent roll rectangle.
  5. Add a dollop of butter to the center of each peach.
  6. Drizzle each peach with honey.
  7. Sprinkle with cinnamon.
  8. Fold the crescent rolls from the corner and pinch along the seams.
  9. Bake for about 20 minutes or until golden brown.
  10. Remove from the oven and let cook for a few minutes for the syrup to thicken.
  11. Serve warm with or without ice cream.

I took a screenshot of the recipe and now I cannot find the source. If anyone knows the source, please let me know so I can give credit where credit is due!

Desserts

Rhubarb Pudding Bars

Rhubarb recipes are always on my search list and this recipe didn’t disappoint. Although the photo in the original recipe showed a crumble top, the recipe calls for whipped cream. I followed the original recipe and was very happy with the results. I first served this to my two grandsons and expected a ‘yuck’ when they saw the fruit filling, but no! They both thought it was yummy and asked for seconds.

It would be fun to play with this recipe and use cherry filling instead of the rhubarb, or any other fruit. It’s a refreshing dessert for the warm spring and summer months.

Rhubarb Pudding Bars

INGREDIENTS:
  • For the Crust:
    • 1 cup all-purpose flour
    • 1/4 cup granulated sugar
    • 1/2 cup unsalted butter, cold and cubed
  • For the Filling:
    • 3 cups chopped fresh rhubarb
    • 1 1/2 cups granulated sugar
    • 1/4 cup all-purpose flour
    • 3 large eggs
    • 1/2 tsp vanilla extract
  • For the Pudding Layer:
    • 1 package (3.4 oz) instant vanilla pudding mix
    • 2 cups cold milk
  • For the Topping:
    • 1 cup heavy cream
    • 2 tbsp powdered sugar
    • 1/2 tsp vanilla extract
DIRECTIONS:
  1. For the Crust: Preheat over to 350 degrees F. Line a 9×13 inch baking dish with parchment paper. (Fork-Lore Note: Next time I would butter the baking dish instead of fighting the parchment paper to cut and serve.) In a medium bowl combine 1 cup flour and 1/4 cup granulated sugar. Cut in the butter until the mixture resembles coarse crumbs. Press into the bottom of the prepared baking dish. Bake for 15 minutes, or until lightly golden. Remove from oven and let cool slightly.
  2. For the Filling: In a large bowl, mix together the chopped rhubarb, 1 1/2 cups granulated sugar, 1/4 cup flour, eggs and 1/2 tsp vanilla extract until well combined. Pour the rhubarb mixture over the cooled crust. Return to the oven and bake for 35-40 minutes, or until the filling is set. Let cool completely.
  3. For the Pudding Layer: In a medium bowl, whisk together the vanilla pudding mix and cold milk until smooth. Let sit for 5 minutes to thicken. Spread the pudding layer over the cooled rhubarb layer. Refrigerate until set, about 1 hour.
  4. For the Topping: In a large bowl, beat the heavy cream, powdered sugar, and 1/2 tsp vanilla extract until stiff peaks form. Spread the whipped cream over the pudding layer. Refrigerate for at least 4 hours, or overnight, before serving.

Recipe from Eva Recipes

Desserts · Uncategorized

Lemon Bars

Lemon Bars are a favorite of mine and I rarely make them. However, when we were planning our family high tea, I knew they had to be in the dessert tiers. The photo below seems to highlight the Macaroons, a great Costco find. However the lemon bars on the bottom are the star of this recipe.

After the tea, I had several leftover and discovered they freeze really well.

In case you’re interested in the tiered plate, I bought the plates from Goodwill and used glasses to glue between the plates. It was fun and added a bit of ‘fancy’ to our tea.

Lemon Bars

INGREDIENTS:
  • For the Crust:
    • 2 cups flour
    • 1/2 cup sugar
    • 1/4 tsp. salt
    • 1 cup salted butter, cut into small cubes, plus more for greasing
  • For the Filling:
    • 1 1/2 cups sugar
    • 1/4 cup flour
    • 4 large eggs
    • Zest and juice of 4 medium-sized lemons
  • Powdered sugar, for topping
DIRECTIONS:
  1. For the crust: Preheat the oven to 350°F. Grease a 13-by-9-inch pan with butter. (Use an 8-by-10-inch pan if you’d like the layers to be a little thicker.) In a large bowl, stir together the flour, sugar, and salt. Add the butter and use a pastry cutter to cut it all together until the mixture resembles fine crumbs. Press into the prepared pan and bake until golden around the edges, about 20 minutes.
  2. For the filling: In a medium bowl, stir together the sugar and flour. Crack in the eggs, and whisk to combine. Add the lemon zest and juice, and mix until combined. Pour over the crust and bake until the filling is set, about 20 minutes.
  3. Allow to cool in the fridge for a minimum of 2 hours, then sift powdered sugar over the top before cutting into squares.

Recipe from ThePioneerWoman

Desserts

Dutch Letter Bars

Dutch Letters are a pastry delicacy that I must purchase when I visit family in Iowa. Extra Dutch letters are always in my bag to bring back to Colorado for my family to enjoy. A few years ago, my sister told me about the recipe for Dutch Letter Bars that she makes often, and people always like them. My first batch was delicious and reminds me of lemon bars but with an almond twist. They are quite rich, so a small square is plenty but so good!

Dutch Letter Bars

INGREDIENTS:
  • 2 sticks butter
  • 8 oz. almond paste
  • 2 eggs
  • 2 cups sugar
  • 2 cups flour
  • slivered almonds and sugar for top (optional)
DIRECTIONS:
  1. Melt together butter and almond paste, then beat with electric mixer.
  2. Stir in eggs, sugar and flour.
  3. Pour into greased 9×13″inch pan.
  4. Bake at 350 degrees for 25 minutes. Can be covered with slivered almonds or sugar when done.

Recipe from Corn Carnival Cookbook, 90 Years of Family Fun, Gladbrook, Iowa

Desserts

No Churn Nutella Ice Cream

One of grandsons LOVES Nutella so I decided to try this recipe. It was easy to put together and no churn time is necessary. I didn’t have hazelnuts on hand so we will enjoy it plain. As the original recipe states, it is rich so you don’t need to eat more than a scoopful. While the photo isn’t fantastic, the flavor is!

No Churn Nutella Ice Cream

INGREDIENTS:
  • 1 can Condensed milk 395g or 14oz
  • 200 g (.70 cups) Nutella
  • 1 tsp. Vanilla extract
  • ¼ cup Extra virgin olive oil get the light (tasting) variety
  • 2 cups Cream heavy whipping cream
  • ½ cup Roasted hazelnuts, chopped (optional)
DIRECTIONS:
  1. In a large mixing bowl, combine the condensed milk, nutella, vanilla and olive oil
  2. In a separate bowl, whisk the cream until soft peaks form
  3. Carefully fold ⅓ of the cream into the nutella mixture, being careful not to deflate the cream
  4. Add the remaining whipped cream and fold through
  5. Pour the mixture into an ice cream container or prepared pan
  6. Sprinkle with roasted hazelnuts and seal with the lid (or cover with plastic wrap and foil, making sure it is completely airtight)
  7. Place in the freezer for 6 hours before serving
  8. Take the ice cream out of the freezer for about 10 minutes before serving, to allow it to soften and be easier to scoop
  9. Notes:
    • If you can’t find roasted hazelnuts, raw hazelnuts can be roasted in a moderate oven for 10 minutes – just place them on a lined tray and give them a roll around after 5 minutes
    • This ice cream is super rich and delicious -1 scoop is often enough

Recipe from AppleCakeAnnie

Breakfast · Desserts

Peanut Butter Oat Energy Balls

I love a peanut butter oat bite or dessert. These energy balls go to the next level with chocolate on top. I wish I had remembered to add the flaky sea salt to enhance the sweet/salty factor but they are yummy as they are!

Peanut Butter Oat Energy Balls

INGREDIENTS:
  • ⅔ cups old-fashioned rolled oats
  • ¾ cup crunchy natural peanut butter (I used regular milk)
  • 3 tablespoons chia seeds
  • 2 teaspoons honey
  • 1½ teaspoons vanilla extract
  • ¼ teaspoon salt
  • ½ cup dark chocolate chips (53% cacao) 
  • 1 tablespoon unrefined coconut oil
  • ¾ teaspoon flaky sea salt (I forget this step–oops!)
DIRECTIONS:
  1. Line the cups of a 24-cup mini muffin tin with silicone or paper liners.
  2. Combine 1⅔ cups oats, ¾ cup peanut butter, ½ cup almond milk, 3 tablespoons chia seeds, 2 teaspoons honey, 1½ teaspoons vanilla and ¼ teaspoon salt in a large bowl; stir to mix well. Divide the mixture among the prepared cups, about 1 heaping tablespoon each; firmly press the mixture into the cup bottoms.
  3. Combine ½ cup chocolate chips and 1 tablespoon coconut oil in a small microwave-safe bowl. Microwave on High until the oil is melted and the chocolate chips have softened, 45 to 60 seconds. Stir until the chocolate chips are completely melted and incorporated into the oil.
  4. Spoon a scant teaspoon of the melted chocolate mixture over the oat mixture in each cup, spreading to cover the entire surface. Refrigerate, uncovered, until the chocolate layer is beginning to set (the surface will begin to lose its shine and become dull), 10 to 15 minutes. Sprinkle with ¾ teaspoon flaky salt; refrigerate, uncovered, until chilled and the layers are fully set, about 1 hour.
  5. Step 3

Recipe from EatingWell

Desserts

5-Ingredient Date Bark

Date Bark is such a yummy treat with healthier qualities than many desserts. As I made it, I used a rolling pin to flatten the dates and found it worked better. After freezing, keep it in the refrigerator to enjoy when you need a sweet treat.

5 Ingredient Date Bark

INGREDIENTS:
  • 12-15 large Medjool dates, pitted
  • 1/4 cup peanut butter
  • 1/4 cup roasted peanuts, chopped
  • 3/4 cup chocolate chips
  • 1 tsp coconut oil
  • flaky sea salt (optional)
DIRECTIONS:
  1. Line a baking tray or large cutting board with a piece of parchment paper.
  2. Spread the pitted dates open and lay them side by side so they form one cluster or sheet of flattened dates. Use the bottom of a glass or bowl with another small piece of parchment paper to press the dates into an even, flat layer
  3. Spread the peanut butter across the top, then sprinkle the chopped peanuts randomly on top of the peanut butter. 
  4. Add the chocolate chips and coconut oil to a microwave-safe bowl. Heat in 15-20 second increments, stirring between each burst, until fully melted and creamy. Expect this to take 1:30-2:00 depending on your microwave. Spread the chocolate over the top of the date bark. Sprinkle with optional sea salt.
  5. Carefully transfer the tray or board to your freezer, making sure it sits flat and level. Chill for at least 30 minutes before removing it from the freezer. Break or cut the date bark into irregular pieces, and enjoy!

Recipe from Streetsmartnutrition

Desserts · Holidays

Chocolate Covered Cherry Rice Krispie Treats

Happy Valentine’s Day! A sweet treat on this holiday is special and I loved how simple and delicious these treats were. My granddaughters assisted in the making, especially the sprinkles! Why have I never thought of adding flavoring to Rice Krispie Treats? Next time I would a pinch more cherry extract but they were delicious made per the recipe. If you want to really creative, you could use cookie cutters to cut out hearts from the treats (and nibble on the extras while you work)! Now I’m wondering about making some next Christmas with peppermint or candy cane flavoring. The possibilities are endless.

Chocolate Covered Cherry Rice Krispie Treats

INGREDIENTS:
  • 3 tablespoons unsalted butter
  • 1 10 oz bag mini marshmallows
  • 1 teaspoon cherry extract (can increase if more intense flavor is desired)
  • 4-5 drops red or pink food coloring, optional
  • 6 cups Rice Krispies cereal
  • 1 1/2 cups semi-sweet chocolate chips
  • 1 tablespoon coconut oil or butter
DIRECTIONS:
  1. Grease the 9×13-inch baking dish with butter or line it with parchment paper for easy removal.
  2. In a large pot over low heat, melt the butter. Add the mini marshmallows and stir until completely melted and smooth.
  3. Remove from heat and stir in the cherry extract. If using, add red or pink food coloring and mix until evenly colored.
  4. Add the Rice Krispies cereal, stirring quickly to coat every piece with the melted marshmallow mixture.
  5. Transfer the mixture into the prepared baking dish. Use a spatula or lightly greased hands to gently press down and create an even layer. Let cool for 15-20 minutes before adding the chocolate topping.
  6. In a microwave-safe bowl, melt the chocolate chips and coconut oil (or butter) in 30 second intervals, stirring between each, until smooth.
  7. Pour the melted chocolate over the cooled Rice Krispie layer. Use a spatula to spread evenly across the surface.
  8. Allow the chocolate to set completely before slicing (about 30 minutes at room temperature or 15 minutes in the fridge).
  9. Cut into squares and serve!

Recipe from Emily Parker from Fique