Appetizers · Vegan · Vegetables · Vegetarian

Balsamic Roasted Tomatoes

Roasted Tomatoes are a family favorite and are delicious served in a variety of ways. When my garden tomatoes are overwhelming, I turn to roasting them. Sometimes I roast them without the balsamic vinegar, with just olive oil, garlic and occasionally strips of anaheim peppers. The tomatoes are delicious by themselves or served with cream cheese, feta or goat cheese as an appetizer. Try them on a pizza or in egg cups. I’ve frozen the roasted tomatoes with good success and find them to be quite a treat in the winter

Balsamic Roasted Tomatoes

INGREDIENTS:
  • 12 plum tomatoes, halved lengthwise, cores and seeds removed (I used a variety of tomatoes from my garden, halved and not seeded)
  • 4 tablespoons good olive oil
  • 1 1/2 tablespoons balsamic vinegar
  • 2 large garlic cloves, minced
  • 2 teaspoon sugar
  • 1 1/2 teaspoons kosher salt
  • 1/2 teaspoon freshly ground pepper
DIRECTIONS:
  1. Preheat the oven to 450 degrees F.
  2. Arrange the tomatoes on a sheet pan, cut sides up, in a single layer. Drizzle with olive oil and balsamic vinegar. Sprinkle the garlic, sugar, salt, and pepper over the tomatoes. Roast for 25 to 30 minutes, until the tomatoes are concentrated and beginning to caramelize. (I had to roast mine for 10-15 minutes longer). Serve warm or at room temperature.

Recipe from Food Network Ina Garten

Appetizers · Family Favorites · Italian Dishes

Pesto Pizza with Fried Potatoes, Corn & BBQ Chicken

What do you make when you have leftovers and want to shake it up a bit. Make a custom pizza! I had leftover steamed, baby potatoes, fresh corn cooked and cut off the cob and a BBQ chicken breast. A batch of pesto from the basil in my garden was calling my name, so let’s go!

Pesto Pizza with Fried Potatoes, Corn & BBQ Chicken

INGREDIENTS:
  • Stonefire Artisan Thin Pizza Crust (or crust of your liking)
  • Pesto
  • Baby potatoes, steamed, sliced and fried until brown
  • Sweet Corn (mine was freshly cooked and cut off the cob)
  • Diced BBQ chicken breast (or try bacon, or pork or ?)
  • Shredded mozzarella cheese
DIRECTIONS:
  1. Preheat the oven to 425 degrees.
  2. Spread pesto on pizza crust. Top with sliced baby potatoes, sprinkle of fresh corn, diced BBQ chicken. Sprinkle with mozzarella cheese.
  3. Bake for about 10 minutes or until crust is crispy and cheese is melted and brown.

Salads

Peach & Roasted Beet Salad

Fall is just around the corner and peaches are about gone. This recipe was the perfect addition to a late summer meal outdoors. While this salad is best when it is fresh, the leftovers are quite tasty! I served the salad on a few leaves of mixed greens.

Peach and Roasted Beet Salad

INGREDIENTS:
  • 4 beets, peeled and cut into wedges or sliced (I used lovebeets already roasted from the grocery store)
  • 2 medium-sized peaches, peeled and cut into wedges or sliced
  • 1 shallot or 1/2 small onion, finely chopped (I used red onion)
  • about 1/4 cup sweet bell pepper, finely chopped
  • 2 tablespoons olive oil
  • juice of 1 lemon
  • salt and pepper to taste
  • handful of fresh basil leaves, chopped
DIRECTIONS:
  1. If roasting fresh beets: Preheat oven to 375 degrees. Wash each beet and remove any long strands. Wrap individually in foil and place on an oven-safe tray. Roast approximately 30-40 minutes (depending on the size of the beets). Remove from oven, unwrap the foil, and let cool completely. Once cool enough to handle, peel the skins off (they should slip off easily). Cut into quarter or eighth wedges (or slice).
  2. In a large bowl, toss the onion and pepper with olive oil, lemon juice, salt and pepper to taste. Carefully cut peaches into wedges and discard the pits. Gently ross in the beet and peach wedges, and add the basil leaves for garnish just before serving.

Recipe originally from grantfarms.com but recipe has been removed.

Salads

Napa Sweet Corn Salad

Napa Sweet Corn Salad is an end of summer treat! The tomatoes from my garden, the fresh local sweet corn, crispy red apple, avocado, basil, onions, etc. What’s not to like! I would recommend eating this within a day or two and is definitely best when made fresh!

Napa Sweet Corn Salad

INGREDIENTS:
  • 2 cups sweet corn kernels, raw (~3 ears)
  • 1 cup cherry or grape tomatoes, halved or quartered if large
  • 3 small or 2 large green onions, chopped
  • 1 small avocado, chopped
  • 1 red apple, chopped
  • 1/3 cup sliced or chopped almonds
  • For the Honey-Dijon Vinaigrette:
    • 1/2 cup extra virgin olive oil
    • 1/4 cup apple cider vinegar
    • 1 Tablespoon honey
    • 1 Tablespoon Dijon mustard
    • salt and pepper
DIRECTIONS:
  1. Combine ingredients for the Honey-Dijon Vinaigrette in a jar or bowl then shake or whisk to combine. Taste then add up to an additional 1/2 Tablespoon honey if desired – remember that the sweet corn and apple will add natural sweetness to the salad. Set dressing aside.
  2. Combine remaining ingredients in a large bowl then drizzle over desired amount of Honey-Dijon Vinaigrette and stir to combine. Serve immediately

Recipe from IowaGirlEats

Garden · Italian Dishes · Sauces · Soups and Stews · Vegetables

Freezing Basil in Olive Oil

What is better than having fresh basil! Unfortunately, when the growing season ends and frost is in the forecast, I pick all of the remaining basil leaves and blend with olive oil. It is frozen, flat, in a freezer bag for use all winter long. I just break off a piece and add to sauces, soups, and other recipes.

Freezing Basil in Olive Oil

INGREDIENTS:
  • Fresh basil of your choice (I used two handfuls of fresh basil)
  • Olive oil (I used 3/4 cup olive oil)
DIRECTIONS:
  1. Rinse your basil well and shake off excess water. Remove all the leaves from the stems. Place leaves in the blender.
  2. With the blender on high (or the purée setting), begin to very slowly drizzle olive oil into the blender (using the removable section of the blender lid to reduce splatter).
  3. Stop the blender as needed and use a rubber spatula to scrape down the sides of the blender and/or stir up the leaves.
  4. Continue running and drizzling just until the mixture begins to purée and turn into a liquid. Run the blender until the mixture is smooth.
  5. Pour into an ice cube tray being careful to not over fill. Freeze for 3-5 hours, or until the cubes will easily pop out. Transfer the cubes to a freezer bag, label, and put in the freezer.
  6. Grab 1-2 cubes and place them into your dish towards the end of cooking to melt, as desired.

Recipe from SavoryMoments

Breads

Peach Streusal Bread

Colorado + August = Delicious Palisade Peaches

Once again, I purchased a case of peaches from the local high school and love experimenting with new recipes. Daughter, Megan and I decided to make a peach bread but swapped out the glaze for a streusal topping. Winner, winner, chicken dinner! We added a bit of peach marmalade to the batter to intensify the peach flavor and it was wonderful.

Peach Streusal Bread

INGREDIENTS:
  • 3/4 cup granulated sugar 150 grams
  • 1/2 cup 2% milk 4 ounces
  • 1/2 cup canola oil (vegetable or coconut oil)
  • 1 large egg
  • 1 teaspoon vanilla extract
  • 2.33 cups all-purpose flour 260 grams
  • 2 teaspoons baking powder
  • 1/4 teaspoon salt
  • 2 cups diced fresh peaches
  • 2 tablespoons heated peach jam or marmalade

Streusal Ingredients:

  • 1/2 cup light brown sugar packed
  • 1 teaspoon cinnamon
  • ½ cup all-purpose flour
  • 4 tablespoons butter very soft
DIRECTIONS:
  1. Preheat the oven to 350ºF.
  2. In a medium bowl, stir together the sugar, milk, oil, egg and vanilla. In a separate bowl, combine the flour, baking powder and salt. Add the dry ingredients to the wet ingredients and stir until just combined.
  3. Fold the peaches and jam gently into the batter.
  4. Mix together Streusal ingredients.
  5. Pour the bread batter into a greased 9″x5″ bread pan. Sprinkle Streusal on top.
  6. Bake at 350 degrees for 55-60 minutes. A toothpick inserted in the center of the bread should come out clean. Allow the bread to cool for 10 minutes, then remove the bread to a wire rack to cool completely.Once the bread is cool, llice and serve.
  7. Store the bread in an airtight container in the refrigerator.

Bread recipe adapted from tastesoflizzyt.com.

Appetizers · Mexican Dishes · Salads

Cowboy Caviar

Cowboy Caviar is an old recipe that was created by Helen Corbitt, famed 1950s Neiman Marcus food director, it was first served as “pickled black-eyed peas” on New Year’s Eve at the Houston Country Club. Soon after, it was dubbed “Texas caviar.” I found this tidbit of history interesting. Cowboy Caviar is great served as an appetizer with tortilla chips. My favorite is to serve it with a cheese, or chicken and cheese, quesadilla. It is also a great topper for any green salad. The recipe made quite a bit and I wondered how I would get through it…never fear…I shared it at a party and leftovers with my daughter, who is now a big fan!

Cowboy Caviar

INGREDIENTS:
  • 3 Roma tomatoes seeds removed, diced
  • 2 ripe avocados diced
  • ⅓ cup red onion diced
  • 15 oz black beans rinsed and drained
  • 15 oz black eyed peas rinsed and drained
  • 1 ½ cups frozen sweet corn thawed (I just usually toss it in the salad frozen unless I plan on eating it immediately, it thaws quite quickly) (Note: Forklore used fresh cooked sweet corn and it was amazing!)
  • 1 bell pepper diced (I used half a green and half a red, but color doesn’t matter)
  • 1 jalapeno pepper seeds removed, diced into very small pieces (or substitute for pepper flakes if you don’t have a jalapeno)
  • ⅓ cup Cilantro finely chopped
DRESSING:
  • ⅓ cup olive oil
  • 2 tablespoons lime juice fresh preferred
  • 2 tablespoons red wine vinegar
  • 1 teaspoon sugar
  • ½ teaspoon salt
  • ½ teaspoon pepper
  • ¼ teaspoon garlic powder
  • Tortilla chips for serving
Directions:
  • Combine tomatoes, avocado, onion, black beans, black eyed peas, corn, pepper, jalapeno pepper, and cilantro in a large bowl. Toss/stir well so that ingredients are well-combined.
  • In a separate bowl, whisk together olive oil, lime juice, red wine vinegar, sugar, salt, pepper, and garlic powder.
  • Pour dressing over other ingredients and stir/toss very well.
  • Keep refrigerated. If not serving immediately, be sure to toss/stir well before serving.

Recipe from Spendwithpennies

Breads · Breakfast

Peach Scones

Oh, the memory of high tea in England with delicious scones, pastries, and tiny sandwiches. The Peach Scone recipe sounded delicious and I had to try it. They were as yummy as I thought they would be and I didn’t even eat with clotted cream and jam (although that would also be delicious).

Peach Scones

INGREDIENTS:
  • 1/2 cup (1 stick) unsalted butter, frozen
  • 2 cups all-purpose flour, plus more for dusting the work surface 
  • 3 tablespoons granulated sugar 
  • 1 tablespoon baking powder 
  • 1/2 teaspoon sea salt 
  • 1 cup sliced peaches, thawed if frozen (I used fresh)
  • 1/2 cup heavy whipping cream, plus more for brushing on the scones 
  • 1/2 cup sour cream 
  • 1 large egg 
  • 1 teaspoon vanilla extract 
  • 1/4 teaspoon almond extract 
  • Glaze:
  • 1 cup powdered sugar
  • 1 to 2 tablespoons heavy cream 
  • 1 teaspoon vanilla extract 
  • 1/4 teaspoon almond extract 
  • Pinch sea salt 
DIRECTIONS:
  1. For the scones: Preheat the oven to 400 degrees F. Grate the frozen butter into a bowl using a box grater. Combine the flour, granulated sugar, baking powder and salt in a large bowl. Add the peaches and toss in the flour to coat. Add the butter and toss to combine.
  2. Stir together the heavy cream, sour cream, egg, vanilla and almond extracts in a medium bowl. Slowly add the cream mixture to the flour mixture, and mix just until a dough comes together. (Make sure not to overwork).
  3. Turn the dough out onto a parchment paper-lined baking sheet and shape into a 9-inch disc, about 1 inch thick. Score the dough into 8 wedges, using a knife to cut into but not all the way through the dough. Brush the tops of the scones with cream. Bake until the scones are cooked through and golden brown on top, 20 to 25 minutes. Cut into wedges, then remove to a wire rack to cool until warm. (Note: I had to bake a bit longer until they were golden brown).
  4. Meanwhile, make the glaze: Whisk together the powdered sugar, cream, vanilla, almond extract and salt in a small bowl. Spoon the glaze over the scones before serving.

Recipe from Food Network Kardea Brown.

Salads

Chile Onion Crunch Cucumbers

Cucumbers are so delicious but I was looking for a different way to serve them other than the traditional cucumbers and onions. Now that I’ve discovered Chile Crisp, I will be experimenting with other vegetables and dishes. This recipe is simple and the chile crisp was not too hot. I’m a bit of a wimp when it comes to spice and I tolerated this very well. This would be delicious with an Asian meal.

Chile Onion Crunch Cucumbers

INGREDIENTS:
  • 12 ounces of cucumber, seeded (peeling is optional)
  • 2-4 tablespoons chilie onion crunch (I used Kroger Private Selection Chile Crisp)
  • 1/2 teaspoon salt
  • 1 1/2 tablespoons rice vinegar
  • 1 1/2 tablespoons maple syrup
DIRECTIONS:
  1. Peel, seed and chop cucumbers in 1/2 inch sliced chunks.
  2. Add salt, rice vinegar and maple syrup to the cucumbers. Stir to combine.
  3. Stir the jar of chile onion crunch then add 2-4 tablespoons to the cucumbers.
  4. Enjoy!

Recipe adapted from starinfintefood on Instagram (unfortunately I cannot find the link to her recipe with homemade chile crunch!)

Vegetables

Dehydrated Tomatoes in Olive Oil

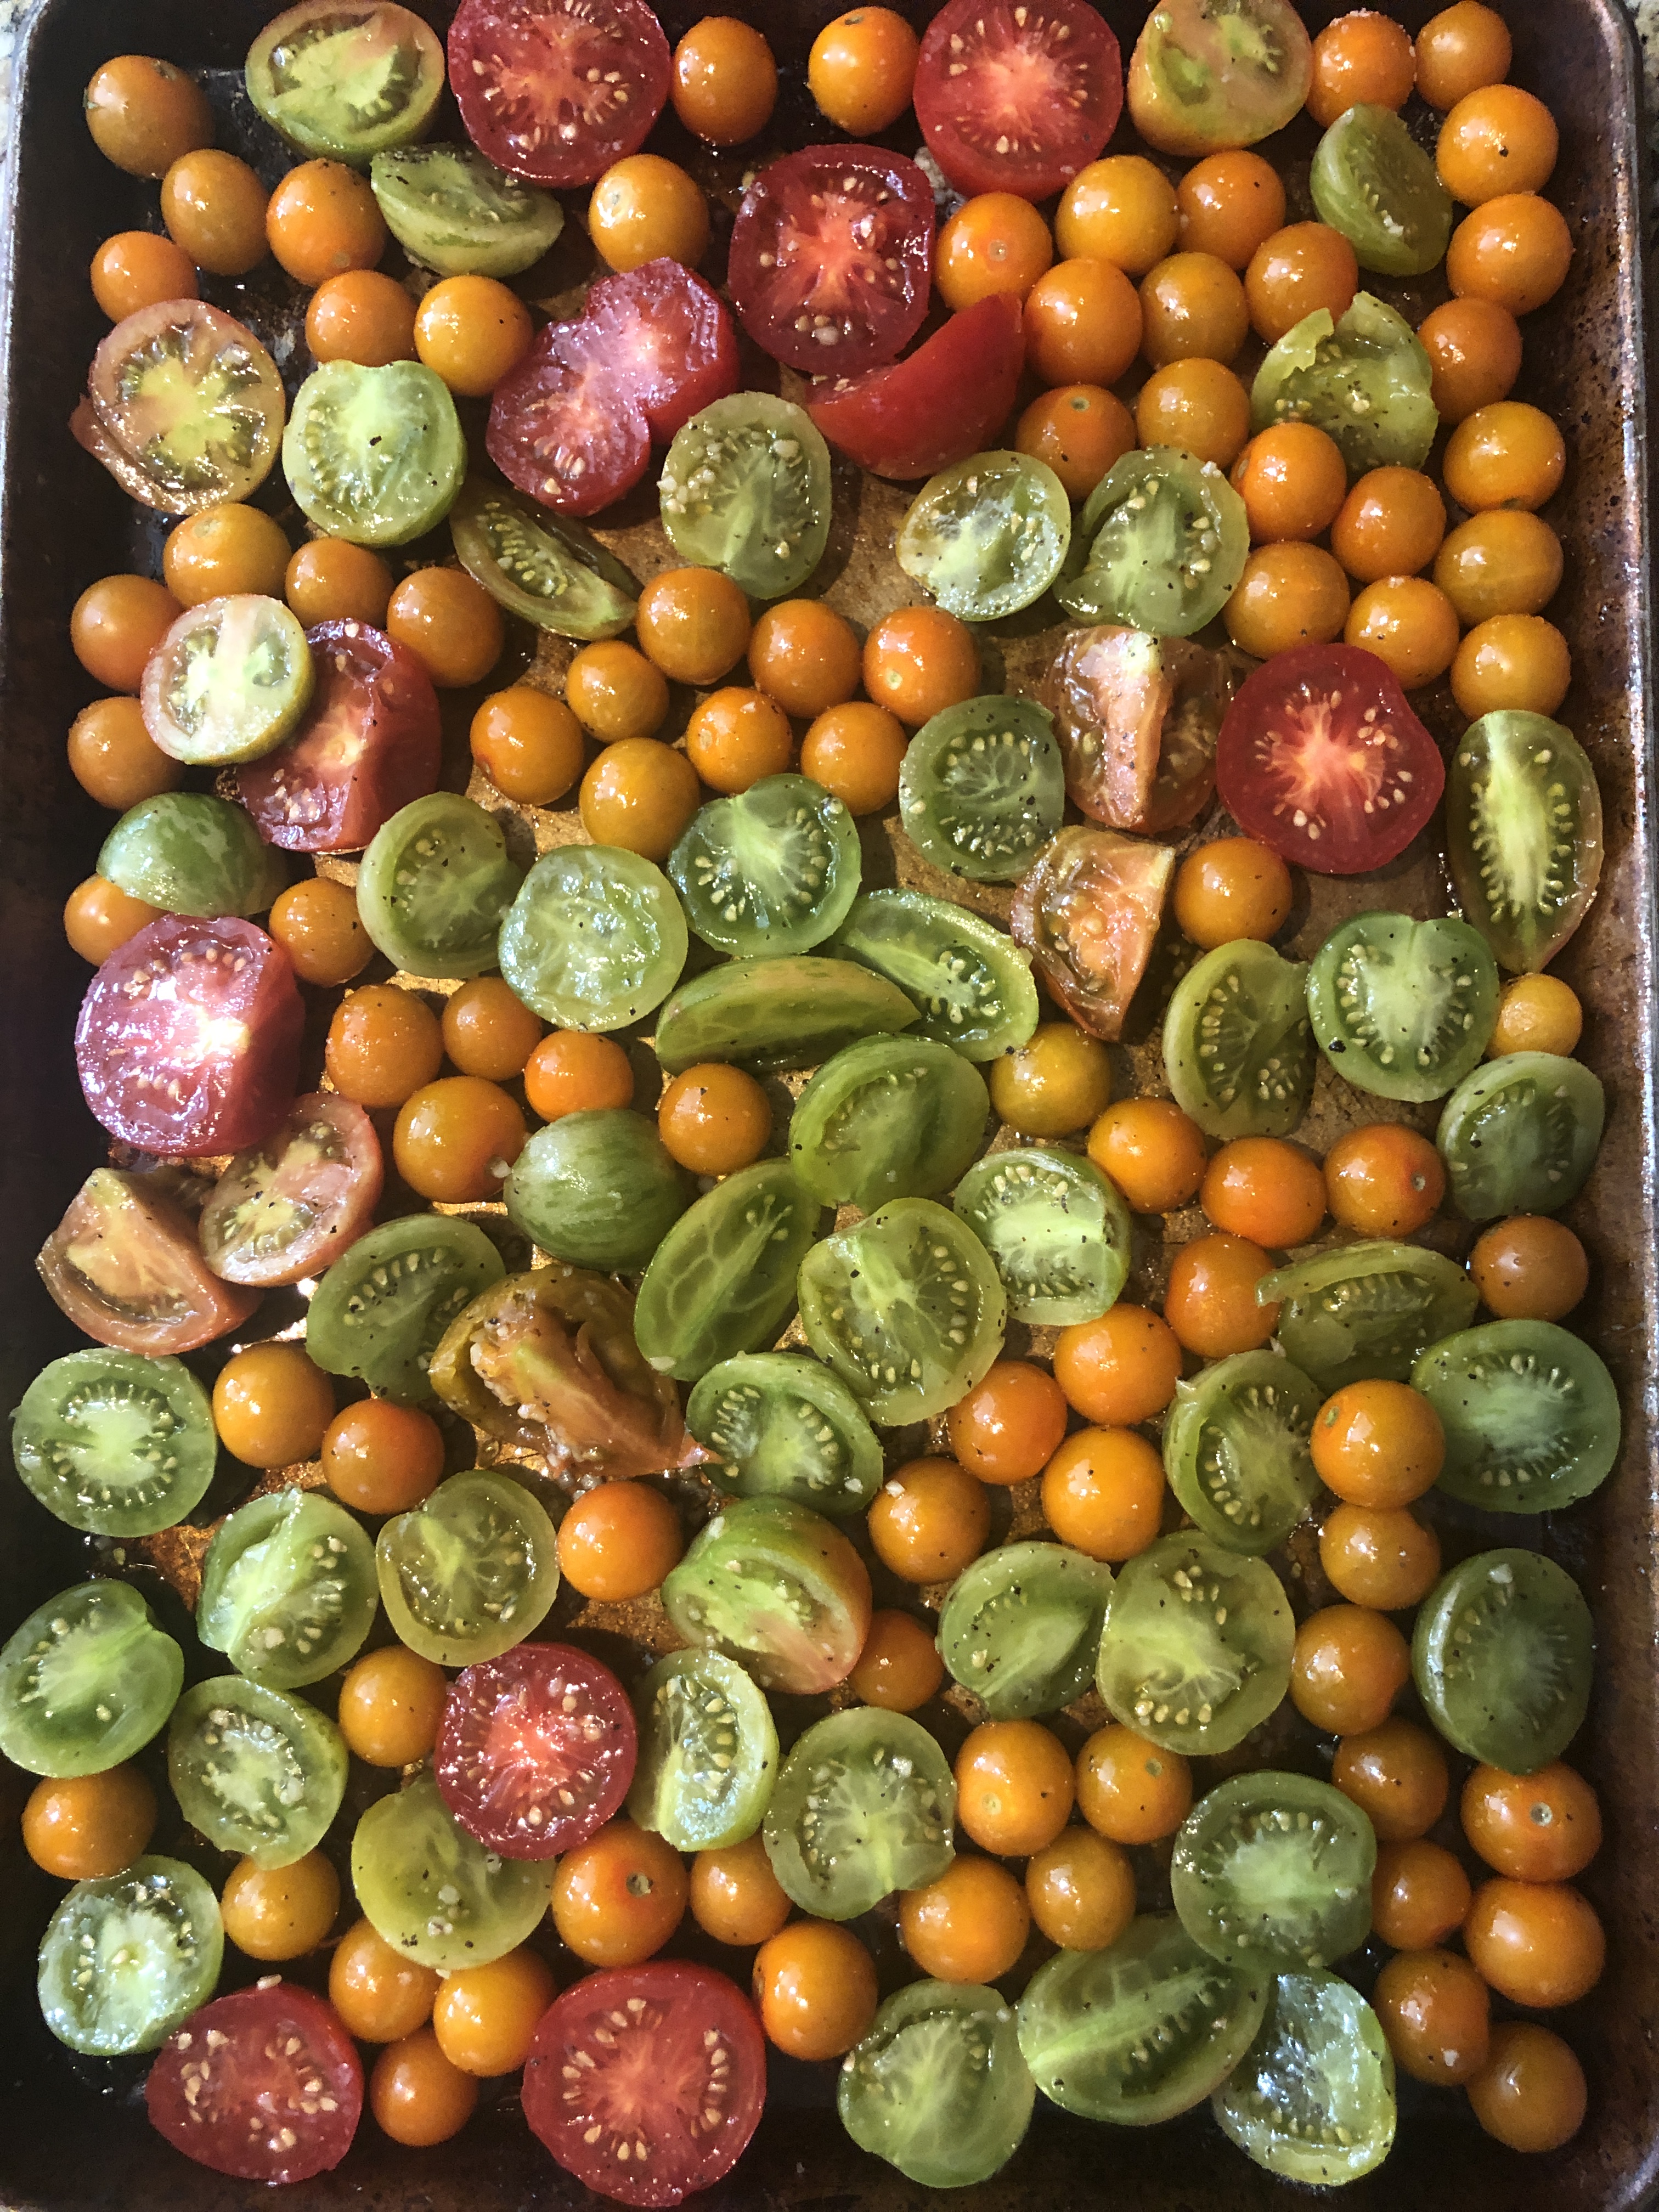
Sungold cherry tomatoes are my favorite and they produce for weeks. I often oven roast the tomatoes but I had access to my dear friend’s dehydrator and took advantage of it. The process took several hours and resulted in wonderful dried tomatoes. I followed the directions below to preserve the dried tomatoes with olive oil, fresh basil, garlic, oregano, salt. The result was delicious seasoned, dried tomatoes for pizza, chicken, and other dishes.

Title

INGREDIENTS:
  • 3-4 cups of olive oil depending on the size of canning jar
  • Fresh basil (you’ll need a good amount of leaves to include in each layer, more on this below)
  • 4-5 cloves of minced garlic
  • ½ cup of dried oregano
  • Kosher salt
  • 3-5 pounds of sun dried tomatoes (try and find the imported variety; here’s a link to some organic sun dried tomatoes just in case you can’t get them from Italy) (Note: I used my Sungold tomatoes from my garden)
DIRECTIONS:
  1. Note: I used a dehyrator to first dry the Sungold tomatoes from my garden. It took several hours and did a great job.
  2. Start by finding a large, wide mouth, mason jar; pint size is fine, but if you can find larger jars they’ll store more tomatoes. Wash your mason jar very well and you can even go as far as sterilizing the jar. Moreover, it’s vital that your hands and any other tool used for the process are exceptionally clean.
  3. Next, begin layering your unseasoned sun dried tomatoes in the jar in the following order: 1. layer of tomatoes, 2. sprinkle of kosher salt, 3. garlic, 4. pinch of dried oregano, 4. layer of fresh basil leaves
  4. Repeat the above layering process until you’re nearly at the top of the jar (don’t over stuff the jar because your last step includes filling the jar with olive oil).
  5. When you’re finished with each layer push down with a flat object to compress the ingredients.
  6. Finally, fill the jar with olive oil, making sure that the tomatoes are completely submerged (note: the oil will need some time to settle so make sure all of the tomatoes are covered).
  7. Screw on the lid tightly and store the jar in a cool, dark, closet or cupboard.
  8. You’ll need to let the tomatoes sit 6-8 days before consuming them (the oil needs to soften the tomatoes and you also need to let the garlic, basil, and oregano do it’s thing).
  9. Note: I refrigerated the tomatoes to make sure they would not spoil!

Note and Disclaimer (viz a viz Clostridium Botulinum) It’s vital when you cure vegetables in olive oil that you thoroughly clean the jar itself as well as all the ingredients and utensils used in the preparation. My family has been curing and pickling vegetables (as well as tomatoes for tomato sauce) for well over 50 years and we haven’t had any health issues. Although our family has been doing this for many years without incident, there aren’t good studies establishing this practice as safe. Many food safety authorities advise against preserving tomatoes and garlic in oil due the risk of bacterial contamination and proliferation of spores, especially clostridium botulinum, which could be fatal.

Recipe adapted from Scordo.com