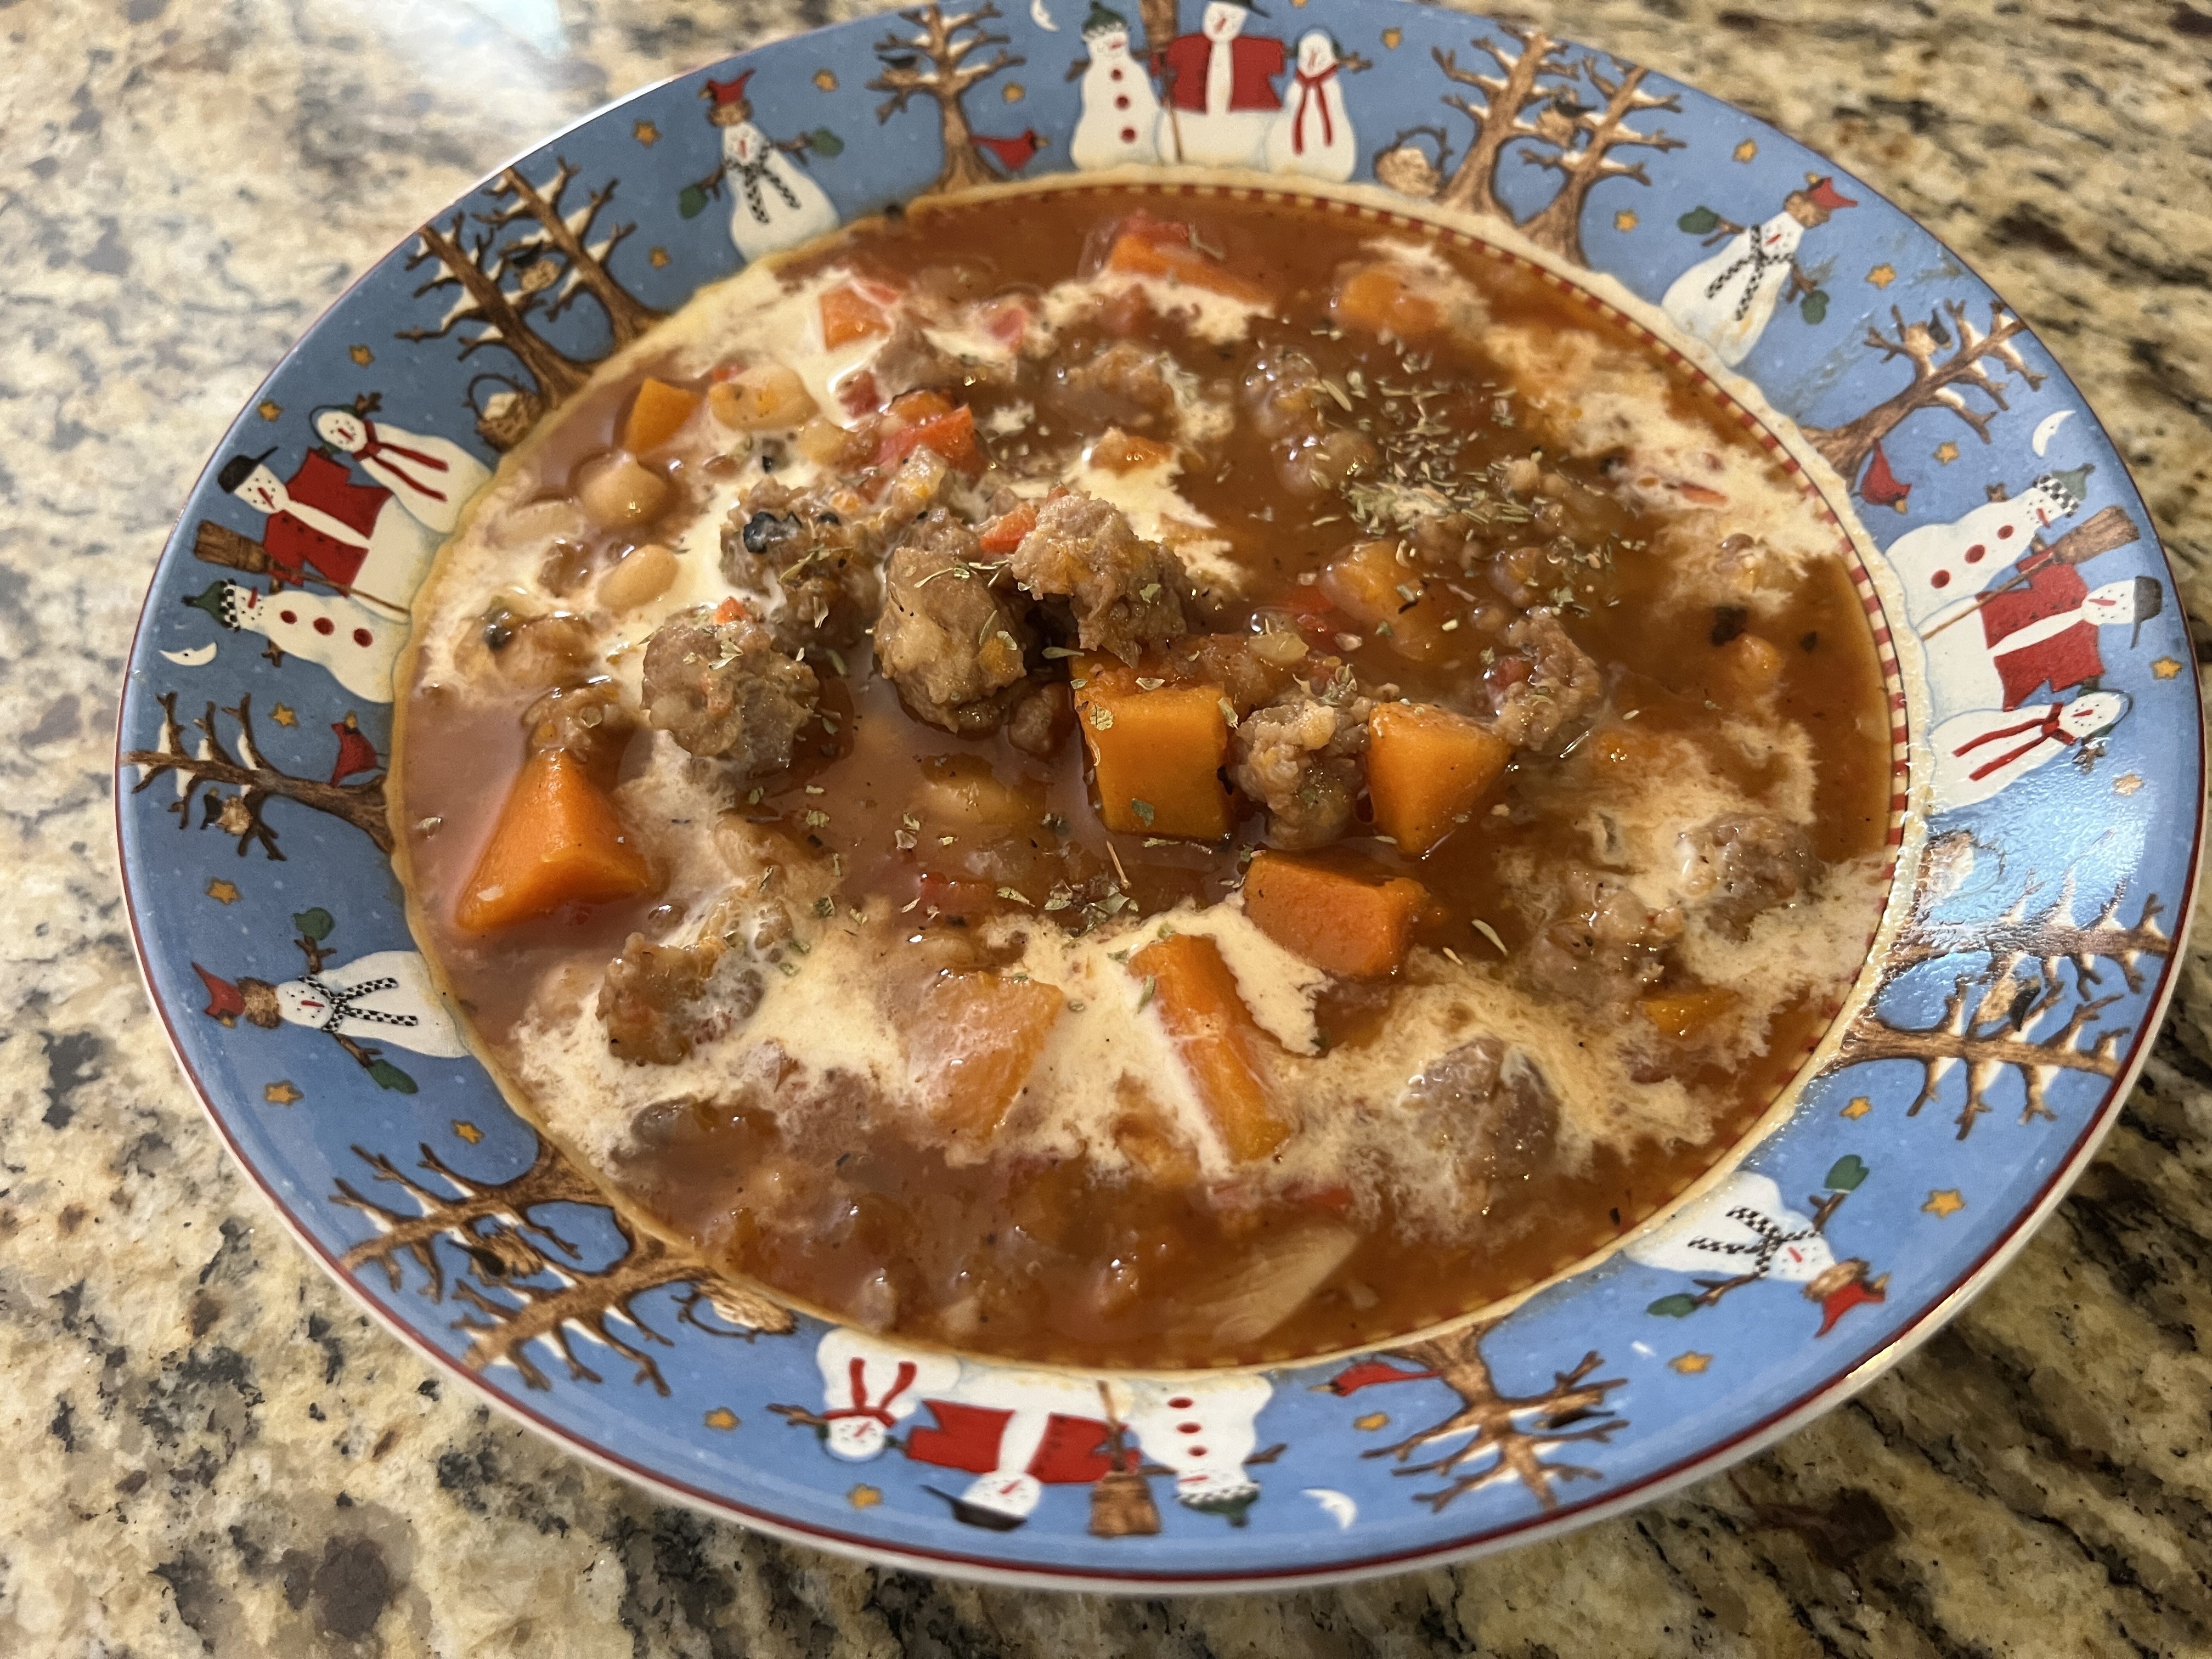
Cookies and Bars · Desserts

Caramel Cookie Bars

Caramel Cookie Bars should be classified as a sin…but a very delicious one! Daughter, Megan, made these to take to friends that recently had a baby and she shared a piece with me. Oh my gosh! They are decadent and perfect for a special occasion.

Caramel Cookie Bars

INGREDIENTS:
  • 1 cup salted butter softened
  • 1 cup brown sugar
  • 1 cup granulated sugar
  • 1 egg
  • 1 tsp vanilla extract
  • 2 1/4 cups all purpose flour
  • 1 tsp baking soda
  • 1/2 tsp salt
  • 2 cups chocolate chips/chopped chocolate use your favorite (I like a combination of milk and semi sweet)
  • 40 Werther’s Soft Caramels (this is 2 small packages)
  • 1/2 cup sweetened condesned milk
  • sea salt optional
DIRECTIONS:
  1. Preheat the oven to 350°.
  2. Prepare a 9×9 pan by lining it with parchment paper or spraying it with non stick spray.
  3. Measure out the chocolate chips/chopped chocolate into a bowl. Set aside.
  4. In the bowl of a stand mixer, cream together the butter and sugars until smooth, light in color and fluffy. This will take a few mintues.
  5. Scrape the sides of the bowl and mix in the egg add vanilla.
  6. Once completely combined, stop the mixer and add in the flour, baking soda and salt.
  7. Start mixing slowly, once the flour mixture is about half way incorporated into the dough, pour the chocolate chips/ chopped chocolate into the mixer and allow everything to mix together.
  8. Stop the mixer as soon as the flour is completely incorporated. Avoid over mixing. Set the cookie dough aside.
  9. In a medium sauce pan over medium heat, stir to combine the caramels and sweetened condensed milk until smooth. Remove from heat and set aside.
  10. Divide the dough in half and press half into the bottom of your prepared 9×9 pan.
  11. Pour the caramel mixture on top of the cookie dough. Spread until evenly covered.
  12. Take large portions of the remaining cookie dough, flatten them in your hand and then place on top of the caramel.
  13. Bake in your 350° oven for 25-35 minutes, or until the top is golden brown and the center is just set.
  14. Sprinkle with sea salt, if desired.
  15. Let the cookie bars cool COMPLETELY before cutting.
  16. Cut the bars into your desired size and serve.
  17. Store in an air tight container for up to 3 days.

Recipe from CookingwithKarli.com

Czech Heritage and Dishes · Meats

Iowa Chops in the Slow Cooker

Iowa Chops in the Slow Cooker has become one of my go-to recipes. It’s easy to prepare and simmer throughout the day. Serve with steamed baby potatoes or boiled perogies. I also served with roasted butternut squash and brussel sprouts. The pork is so fork-tender and will melt in your mouth.

Iowa Chops in the Slow Cooker

INGREDIENTS:
  • 4 Iowa chops (thick boneless pork chops–I get mine at Costco)
  • salt & pepper
  • 1+ cups frozen pearl onions
  • 1 can mushroom soup
  • 1/2 cup sour cream
  • 1 teaspoon Bohemian rub seasoning (available from Savory Spice Shop)
DIRECTIONS:
  1. Place Iowa chops in slow cooker and sprinkle with salt and pepper.
  2. Add frozen onions to slow cooker.
  3. Combine soup, sour cream, and Bohemian rub seasoning and pour over pork chops and onions.
  4. Cook on low for 8 hours.

Cookies and Bars · Gluten Free · Uncategorized · Vegan · Vegetarian

Soft Batch Pumpkin Gingersnap Chocolate Chip Cookies

Who doesn’t love a Gingerbread cookie, but bump it up a notch with pumpkin AND chocolate chips! These cookies are delicious and a great fall treat. I added more flour to keep the cookies from spreading, perhaps because of the gluten-free flour I used. I would make these again and try with all-purpose flour and they would equally as good!

Soft Batch Pumpkin Gingersnap Chocolate Chip Cookies

INGREDIENTS:
  • 1/2 cup butter or vegan butter, softened to room temperature
  • 1-3/4 cups sugar, divided
  • 1/2 cup pure pumpkin puree
  • 1/4 cup molasses
  • 1 teaspoon vanilla
  • 1 egg
  • 2-1/3 cups gluten-free 1:1 or “cup for cup” baking flour blend (I added 1/2 cup additional flour after baking the first pan–see before & after photo below)
  • 2 teaspoons baking soda
  • 2 teaspoons cinnamon
  • 4-1/2 teaspoons ground ginger, divided
  • 1 teaspoon ground cloves
  • 1/2 teaspoon salt
  • 1 cup Enjoy Life Dark Chocolate Morsels (I used Nestle)
Left–Cookie before adding additional flour; Right–Cookie after adding flour
DIRECTIONS:
  1. Preheat oven to 350 degrees then line a half sheet pan with a silpat or parchment paper and set aside.
  2. Add butter and 1 cup sugar to the bowl of an electric mixer or large glass bowl if using a handheld mixer. Beat until lightly and fluffy. Add pumpkin puree, molasses, and vanilla then beat until combined. Add egg then mix until just combined.
  3. In a separate bowl stir together flour, baking soda, cinnamon, 1-1/2 teaspoons ground ginger, ground cloves, and salt. Add to the wet ingredients in two batches, mixing until just combined before adding the second batch. Add dark chocolate morsels then mix until just combined.
  4. Stir together remaining 3/4 cup sugar and 3 teaspoons ground ginger in a bowl then scoop cookie dough by the Tablespoon into the mixture and roll to coat. Place onto prepared baking sheet then bake for 7-8 minutes (7-1/2 minutes were perfect for mine.) Rap the sheet pan on the counter (aka drop the sheet pan from a couple inches above the countertop onto the countertop) then let cookies cool slightly before transferring to cooling racks to cool completely.

Recipe from IowaGirlEats

Soups and Stews

Sopa de la Casa

Sopa de la Casa is a recipe I discovered in the early 1980s. It reminded me of the scrumptious tortilla soup that I first enjoyed at Tijuana Tilly’s, in Tijuana, Mexico. Sopa de la Casa was a regular on my table before my daughters were born and it was time to revisit this easy, delicous recipe. It was just as I remembered!

Sopa de la Casa

INGREDIENTS:
  • 8 slices bacon, diced
  • 1 1/4 c. finely chopped onion
  • 1 1/4 c. finely chopped celery
  • 2 green peppers, finely chopped
  • 2 cloves garlic, minced
  • 2 cans (14.5 oz. each) chicken broth
  • 1 can (31 oz.) refried beans
  • 1/2 t. pepper
  • 2 T. chili powder
DIRECTIONS:
  1. In a soup pot, cook bacon until crisp. Move cooked bacon to a separate bowl. Drain half of the bacon drippings. Add onion, celery, green pepper and garlic. Cook until tender.
  2. Blend in chicken broth, cooked bacon, refried beans, pepper and chili powder. Bring to boil. Remove from heat.
  3. Garnish with tortilla chips and shredded Monterey Jack cheese.

Italian Dishes · Soups and Stews

Italian Sausage Butternut Squash Soup

I live for soup season and enjoy trying many different recipes. This Italian Sausage Butternut Squash Soup sounded like the comfort food I needed. It was very good but next time I will blend all of the squash to make the base even silkier.

Italian Sausage Butternut Squash Soup

INGREDIENTS:
  • 1 tablespoon unsalted butter, divided
  • 1 yellow onion, finely chopped
  • 1 small red bell pepper, diced
  • 1 pound ground Italian Sausage, (I use Hot Italian Sausage in casings)
  • salt and freshly ground black pepper, to taste
  • 4 cloves garlic minced
  • 2.5 pounds butternut squash, peeled, seeded, and chopped into 1-inch cubes
  • 6 cups low sodium chicken broth
  • 1 bay leaf
  • 1 can (15.5 ounces) great northern beans, well rinsed and drained
  • 1 can (14.5 ounces) fire roasted diced tomatoes, undrained
  • Salt and freshly ground black pepper, to taste
  • Heavy cream, for garnish, optional
  • Chopped fresh parsley, for garnish
DIRECTIONS:
  • Melt 1/2 tablespoon butter in a dutch oven or stockpot set over medium heat. Add onions and peppers; cook for 2 minutes. Stir in sausage and cook for 10 minutes, or until browned and cooked through, breaking up the sausage into crumbles as it cooks.
  • Add garlic, season with salt and pepper, and cook for 1 minute. Using a slotted spoon, remove the sausage mixture from the pot and set aside.
  • Melt remaining butter in the pot set over medium heat; add squash to the pot and cook for 2 minutes. Then stir in chicken broth; add bay leaf, increase heat to high, and bring to a boil. Reduce heat to a steady simmer and continue to simmer, covered, for 12 to 15 minutes, or until butternut squash is tender. Start checking around the 10-minute mark. Note: The larger the chunks of butternut squash, the longer it will take for them to soften.
  • Remove from heat. Discard bay leaf. Remove couple handfuls of butternut squash chunks from the soup and set aside (next time I would blend all of the squash). Using an immersion blender, blend the soup until smooth. You can also blend the soup in a blender. Return soup back to the stockpot.
  • Return the butternut squash chunks back to the pot. Set stockpot over medium heat. To the soup, add beans, tomatoes, and previously prepared sausage mixture; cook for 3 to 4 minutes, or until heated through.
  • Taste for salt and pepper, and adjust accordingly. Drizzle with cream. Garnish with parsley. Serve.

Recipe from Eastweeknightrecipes

Family Favorites · New Favorite · Salads

Wild Rice Harvest Bowls with Fig Balsamic Vinaigrette

Harvest Bowl is one of my favorite recipes of all times. There are a multiple of flavors and textures to enjoy. I added bits cooked pork roast, a delicious addition. However, the bowl with a meat addition is equally delicious. The best temperature for serving is slightly warm. Leftovers are great for 3-4 days, slightly warmed in the microwave. This the first time I’ve cooked with fig jam and I loved it. For a different twist, it could be interesting to try apple butter. Anyway you make it, you’ll love it!

Wild Rice Harvest Bowls with Fig Balsamic Vinaigrette

INGREDIENTS:
  • 1 cup wild-brown rice blend (I recommend Lundberg)
  • 1-3/4 cup gluten-free chicken broth
  • 3 cups 1” butternut squash cubes (about 1 small squash)
  • 3 Tablespoons extra virgin olive oil, divided
  • 1/8 teaspoon each garlic powder, chili powder, cinnamon
  • salt and pepper
  • 9 oz thinly shredded brussels sprouts
  • 1 large or 2 small apples, chopped
  • 3 oz white cheddar cheese, cut into cubes
  • 1/3 cup sliced almonds or pepitas
  • 1/3 cup dried cranberries

For the Fig Dressing:

  • 1/2 cup extra virgin olive oil
  • 1/4 cup balsamic vinegar
  • 1 clove garlic, microplaned or minced
  • 2 Tablespoons fig jam
  • salt and pepper
DIRECTIONS:
  1. Add rice and chicken broth to a small saucepan then bring to a boil, place a lid on top, then turn heat down to a simmer and cook for 40-50 minutes or until rice is al dente (verify liquid amount and cooking method with rice package directions.) Set aside to cool slightly – can be done a day ahead of time.
  2. Preheat oven to 400 degrees. Line a half sheet pan with a silpat or foil then spray with nonstick spray if using foil. Add butternut squash cubes, 1-1/2 Tablespoons extra virgin olive oil, garlic powder, chili powder, cinnamon, salt, and pepper then toss with your fingers to evenly coat. Roast for 15-20 minutes, or until squash is tender, stirring halfway through. Set aside to cool slightly – can be done a day ahead of time.
  3. Meanwhile, line another half sheet pan with a silpat or foil then spray with nonstick spray if using foil. Add shredded brussels sprouts, remaining 1-1/2 Tablespoons extra virgin olive oil, salt, and pepper then toss with your fingers to evenly coat. Add to oven after stirring the squash then roast together for 8-10 minutes or until brussels sprouts are tender and golden brown.
  4. For the Fig Balsamic Vinaigrette: Combine ingredients in a bowl or jar with a tight fitting lid then whisk or shake to combine (might need to microwave for 15-20 seconds to help melt the fig jam.) Taste then add more salt, pepper, and/or fig jam if desired.
  5. In a large bowl combine cooked rice, butternut squash, brussels sprouts, apples, cheese, almonds, and dried cranberries. Drizzle Fig Balsamic Vinaigrette on top then toss to coat and serve. Leftovers are good for 3-4 days.

Recipe from IowaGirlEats

Appetizers · Italian Dishes

Pizza with Hatch Chiles, Bacon & Caramelized Onion

What smells more like fall than the roasting of Hatch Chiles? This easy pizza recipe is a real delight with an abundance of flavor. I love the Hatch Green Chile Cheddar Dip from the grocery store or Costco and decided to use it as the base for this yummy pizza. What fun to experiment with new toppings…get creative!

Daughter, Megan, an I made it again the other day and used Stonefire Pizza Crust (or any premade pizza crust). Megan suggested that fresh sweet corn would be a great addition, along with the yummy caramelized onions.

Pizza with Hatch Chiles, Bacon & Caramelized Onion

INGREDIENTS:
  • Pizza Dough (from your favorite recipe or available in grocery stores)
  • Hatch Green Chile Dip (Available at Grocery Stores or Costco)
  • Cooked Bacon (4-6 slices) broken into pieces
  • One Large Onion, peeled and thinly sliced
  • 1 tablespoon olive oil
DIRECTIONS:
  1. Roll the pizza dough to your baking pans dimensions. Sprinkle baking pan with cornmeal. Place dough on pan. Use fork to poke holes in pizza dough.
  2. Prebake pizza dough for 5-6 minutes at 400 degrees.
  3. Cook bacon until crisp.
  4. Heat 1 tablespoon olive oil and add sliced onion. Cook slowly until onions are brown and caramelized.
  5. Remove pizza dough from oven. Spread with Green Chile Dip. Sprinkle with bacon bits and onions.
  6. Bake for another 5-10 minutes until dough is brown and cooked through.

A suggestion from my good friend, Maribeth, and addition of caramelized onions suggested by my daughter, Megan. We have a winning combination!

Appetizers · Poultry

Baked Hot Wings

Never have I ever…made hot wings until now. Daughter Megan has a craving for hot wings about a year ago so I bought the fixings. Then, she was pregnant and they sounded disgusting. Now that Baby Callen has arrived, she thought they sounded better and told me of this recipe. Easy peasy and very adaptable to your heat/spice tolerance. Great treat for game day or just because…

Baked Hot Wings

INGREDIENTS:
  • 3 lbs. chicken wings
  • 4 Tbsp. melted butter
  • Salt, pepper, garlic powder, cayenne, paprika

For the Sauce:

  • 2 Tbsp. high temp oil (canola, avocado, etc.)
  • 2-3 Tbsp. chopped garlic
  • 1 Tbsp. crushed red pepper flakes (I used a pinch)
  • 1 tsp. black sesame seeds (optional)
  • 2 Tbsp. barbecue sauce
  • 2 Tbsp. Frank’s hot sauce
DIRECTIONS:
  1. Heat oven to 400 degrees F.
  2. Add the seasonings to the melted butter in a large bowl and toss all the wings until they are coated. Place a wire rack into your baking sheet. Line the baking sheet with foil to make clean up easy peasy.
  3. Bake for 40 minutes or so until they are brown and sizzling and crispy. (I turned up the heat to 450 degrees and baked another 5+ minutes to make extra crispy).
  4. Meanwhile in a large hot skillet, throw in the oil, garlic, red pepper flakes, sesame seeds, barbecue sauce, and hot sauce. Stir until bubbly and glazy, around 2 minutes. Add the crispy wings and toss until totally coated. Serve with blue cheese or Ranch sauce.

Recipe slightly adapted from Jen Hatmaker Facebook post 1/23/22.

Fish · Garden · New Favorite · New Traditions

Garlicky Tomato-Basil Shrimp with Zoodles

Zucchini abound this time of year as do my Sungold cherry tomatoes. Combine these two ingredients with basil, garlic, shrimp…WOW! You could easily adapt this to regular pasta, but why? I topped my meal with a sprinkle of Parmesan as well. Deliciouso!

Garlicky Tomato-Basil Shrimp with Zoodles

Serves Three

INGREDIENTS:
  • 4 small, straight zucchini, ends trimmed
  • salt, garlic salt, pepper
  • 1 cup cherry or grape tomatoes, quartered
  • 5 large fresh basil leaves, chopped
  • 1/4 cup + 1 teaspoon extra virgin olive oil, divided
  • 1lb jumbo shrimp (16/20 count,) peeled and deveined
  • 1 large clove garlic, minced
DIRECTIONS:
  1. Spiralize zucchini using the fattest noodle blade then add to a colander set atop a bowl. Lightly salt then toss with your fingers to coat. Cover then place in the refrigerator for 30 minutes to an hour to drain excess liquid.
  2. Add tomatoes and basil to a large bowl with 1 teaspoon extra virgin olive oil then season with salt and pepper, stir to combine, and set aside.
  3. Heat 1-1/2 Tablespoons extra virgin olive oil in a large skillet over medium-high heat. Pat shrimp very dry between paper towels then season tops with garlic salt and pepper. Add half the shrimp to the skillet seasoning-side down then sauté for 2 minutes per side, or until cooked through, then transfer to bowl with tomatoes and basil. Heat another 1-1/2 Tablespoons extra virgin olive oil in the skillet then sauté remaining shrimp. When shrimp have 30 seconds left add garlic then sauté until fragrant, and then add to the bowl and stir everything to combine.
  4. Meanwhile, remove zoodles from refrigerator then pat dry with paper towels. Heat remaining Tablespoon extra virgin olive oil in the skillet then add zoodles. Season with salt and pepper then sauté until crisp-tender, 2-3 minutes. Plate zoodles then top with garlicky tomato-basil shrimp and serve.

Recipe from Iowa Girl Eats

Breakfast · Cakes · New Favorite

Peach and Blueberry Greek Yogurt Cake

Peaches are one of my favorite summer treats. Living in Colorado, we are lucky to get juicy Palisade peaches in August, assuming there isn’t a hard spring freeze on the western slope. My daughters and I order a box of peaches from a local high school each year and they are always amazing. While I made my favorite peach recipes of peach salsa, peach raspberry cobbler, Dutch Baby Pancake with Peaches and raspberries, and others, I love trying new recipes. This recipe was delicious and I enjoyed it for breakfast/brunch and for an every dessert. You could top it with whipped cream or ice cream or even a dollop of Greek Yogurt.

Next time, I will substitute fresh raspberries for the blueberries, a fruit marriage blessed by the Gods! Perhaps I’ll also substitute almond extract for the vanilla. Now that’s living on the edge.

Peach and Blueberry Greek Yogurt Cake

INGREDIENTS:
  • 1 ½ cups all-purpose flour
  • 1 teaspoon baking powder
  • ½ teaspoon baking soda
  • 2 oz butter softened
  • 1 cup sugar
  • 2 eggs
  • ½ teaspoon vanilla (or almond extract)
  • ½ cup Greek yogurt
  • 2 peaches sliced into wedges
  • 6 oz blueberries (or raspberries)
  • 1 teaspoon granulated sugar
DIRECTIONS:
  1. Use 9×3-inch springform pan.
  2. Preheat oven to 350°F with rack in middle. Grease the side and the bottom of the pan with butter or cooking spray. Line the bottom of a 9×3-inch springform pan (or 9 inch round cake pan) with parchment paper. Grease the parchment paper too.
  3. Sift flour, baking powder, baking soda, together into a medium bowl.
  4. In a separate bowl, beat butter, sugar, and 2 eggs until very light in color and fluffy, 2-3 minutes on high speed. Add vanilla and Greek yogurt and continue beating until very creamy and light in color, for about 1 more minute.
  5. Keeping the mixer speed low, mix in the flour mix until combined. Do not overmix.
  6. Transfer the cake batter to the springform pan. Top with sliced peaches, and scatter blueberries evenly on top in the spaces between the peach slices. Sprinkle the fruit with 1 teaspoon granulated sugar.
  7. Bake until cake turns golden, and the tester comes out clean in the center, about 1 hour, depending on your oven. Midway through baking, I like to put some extra peach slices and extra blueberries on top of the cake for prettiness, and return cake to baking.
  8. When the cake is done baking, let it cool (still in the baking pan) on a wire rack. After cake has cooled for about 40 minutes, release the cake from the springform pan. At this point, if the cake is cool enough, you can slide your hand under the cake, between the parchment paper and the bottom portion of the springform pan and move the cake with the parchment paper attached to its bottom onto a cake plate easily.
  9. If using a 9 inch round cake pan, cook in pan for about 40 minutes or more (up to 1 hour, depending on your oven), then invert onto a plate.

Recipe slightly adapted from Juliasalbum.com