Cookies and Bars · Family · Family Favorites · New Favorite

French Macarons by Daughter Megan

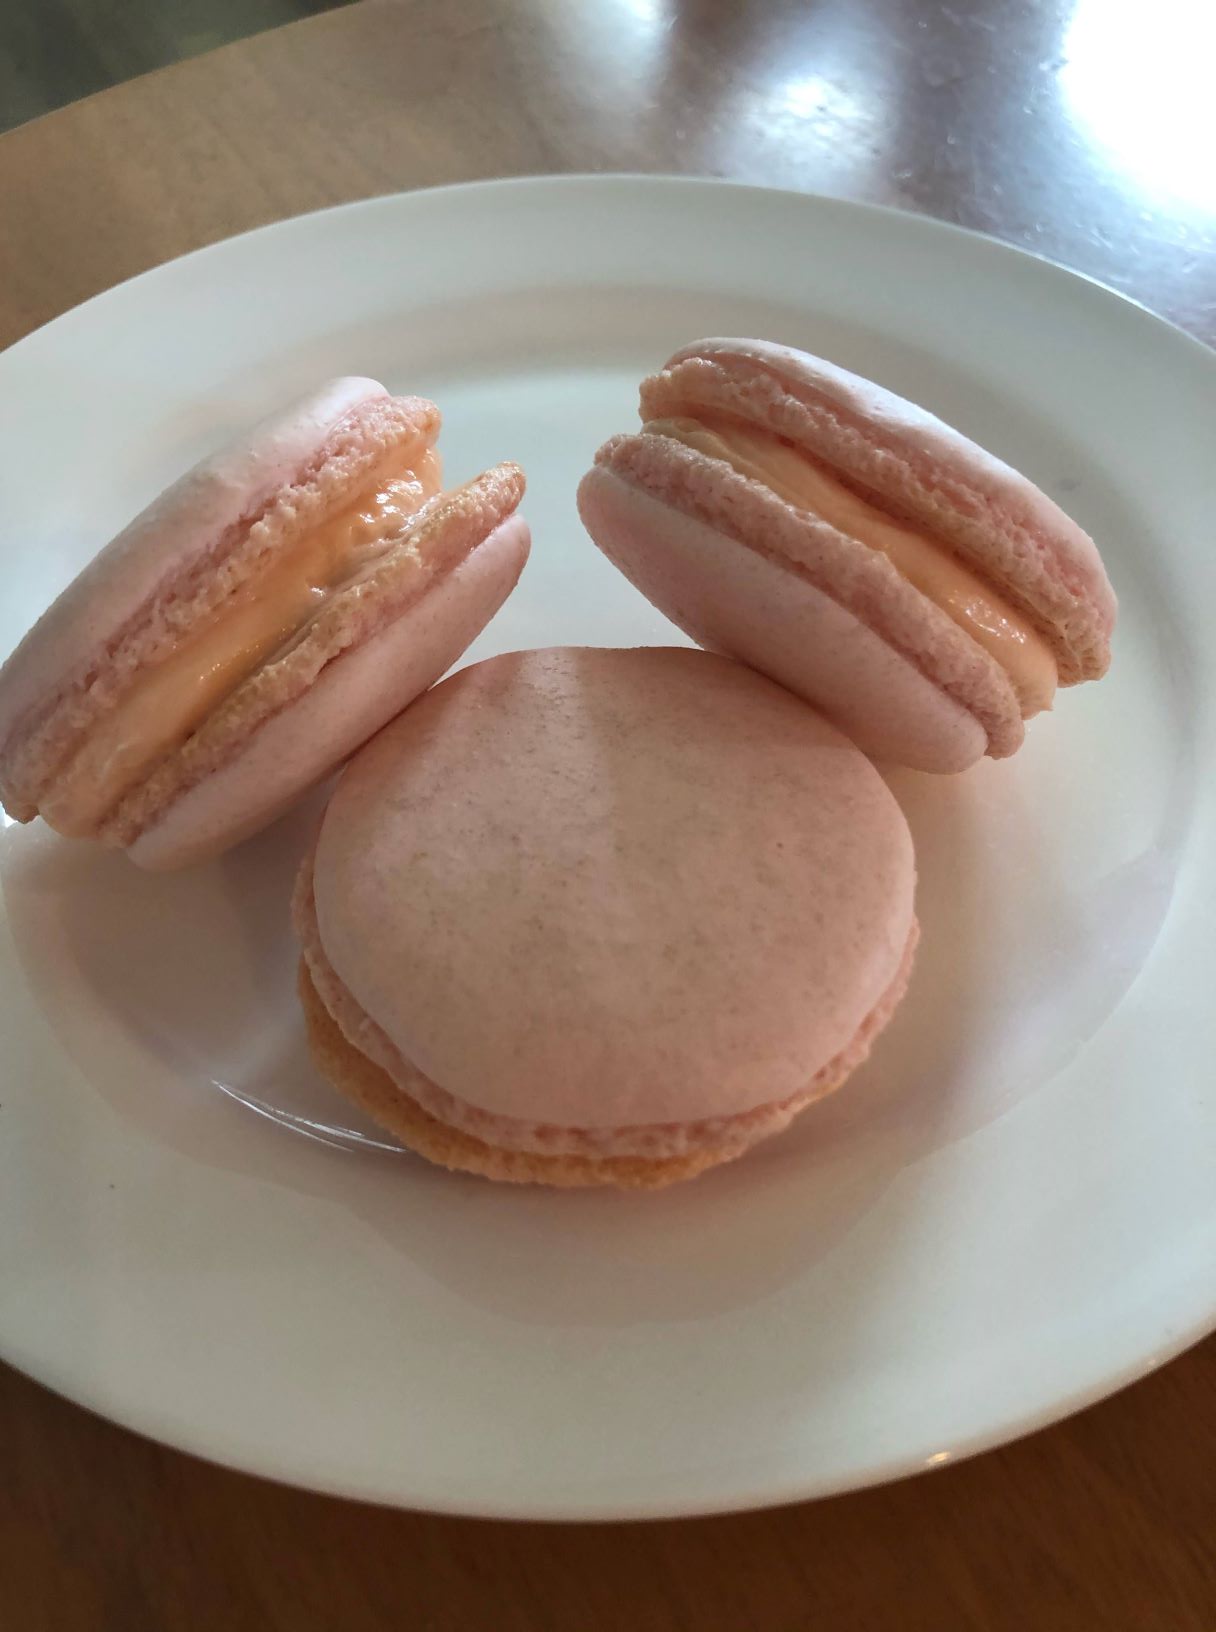
French Macarons are such a light, sweet delicacy.  I never would think of making them, yet, one day, my oldest daughter, Megan, called to say she’d had a dream about making Macarons and was going to bake them that very day.  Megan is the dessert maker in our family, always coming up with something new and delightful. Even so, I thought they would be extremely difficult, especially at Denver altitude.

Never fear!  The results were stunning and delectable.  The only change Megan made to the recipe was reducing the vanilla and adding almond extract to both the cookie and to the frosting. I’ll leave the Macaron making to Megan and praise (and enjoy) the results!

FRENCH MACARONS

For the Cookie

  • 100 g egg whites room temperature or 3 large eggs
  • 140 g almond flour or 1 1/2 cups
  • 90 g granulated sugar just under 1/2 cup
  • 130 g powdered sugar or 1 cup
  • 1 tsp. vanilla 5mL (Megan used 3/4 tsp. vanilla and 1/4 tsp. almond extract)
  • 1/4 tsp. cream of tartar 800mg

For the Buttercream

  • 1 cup unsalted butter softened 226g
  • 5 egg yolks
  • 1/2 cup granulated sugar 100g
  • 1 tsp. vanilla (Megan used 3/4 tsp. vanilla and 1/4 tsp. almond extract)
  • 3 tbsp. water 30mL
  • 1 pinch salt

Instructions

For the Macarons:

  • Sift the confectioners sugar and almond flour into a bowl.
  • Add the room temperature egg whites into a very clean bowl.
  • Using an electric mixer, whisk egg whites. Once they begin to foam add the cream of tartar and then SLOWLY add the granulated sugar.
  • Add the food coloring (if desired) and vanilla then mix in. Continue to beat until stiff peaks form.
  • Begin folding in the 1/3 of the dry ingredients.
  • Be careful to add the remaining dry ingredients and fold gently.
  • The final mixture should look like flowing lava, and be able to fall into a figure eight without breaking. Spoon into a piping bag with a medium round piping tip and you’re ready to start piping.
  • Pipe one inch dollops onto a baking sheet lined with parchment paper (this should be glued down with dabs of batter). Tap on counter several times to release air bubbles. Allow to sit for about 40 minutes before placing in oven.
  • Bake at 300F for 12-15 minutes, rotate tray after 7 minutes. Allow to cool completely before removing from baking sheet.

For the French Buttercream Filling:

  • Combine sugar and water in medium saucepan. Heat over low heat while stirring until sugar dissolves. Increase heat to medium- high and bring to a boil
  • Put egg yolks in a stand-mixer fitted with a whisk attachment and beat until thick and foamy.
  • Cook the sugar and water syrup until it reaches 240 degrees F. Immediately remove from heat. With mixer running, SLOWLY drizzle hot syrup into bowl with yolks.
  • Continue mixing until the bottom of the bowl is cool to the touch and the yolk mixture has cooled to room temperature.
  • Add in butter one cube at a time allowing each piece to incorporate before adding the next. Add vanilla and salt. Continue mixing until buttercream is smooth and creamy. (About 5-6 minutes.) Add food coloring if desired.

For Assembly

  • Pipe your filling onto the back of half the shells. Form a sandwich and repeat. Macarons should be aged in the fridge for 1-3 days for best results. This allows the filling to soften the shells inside.

Notes

  • THE MERINGUE!!!! That meringue HAS TO BE STIFF! I had no idea French meringue could be whipped to such a thick marshmallowy consistency but all it takes is a bit of extra whisking. You’ll notice the meringue start to fill the whisk when you’re getting close to the right stage.
  • Sift, Sift, SIFT! Those larger pieces of almond flour will mar the surface of your macarons. Best practice is to sift then whiz in the food processor and repeat two more times. Discard the larger particles, don’t try to press them through the sieve.
  • Use a scale if possible, accuracy helps with this recipe.
  • The mixing will take some practice, you will fold and fold the batter and then use the spatula to GENTLY press the batter against the bowl. You want to remove some of the bubbles but not to many… Continue this until it reaches a thick “lava” consistency. It should slowly fall off the spatula in ribbons and be able to form a figure eight without breaking.
  • Pipe the macarons perpendicular to the surface. If your tip is pointing a bit in any particular direction when you pipe the macarons might be oblong or malformed.
  • Add your coloring to the meringue after it reaches the soft peak stage.
  • When you are finishing the piping motion stop squeezing the bag and pull up with a circular motion.
  • The macarons will be best after 2-3 days resting in the fridge.
  • If you over-bake the shells and they’re too crisp, brush the bottom with some milk before assembly to soften them up.

Recipe adapted from Preppykitchen.com

Family · Family Favorites

Fresh Peach Cobbler…summertime favorite

Fresh peaches are a summer treat!  I have fond memories, as a kid, of biting into a fresh peach and have the juice run down my arms and all over my face. I was a sticky mess, but loving that peach!

English: juicy peach half

Colorado peaches are some of the best and I’m lucky enough to live in the great state that produces them. To date, I’ve not seen Colorado peaches at the market but Costco has had wonderful peaches this summer. What better dessert to serve visiting family topped with vanilla ice cream! The recipe is from my tried and true Farm Journal Country Cookbook, 1972 a gift from the folks at Farm Journal many years ago when I worked in Agri-Marketing for an ad agency in St. Joe, MO. The cookbook has seen a lot of love and even though it’s spine is broken, it continues to support my love of good home-cooking!

IMG_0041

Our Book Club potluck was coming up, featuring the book Proof of Heaven a Neurosurgeon’s Journey into the Afterlife by Eben Alexander, M.D.  Our potluck theme was ‘what would you have for your last meal?’  I tripled the recipe so I could have enough Cobbler for the Book Club and for visiting family.  It was hit with both groups. It’s delicious (even if I do say so myself) and a wonderful summer treat.

FRESH PEACH COBBLER

Peach Mixture:

1 1/2 tablespoons cornstarch
1/4 to 1/3 cup brown sugar, firmly packed
1/2 cup water
4 cups sweetened sliced peeled peaches
1 tablespoon butter
1 tablespoon lemon juice

  • Mix cornstarch, brown sugar, and water.  Add peaches and cook until mixture is thickened, about 15 minutes.
  • Add butter and lemon juice.  Pour into a greased 8″ round or square baking dish.

Batter Topping:

1/2 cup sifted flour
1/2 cup sugar
1/2 teaspoon baking powder
1/4 teaspoon salt
2 tablespoons soft butter
1 egg, slightly beaten

Combine flour, sugar, baking powder, salt, butter and egg.  Beat until butter is smooth.

Drop spoonfuls of Batter Topping over hot peach mixture.  Sprinkle with 1 tablespoon white sugar.

Bake in hot oven (400 degrees) 40 to 50 minutes.  Serve warm, in bowls, with vanilla ice cream.


Adapted from Farm Journal Country Cookbook

New Favorite · Nicaragua

Iced Vanilla Latte, please

Remember when we used to have a plain cup of coffee brewed in our Mr. Coffee machine or percolator?  Coffee was typically Folgers, always hot, and if it cooled, you nuked it in the microwave. God forbid, I would EVER drink iced coffee, or so I thought.

I clearly remember when my perception of coffee changed…twice.  In the 1980-1990s I traveled on business to Seattle quite frequently and small, gourmet coffee shops and trucks were everywhere.  Seattle was the hot-bed of gourmet coffee yet to hit my home in the Mile-High City.  (Thinking back…why didn’t I invest in Starbucks?)

Ordering a coffee was far beyond the typical ‘I’ll have a cup of coffee, black to go’. Now there were terms like tall, grande, venti, Americano, espresso, skinny, Macchiato, half-caf, blends, etc., etc., etc..  It was an anxious moment when I tried to figure out what to order without embarrassing myself. I can still imagine the people in line behind me rolling their eyes at this out-of-state novice.  Despite my initial fumbling, I started experimenting with difference blends, flavors, iced coffees and loved it!

My second perception occurred when I traveled to Finca Esperanza Verde, a coffee plantation in Nicaragua, in 2012.  My ‘cup of Joe’ would never be the same as documented in my 6/12/12 Fork-Lore post. My daily iced latte is simple:  One packet of Starbuck’s Via, a packet of Stevia with 1/2 cup of boiling water.  Stir.  Add cold water to the cup, stir.  Pour contents over a large glass full of ice.  Top with about 1/4 cup of Almond Milk and stir again.  Add a splash of vanilla or cinnamon to taste. My easy version of an Iced Latte!

When my daughter and fellow blogger, Megan, asked me to join her to make Iced Vanilla Latte I jumped at the chance to 1) spend time with my daughter and 2) make (and drink!) my favorite summer morning picker-upper. Our recipe follows and I’ve enjoyed our creation for the past two days. Megan’s blog, Lifeloveandgarlic, also features the Iced Vanilla Latte AND includes a Seattle’s Best give-away.  Check it out!

Screenshot 2021-09-26 144825

EASY PEASY ICED VANILLA LATTE

2 tbsp. vanilla simple syrup (see recipe below)
1/3 cup whole milk coffee ice cubes (see directions below)
Seattle’s Best Level 4, Medium-Roast Coffee brewed (we used 3.5 scoops for a pot)

  • Fill your cup (or fancy tumbler) with coffee ice cubes.
  • Pour simple syrup and whole milk into the bottom of the cup
  • Fill the rest of the cup with your coffee of choice. Stir!
  • Voila! Enjoy a delicious, easy and perfect drink for summer mornings. *This is the simple syrup, which actually looks like coffee. The brown sugar + vanilla give it the darker hue. 

Vanilla Simple Syrup

1/4 cup brown sugar
1/4 cup white sugar
1/2 cup water
Pinch of cinnamon
4 tbsp. vanilla extract

  • Put both sugars, water and pinch of cinnamon in a pot over medium heat. Bring to boil.
  • Pull the pot off the stove and pour the vanilla into the syrup. Allow to cool. You’re done!
  • Note: Don’t be alarmed that your syrup is quite dark in hue (almost coffee colored). The brown sugar/vanilla have that effect – it’s perfectly normal.

Coffee Ice Cubes

  • Take your left over coffee and pour it in your ice cube tray and freeze! They’re perfect for cooling down your coffee without watering it down!

Family Favorites · New Traditions

Salted Caramel Hot Chocolate Mix…mmmm!

Salted Caramel is a taste bud extravaganza!  Combining salted caramel with chocolate has to be a winner.

A few weeks ago I discovered this recipe on Pinterest and, of course, had to try it.  I made a batch to give as gifts but stashed a few servings away for me, too.  It’s delicious.  Add the sea salt to your taste and…BONUS…you have to try it to assure that the combination is absolutely perfect.

A cup of salted caramel hot chocolate mix for a long winter’s night…mmmm!

SALTED CARAMEL HOT CHOCOLATE MIX

2 1/2 cups granulated sugar
3 tablespoons pure vanilla extract
1 1/2 cups good quality Dutch cocoa powder
1 to 3 tablespoons good sea salt (I used 1 1/2 tablespoons)
1 cup dry milk powder
3/4 cup packed light brown sugar
10 ounces good quality bittersweet chocolate or chocolate chips

  • Line a rimmed baking sheet with parchment paper; set aside.
  • Heat the 2 1/2 cups sugar in large, heavy pan, over medium heat.  Stir often.
  • When the sugar begins to melt, continuous stir (or swirl the pan) to melt without burning.  The sugar seems to crystallize but it will melt to a deep amber color after 15-20 minutes.
  • Remove the pan from the heat and carefully add the vanilla (it will spatter). Whisk the caramel until smooth again, then immediately pour in the lined baking sheet. Allow it to spread without touching the sides.  Set aside and let the caramel harden, at least 1 hour.

  • When ready to make the mix, use the back of a large spoon to tap the caramel several times into small broken pieces that can fit into the feeding tube of a large food processor.
  • Turn the processor on, and while running, feed the caramel pieces into the tube so the processor pulverizes the caramel into a fine powder.  Continue to add the pieces, a few at a time, until it is completely powder (a cloud of caramel dust will float out of the tube).  Turn the processor off and follow the next steps to complete the mix.

  • Add the rest of the ingredients, except the chocolate, into the food processor with the caramel powder.  Replace the lid and process until smooth.
  • Add the chocolate to the bowl and process again until the mixture is a fine powder.
  • At this point, I made a cup to taste to assure I added enough sea salt. Originally, I started with 1 tablespoon and after tasting, I added another 1/2 tablespoon to the mixture.

Store in an airtight container in a cool, dry place, for up to one month.  To serve, stir 3 tablespoons mix into 1 cup hot milk.

Adapted from Pennies on a Platter 2007; Adapted from Mom It Forward

Family Favorites · My Roots · Nicaragua

Guest Post: Nicaraguan Cocoa Beans + Gamma’s Fudge Recipe = New Nicaraguan Tradition?

My sister-in-law, Betty, gets all the credit for making my trip to Nicaragua a reality. Betty has kindly shared the following information about her Mother’s (Gamma’s) Fudge Recipe and her introduction of the recipe to Nicaraguan families in San Ramon, using local, ground cocoa beans.
Cocoa Beans in Nicaragua

————————————–

My Mother had a way with Hershey’s cocoa powder.  It was a cupboard staple, allowing a host of unique concoctions to be served in our family kitchen.  There was chocolate gravy, made in a skillet from a roux of flour, sugar, and cocoa powder laced with milk and butter.  It had a certain satin sheen when ready to be served for our before-school breakfast. Yikes!  There was also an ugly chocolate pie, made with cocoa powder, sugar and butter pats folded simply into pastry and baked.  Yum!  Nothing, however, competed with her five-ingredient fudge, ready in 20 minutes if one of the family developed an after-dinner sweet tooth.  We didn’t often have layered cakes or fruit pies, but we had fudge to die for.
Gamma’s Fudge in Nicaragua
Family legend says that during the Depression and the rationing of sugar, that the prized candy was coveted – so much so that a sad tale is told that while “beating the mixture” the sauce pan capsized into the dirty kitchen sink while Mother attended to a baby’s wailing – only to have the cry equaled by the disappointed older brother, Karl, who awaited the prized fudge.
Most of the family still loves Gamma’s Fudge, especially thinking of it and Buttermilk Fudge at Christmas-time when she carefully rationed it among families. I’ve made it for kids and grandkids.  I even made it with Nicaraguan women when we recently visited, with Cathy,  in the small town of San Ramon.  Processed chocolate candy is not affordable to the locals, so I taught three different households how to make fudge using their own ground cocoa beans, their local sugar and dairy and butter or margarine.  Thankfully, vanilla extract was for sale, a spoonful at a time, at one of the many tiny shops lining the four streets of San Ramon.  The fudge was a big hit – and I am hoping some were able to make it into a cottage industry – or maybe just into a new family tradition.
Teaching Fudge Making in one Nicarguan home
Teaching Fudge Making in a second Nicaraguan Home

GAMMA’S FUDGE (Spanish)

In a saucepan, combine:
2 C. sugar
1 C. milk
4 T. cocoa

Heat over medium-high heat, stirring to blend until the mixture reaches a boil. Then adjust heat to maintain a low boil. Check mixture frequently until it begins to thicken, but do not stir too vigorously as the mixture will turn grainy. After about 15 minutes, check to see if the mixture forms a ball when a teaspoonful is dropped into a glass or cool water. When you are sure the chocolate ball is forming and there is loss of brightness to the mixture, turn off heat, then add:
4 T. butter or margarine
1 T vanilla or vanilla extract
Hand beat the mixture within the tilted saucepan until it thickens and forms folds when dropped from spoon back into the mixture. When very hard to beat, pour the mixture on a plate that has been greased with a little margarine. Let stand for 30 minutes before cutting into 1-inch squares.

If for some reason the fudge does not harden, use the crumbles as chips in cookies or as sprinkles on top of ice cream. This recipe can also be used to make a fudge sauce when reheated with a little milk or cooking stopped before the mixture is at hard-stage.

Delicious!

DULCE DE AZUCAR DE GAMMA

Simple ingrediente de 5 Fudge

En una cacerola, combine
2 C. azĂşcar
1 taza de leche
4 T. cacao

  • Calienta a fuego medio-alto, revolviendo ocasionalmente para mezclar, hasta que la mezcla llegue a hervir. A continuaciĂłn, ajuste de calor para mantener a fuego bajo, para comprobar si la mezcla de chocolate, cuando cayĂł en el agua, forma un grupo de bolas. AsegĂşrese de no mezclar con demasiada frecuencia, sin embargo, como se puede convertir en dulces granulada.
  • Cuando uno está seguro de que el chocolate es la combinaciĂłn de una pelota, asĂ­ como la pĂ©rdida de su brillo, apagar el fuego, añadir
    • 4 T. mantequilla o margarina
    • 1 T de vainilla o esencia de vainilla
  • Mano batir la mezcla hasta que espese y forma pliegues cuando se deja caer por cucharada de nuevo en su mezcla. Cuando muy difĂ­cil de batir, vierta la mezcla en una placa que ha sido untada con un poco de margarina.
  • Deje reposar durante 30 minutos, luego se corta en cuadrados de 1 pulgada.
  • Si por alguna razĂłn no se endurecen, se derrumba como el uso de las cookies o en helados. TambiĂ©n se podrĂ­a utilizar como una salsa de recalentamiento con un poco de leche.

Sin embargo, esta consta de 5 ingredientes simples y la clave es cĂłmo late el tiempo suficiente que sĂłlo “establece” una vez que se vierte en el plato.

¡Delicioso!

Family Favorites · New Traditions

Cinnamon Bread Pudding … sweet comfort!

It’s spring and I seem to be in a cake mode…wonder what’s up with that?  After finally cleaning my freezer, I decided to make something with the cherished Cinnamon Bread from the Butterhorn Bakery in Frisco.  What to make….hmmmm….bread pudding?

Serving of Bread Pudding

I don’t recall making bread pudding, but I’ve indulged in several fabulous samples through the years.  This is one recipe where I don’t have a family favorite.  Next best choice…my handy, dandy Farm Journal Country Cookbook.

This cherished cookbook was a gift from one of our client’s at Farm Journal in Kansas City in 1976.  It’s my ‘go-to’ book for a traditional midwest recipe.  No surprise, I found a bread pudding recipe and decided to go for it!

Cinnamon Bread Pudding fresh from the oven

Not to brag, but…it was a slice of heaven.  I instantly knew that if I kept it in the house, I would devour the whole pan.  Neighbors Maribeth and Gary were the recipients of half a pan.  After sampling a piece (or two…), the rest will go to family tomorrow.  The bread pudding was wonderful by itself, but a light vanilla or butterscotch sauce would be great on top.

CINNAMON BREAD PUDDING

2  and 2/3 cups milk
1/4 cup butter
3 eggs
1/2 cup sugar
1 teaspoon vanilla
1/4 teaspoon salt
3 cups (1″ square) day-old cinnamon bread cubes
1/8 teaspoon ground nutmeg

  • Preheat oven to 350 degrees.
  • Scald milk; add butter and cool.
Scald milk, add butter and cool
  • Add 3 egg yolks and 1 egg white to 1/2 cup sugar; beat to mix well.  Add cooled milk, teaspoon vanilla and salt.

  • Place bread cubes in buttered 1.5 quart casserole.  Pour egg-milk mixture over bread.  Sprinkle nutmeg on top.
Pouring milk mixture over cinnamon bread
  • Set casserole in another, larger casserole containing at least 2″ of warm water.
  • Bake for 45-60 minutes or until knife inserted in center comes out clean.  Remove from oven.
  • Serve warm or cool, both are delicious!

Adapted from Farm Journal’s Country Cookbook, 1972.