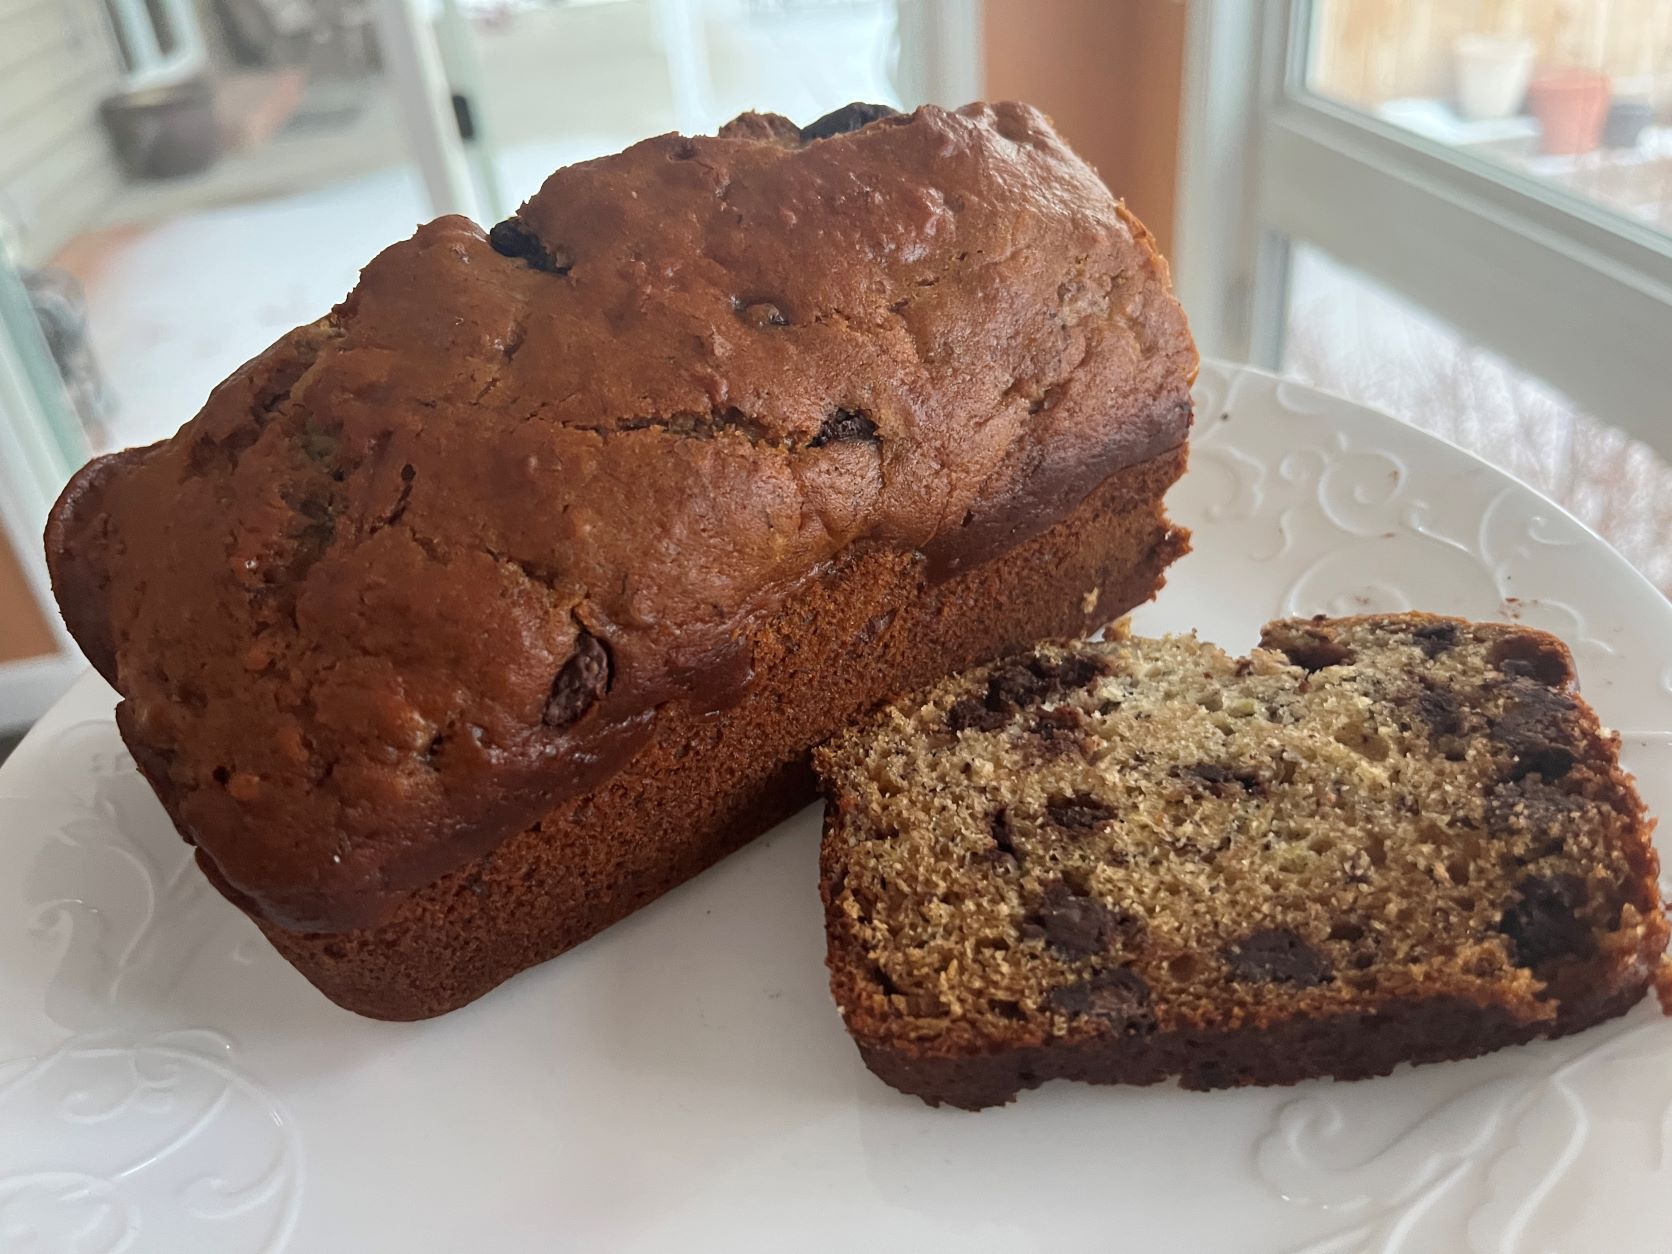
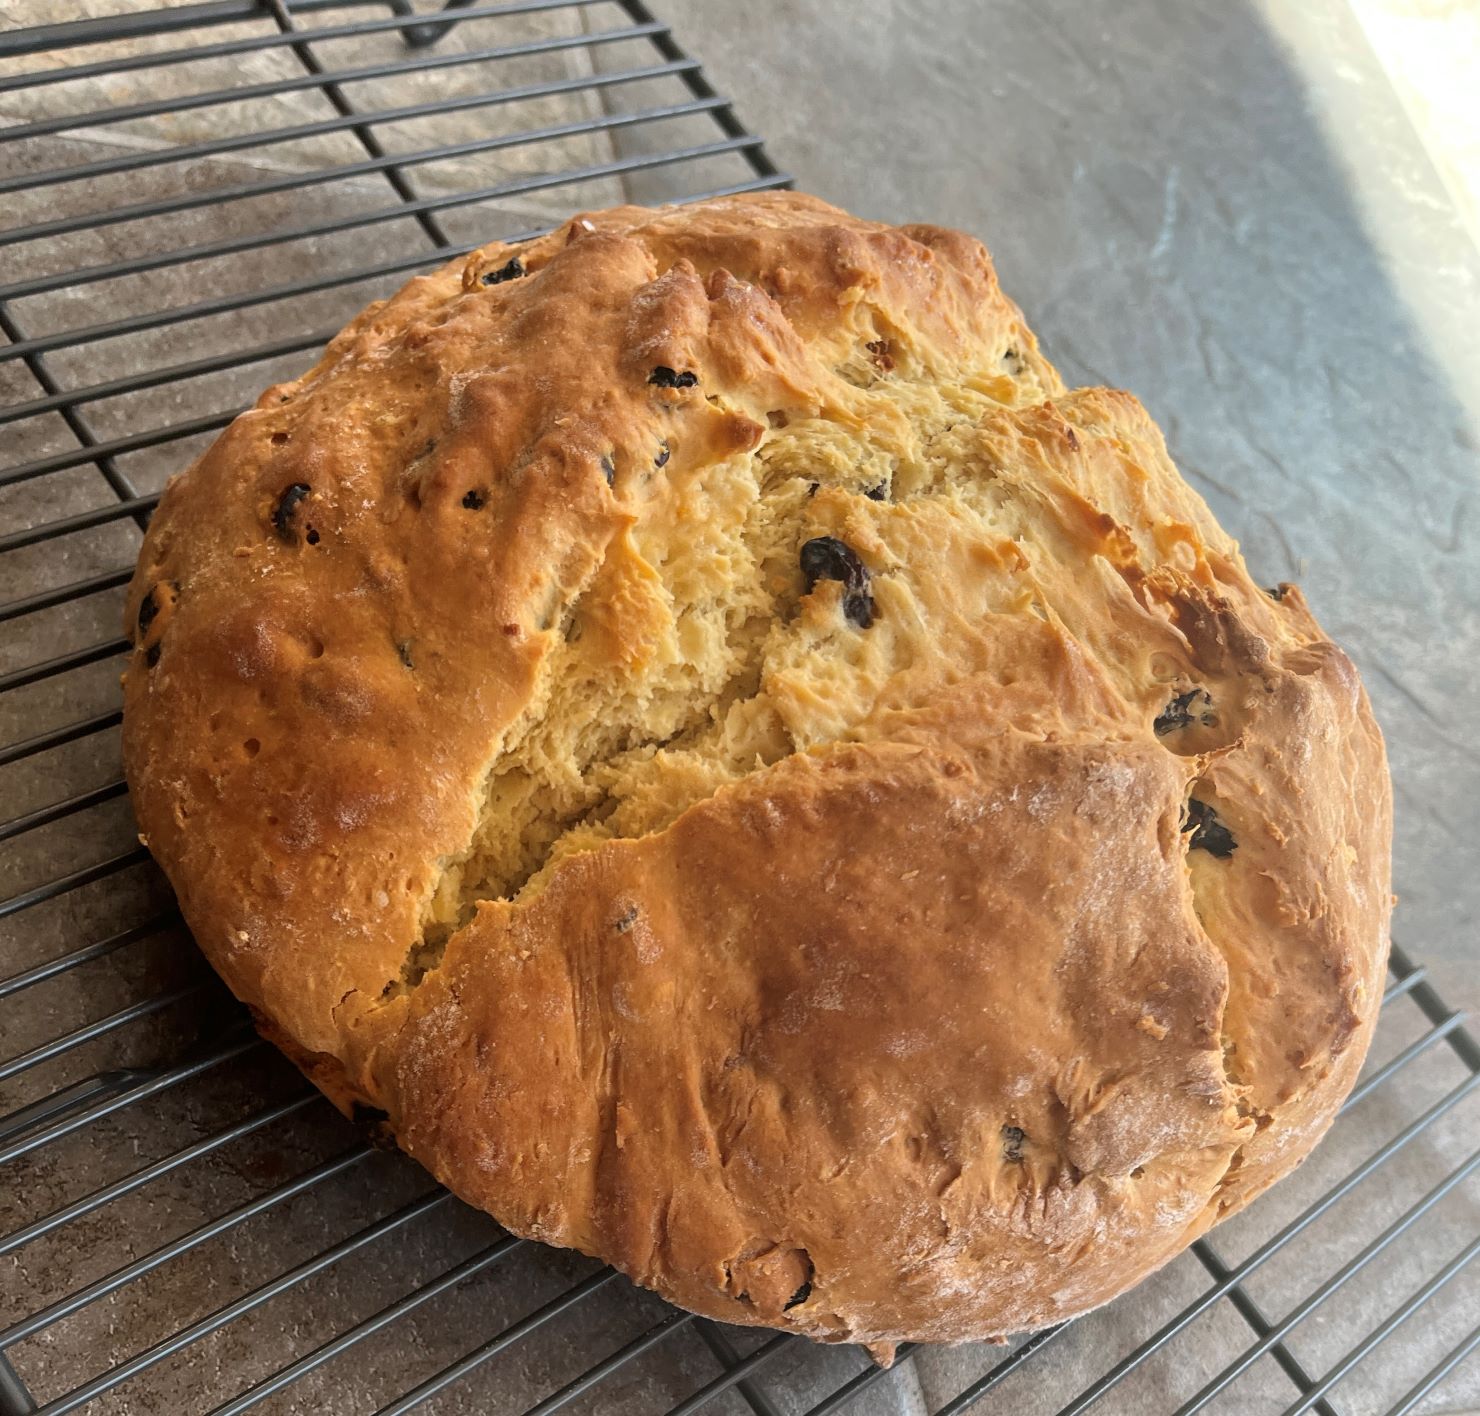
Meats

Oven-Baked Pork Chops

Oven-baked pork chops are so quick and easy…why haven’t I tried this before? I love the thick cut (or Iowa chops) at Costco and frequently cook them in the crock pot. On this particular day, I thawed the pork chops and forgot to put them in the crockpot in the morning. What to do…well, this recipe was perfect. The pork chops came out so juicy and tender. I served the chop with yummy roasted vegetables for the win!

Oven-Baked Pork Chops

INGREDIENTS:
DIRECTIONS:
  1. Use paper towels to pat the pork chops dry.
  2. Prepare the pork chop marinade here. Marinate the pork chops for at least 1 hour, up to 24 hours (but not longer). Alternatively, you can season with pork chop seasoning (link in ingredient section above), or simply season generously with salt and pepper and skip the marinade, but the marinade makes them so juicy! (Fork-Lore Note: I seasoned the pork chops and immediately cooked them and they were juicy and delicious).
  3. Remove the chops from the fridge about 30 minutes before cooking.
  4. Preheat the oven to 400 degrees F (204 degrees C). At the same time, preheat a cast iron skillet (or a cast iron grill pan) on the stovetop over medium-high heat, about 2-3 minutes.
  5. Once the oven is just a few minutes away from being preheated, add the butter and heat until melted, tilting the pan to coat. Add the pork chops in a single layer. Sear for 2-3 minutes, without moving, until browned on the bottom. Flip and sear for 1-2 minutes on the other side.
  6. Transfer the pan to the preheated oven. Bake pork chops until their internal temperature reaches 145 degrees F (63 degrees C), or 140 degrees F (60 degrees C) for juicier pork chops. (The internal temperature will rise another 5 degrees while resting later.) Use a probe thermometer for best results, but here is a guideline for pork chop baking times:* 1″ thick boneless pork chops: 6-8 minutes* 1/2″ thick boneless pork chops: 3-4 minutes* 1″ thick bone-in pork chops: 8-10 minutes* 1/2″ thick bone-in pork chops: 5-6 minutes
  7. Remove the pork chops from the oven and transfer to a plate. (Do not leave them in the pan or they will be overcooked.) Tent the top with foil and let the chops rest for 3-5 minutes.

Recipe adapted from WholesomeYum

Cookies and Bars

5-Ingredient Cheesecake Thumbprint Cookies

These delicious cheesecake thumbprint cookies are so delicious. Daughter, Megan, found this recipe and used apricot vs. the suggested raspberry jam. Any jam would work and for the chocolate lover, a few of those as well. One last bit of sugar before the New Year diets begin!

5-Ingredient Cheesecake Thumbprint Cookies

INGREDIENTS:
  • 4 ounces cream cheese, softened
  • 8 tablespoons salted butter, at room temperature
  • 1/2 cup + 3 tablespoons sugar
  • 1 cup + 3 tablespoons flour
  • 1/4 cup preserves (raspberry, strawberry, apricot or bits of chocolate)
DIRECTIONS:
  1. In the body of a stand mixer fitted with a paddle attachment, beat the cream cheese and butter until light and fluffy, scraping down the sides as needed.
  2. Add the sugar and beat well.
  3. Add in flour, a small bit at a time, beating in on low speed, just until incorporated.
  4. Cover bowl with plastic wrap and place in the refrigerator for at least 45 minutes and up to two hours.
  5. 30 minutes prior to baking, preheat oven to 375 degrees (F).
  6. Line a large baking sheet with parchment paper.
  7. Using a cookie scoop, scoop out 1 tablespoon sized balls of dough, roll them into rounds, and place on the cookie sheet. Lightly press your thumb in the center of each round. Fill each indentation with 1/2 teaspoon of jam.
  8. Place pan in the oven to bake for 11 to 12 minutes or until just golden at the edges. They will still be very soft when you remove them from the oven–that’s a good thing!
  9. Cool on the baking sheet for 10 full minutes, then very carefully transfer to a cooling rack to cool completely.

Recipe from bakerbynature

Cookies and Bars · Holidays

Easy Sugar Cookies & Sugar Cookie Frosting

Everyone loves a frosted sugar cookie for the holidays. Daughter, Megan, made several batches for her daughter’s December birthday party and to give to neighbors. They rolled out and cut beautifully. They are perfect for Santa’s visit on Christmas Eve. Yummo!

Easy Sugar Cookies & Sugar Cookie Frosting

INGREDIENTS:
  • Sugar Cookies
    • 1 cup unsalted butter softened (226g)
    • 1 cup granulated sugar (200g)
    • 1 ½ teaspoons vanilla extract (see note)
    • 1 large egg
    • 2 ½ cups all-purpose flour (Plain flour) (315g)
    • ¾ teaspoon baking powder
    • ¾ teaspoon table salt
  • Sugar Cookie Frosting
    • 3 cups powdered sugar, sifted (375g) (weigh before sifting)
    • 3-4 Tablespoons milk (I use whole milk, but any kind will work)
    • 2 Tablespoons light corn syrup (see note)
    • ½ teaspoon vanilla extract
    • Gel food coloring optional
    • Additional candies and sprinkles for decorating optional
DIRECTIONS:

Sugar Cookies

  1. Combine butter and sugar in the bowl of a stand mixer (or in a large bowl and use an electric hand mixer) and beat until creamy and well-combined.
  2. Add egg and vanilla extract and beat until completely combined.
  3. In a separate, medium-sized bowl, whisk together flour, baking powder, and salt.
  4. Gradually stir dry ingredients into wet until dough is smooth and completely combined.
  5. Lay out a large piece of plastic wrap and transfer approximately half of the dough onto the wrap (dough will be quite sticky at this point, that’s OK!).
  6. Cover dough with clear wrap or wax paper and mold into a flat disk. Wrap tightly. Repeat with remaining cookie dough in another piece of clear wrap. Transfer dough to refrigerator and chill for at least 2-3 hours and up to 5 days.
  7. Once dough has finished chilling, preheat oven to 350F (175C) and line a baking sheet with parchment paper (alternatively bake cookies directly on an ungreased baking sheet). Set aside.
  8. Generously dust a clean surface with flour and place one chilled cookie dough disk onto the surface. Lightly flour the dough and roll out to ⅛” (for thinner, crispier cookies) or ¼” (for thicker, softer cookies). Add additional flour as needed both on top of and beneath the dough so that it doesn’t stick. Note: if dough is cracking as you roll it, let it sit at room temperature for 10-15 minutes to soften before attempting again.
  9. Use cookie cutters to cut out shapes and use a spatula to transfer shapes to prepared baking sheet, spacing at least 1″ apart. If you are not intending to decorate your cookies with icing, you can decorate them with sanding sugar at this point before you bake them. 
  10. Bake on 350F (175C) for 8-10 minutes (this is for cookies that are approximately 3″ [7.6cm]; note that smaller cookies will need less time and larger cookies will need more), or until edges just begin to turn lightly golden brown.
  11. Allow cookies to cool completely on cookie sheet before decorating.
  12. Easy Sugar Cookie Icing; Combine powdered sugar, 2 Tablespoons of milk, corn syrup, and vanilla extract in a medium-sized bowl and stir until combined. If frosting is too thick, add more milk, about a teaspoon at a time, until the frosting is thick but pipeable. If you accidentally add too much milk, add powdered sugar until desired texture is reached.  
    • If coloring the frosting, divide into bowls and color as desired at this point.
    • Transfer frosting to a piping bag with a piping tip (I used Wilton 5), or place in a Ziploc bag and snip a small piece of the corner off (not as neat, but this will still work, just take care that the frosting isn’t so thick that it breaks open the seam of the bag when you are squeezing).  
    • Pipe frosting on cookies and decorate with decorative candies, if desired.
    • Allow frosting to harden before enjoying, stacking, or storing (this took several hours for me and may vary for you depending on the consistency of your frosting).

Recipe from SugarSpunRun

Appetizers

Cranberry Salsa

Cranberry Salsa is the perfect appetizer for the holidays. I am not a fan of too much spice but i jalapeno is just right for this dish. I served the Cranberry Salsa over softened cream cheese with crackers, tortilla chips, and cubes of sourdough bread. In addition I had very thinly sliced piecs of serrano ham. A piece of the bread with cream cheese, salsa and a bite of serrano ham…to die for!

After Thanksgiving, I made a turkey sandwich topped with the salsa and it was sooo good. Definitely worth making this holiday season!

Cranberry Salsa

INGREDIENTS:
  • 12 ounces fresh cranberries
  • 3/4 cup granulated sugar, (add more to taste)
  • 1 jalapeno, seeded and chopped coarsely (leave the seeds in if you like it spicy)
  • 1/2 cup cilantro
  • 4 green onions
  • 2 tablespoons lime juice
  • pinch of salt
  • 2 (8 ounce) blocks of cream cheese
  • Crackers or tortilla chips
DIRECTIONS:
  1. Place all of the ingredients in a food processor (EXCEPT CREAM CHEESE) and pulse until desired consistency. I like mine fairly fine. Chill in the fridge for a couple of hours (preferably overnight) to allow the salsa to macerate. Serve over cream cheese and with crackers.
  2. This makes enough to cover two blocks of cream cheese. Some people prefer to spread the cream cheese on a serving dish with the salsa on top. I prefer to just pour it on top of a block of cream cheese.
  3. Depending on how tart your cranberries are you may want to add more sugar. This last batch I added a total of 1 cup of sugar.
  4. NOTE: Wheat thins or triscuits are great for serving with this because they are sturdy and won’t break. I love it with Ritz crackers but they are too soft and will break with dipping. If you want to use them just make sure you have a spreader with the salsa. As with all salsa, the quantities are approximate and you can adjust to your own preferences. I have kept this in the fridge for up to 10 days and it was still good! I’m not a food safety expert but it does last for a while.

Recipe from Thegirlwhoateeverything.com

Cakes · Holidays

Chocolate Rum Cake

This Bacardi Chocolate Rum Cake recipe card has been in my collection since the mid-70s when I lived in St. Joseph, Missouri. This recipe along with the traditional Rum Cake are so delicious. Last Christmas, Megan made the cake for family gatherings, carrying on the tradition. Her cake was as delicious as it looks.

Chocolate Rum Cake

INGREDIENTS:
  • 18 1/2 oz. chocolate cake mix
  • 1 pkg. (4 serving sice) Jell-O Chocolate Instant Pudding and Pie Filling
  • 4 eggs
  • 1/2 cup Bacardi dark rum (80 proof)
  • 1/2 cup cold water
  • 1/2 cup canola oil
  • 1/2 cup slivered almonds (optional)

Filling:

  • 1 1/2 cups cold milk
  • 1/2 cup Bacardi dark rum (80 proof)
  • 1 pkg. (4 serving size) Jell-O Chocolate Instant Pudding and Pie Filling
  • 1 envelope Dream Whip Whipped Topping Mix
DIRECTIONS:
  1. Preheat oven to 350 degree Fahrenheit. Grease and flour two 9″ layer cake pans.
  2. Combine all cake ingredients together in a small bowl. Blend well, then beat at medium mixer speed for 2 minutes. Turn into prepared pans.
  3. Bake 30 minutes or until cake tests done. Do not underbake. Cool in pans for 10 minutes.
  4. Remove from pans, finish cooling on racks.
  5. Split layers in half horizontally. Stack.
  6. For filling: Combine milk, rum, pudding mix and topping mix in deep narrow-botton bowl. Blend well at high speed for 4 minutes, until light and fluffy. Makes 4 cups.
  7. Spread 1 cup filling between each layer and over top of cake.
  8. Keep cake chilled. Serve cold.

Recipe from Bacardi Rum about 1977

Uncategorized

Soft Gingerbread Cookies with Maple Glaze

Gingerbread cookies are a staple of the holidays this version, is soft, sweet and delicious. The Maple Glaze makes it extra sweet. You will also enjoy these delicious cookies without the icing as well. Feel free to decorate for the season/holidays. My granddaughters enjoyed adding their special sprinkles to their cookies.

Soft Gingerbread Cookies with Maple Glaze

INGREDIENTS:

Gingerbread Cookies

  • 3/4 cup salted butter, softened (1 1/2 sticks)
  • 1 cup white sugar
  • 1 large egg
  • 1/3 cup molasses
  • 2 1/4 cups all-purpose flour (10.75 ounces)
  • 2 teaspoons baking soda
  • 1/2 teaspoon salt
  • 1–2 teaspoons ground ginger
  • granulated sugar for rolling

Maple Glaze

  • 2 tablespoons melted butter
  • 1/4 cup pure maple syrup
  • 3/4 to 1 cup confectioners’ sugar
  • pinch of salt, to taste
DIRECTIONS:
  1. Preheat oven to 350 degrees.
  2. Cream butter and sugar in the bowl of a stand mixer until light and fluffy. Add egg and molasses; mix until incorporated.
  3. Add flour, baking soda, salt, and ginger. Mix until a soft dough forms.
  4. Scoop into small balls (a little smaller than the size of a golf ball) and roll in sugar. Bake for 8-10 minutes; remove from pan so the cookies can sink / flatten slightly as they cool. 
  5. Allow the cookies to cool fully. Whisk maple glaze ingredients together until smooth. Dip one side of the cooled cookies into the maple glaze, set on a piece of wax paper, and add a few festive sprinkles before the glaze sets! So fun

Recipe from PinchofYum

Soups and Stews

Turkey & Wild Rice Soup — Trader Joe’s Style

What’s better on a cold night that soup! This Turkey & Wild Rice Soup is very good and easy to make. I must admit, I didn’t use all Trader Joe’s ingredients, but the Holiday Vegetable Hash is such an easy, wonderful addition. If you have a TJ’s near you, I’d highly recommend it!

Turkey & Wild Rice Soup — Trader Joe’s Style

INGREDIENTS:
  • 2 tablespoons TJ’s Olive Oil
  • 1 package TJ’s Holiday Vegetable Hash (seasonal)
  • TJ’s Sea Salt & Pepper
  • 1 package TJ’s Sliced Cremini Mushrooms
  • 2 packages TJ’s Turkey Stock (seasonal) OR Chicken Stock (2 boxes)
  • 1 cup TJ’s Wild Rice (I have also used their Harvest Blend)
  • 2 cups cooked leftover TJ’s Turkey (or Chicken)
DIRECTIONS:
  1. Heat a large pot over medium heat, add 2 tablespoons olive oil.
  2. When oil is hot, add hash and a generous pinch of salt. Sauté until onions are translucent, 3-5 minutes.
  3. Add mushrooms and sauté another 5 minutes.
  4. Add stock and rice to pot and bring to a simmer. Cover and simmer 30 minutes, stirring halfway through.
  5. Remove lid, add turkey and continue to simmer another 15-20 minutes, until rice is cooked through.
  6. Season to taste with sea salt & pepper. Ladle soup into large bowls and enjoy! 

Recipe from Trader Joe’s

Breads

Cranberry Brie Sheet Pan Biscuits

Marrying two of my favorite fall flavors, Brie and Cranberry, into a biscuit was too good to skip. The fresh herbs and the drizzle of honey makes these savory biscuits a must for a special fall meal or Thanksgiving dinner. They are especially good warm from the oven. Even my grandsons liked them…but who doesn’t love a biscuit with honey!

Cranberry Brie Sheetpan Biscuits

INGREDIENTS:
  • Nonstick cooking spray, for the pan
  • 4 cups all-purpose flour, plus more for dusting (see Cook’s Note)
  • 4 teaspoons baking powder
  • 2 teaspoons sugar
  • 3/4 teaspoon baking soda
  • 2 1/2 teaspoons fine salt
  • 2 1/2 sticks (20 tablespoons) cold unsalted butter, cut into pieces, plus
  • more for serving
  • 1 1/2 cups buttermilk, plus more for brushing
  • 8 ounces Brie, cut into small pieces
  • 1 cup fresh flat-leaf parsley, finely chopped
  • 1 cup dried cranberries
  • 1/4 cup finely chopped chives
  • 2 tablespoons fresh thyme leaves, chopped
  • 1/4 cup honey
DIRECTIONS:
  1. Preheat the oven to 450 degrees F. Spray an 18-by-13-inch half sheet pan with nonstick cooking spray.
  2. Whisk together the flour, baking powder, sugar, baking soda and 2 teaspoons of the salt in a large bowl. Rub 4 tablespoons of the butter into the flour mixture with your fingertips until completely absorbed. Work the remaining 16 tablespoons butter into the flour mixture until pea-sized bits of butter remain. Use a fork to stir in the buttermilk until the mixture comes together into a shaggy dough. (Don’t overmix the dough.)
  3. Add the Brie, parsley, cranberries, chives and thyme to the bowl and gently mix with lightly floured hands, folding the dough over itself (this is where the flaky layers will form) until the ingredients are just combined.
  4. Turn the dough out onto the prepared sheet pan and use lightly floured hands to evenly distribute the dough into the prepared pan. Using a paring knife, gently score 24 squares on top of the dough, making sure the knife does not cut through to the bottom of the biscuit. (If baking the biscuits the following day, cover gently with plastic wrap at this point and refrigerate up to 24 hours.)
  5. Brush the top of the dough with more buttermilk. Bake until the biscuit top is lightly browned, 12 to 14 minutes. Cool in the pan for 5 minutes, then use a paring knife to follow the score marks to cut through the biscuits.
  6. Meanwhile, mix the honey with the remaining 1/2 teaspoon salt in a small bowl. Drizzle the honey over the warm biscuits. Serve the biscuits warm or at room temperature with more butter, if desired.

Recipe from Food Network

Holidays · Salads · Sauces

Cranberry Orange Sauce

Cranberry Orange Sauce is a Thanksgiving staple and now that the grandkids have discovered it, I have to make a double batch. While the Sauce is delectable with the Turkey and sides on Thanksgiving day, a turkey sandwich with the sauce is heavenly. I always hope that the turkey and the cranberry sauce run out at the same time.

Cranberry Orange Sauce

INGREDIENTS:
  • 1/2 cup fresh orange juice, from two oranges
  • 1/2 cup water
  • 3/4 cup plus 2 tablespoons sugar
  • 1 (12 oz) bag fresh or frozen cranberries (do not use dried)
  • Zest of one orange, about 2 teaspoons
  • Pinch salt
DIRECTIONS:
  1. In a medium sauce pan over high heat, bring the orange juice, water and sugar to a boil. Add the cranberries, orange zest, and salt and return to a boil. Reduce the heat to medium and boil gently for 10 to 12 minutes, until most of cranberries have burst open. (You may need to mash them a bit with a spoon.)
  2. Transfer sauce to a serving bowl. Cover and chill until ready to serve.
  3. Make-Ahead/Freezing Instructions: Cranberry sauce will keep for 10 days in a covered container in the refrigerator. It can also be frozen for up to two months. Thaw overnight in the refrigerator before using.

Recipe from Onceuponachef

Family Favorites · Holidays · Vegetables

Broccoli with Garlic Egg Sauce

Broccoli with Garlic Egg Sauce is a family favorite and served with holiday meals or gatherings. Now I know it sounds somewhat disgusting, but, trust me, it’s delicious. I came across this recipe several years ago in the cookbook from popular Denver restaurants. The cookbook is long gone but the memory of the recipe is still with me. If anyone knows of the origin of the recipe at a Denver establishment, please comment.

Broccoli with Garlic Egg Sauce

INGREDIENTS:
  • 1 pound fresh broccoli, washed and cut into flowerettes
  • 3 hard-boiled eggs, shelled and diced
  • 3-4 T. olive oil
  • 1-2 garlic cloves, minced
  • bread crumbs, about 1/2-1 cup
  • salt and pepper to taste
DIRECTIONS:
  1. Steam the broccoli until tender.
  2. Heat olive oil in pan. Add minced garlic and saute. Add chopped eggs, salt and pepper. Stir in bread crumbs.
  3. Place broccoli in a serving dish and top with the garlic egg sauce.

Attribution