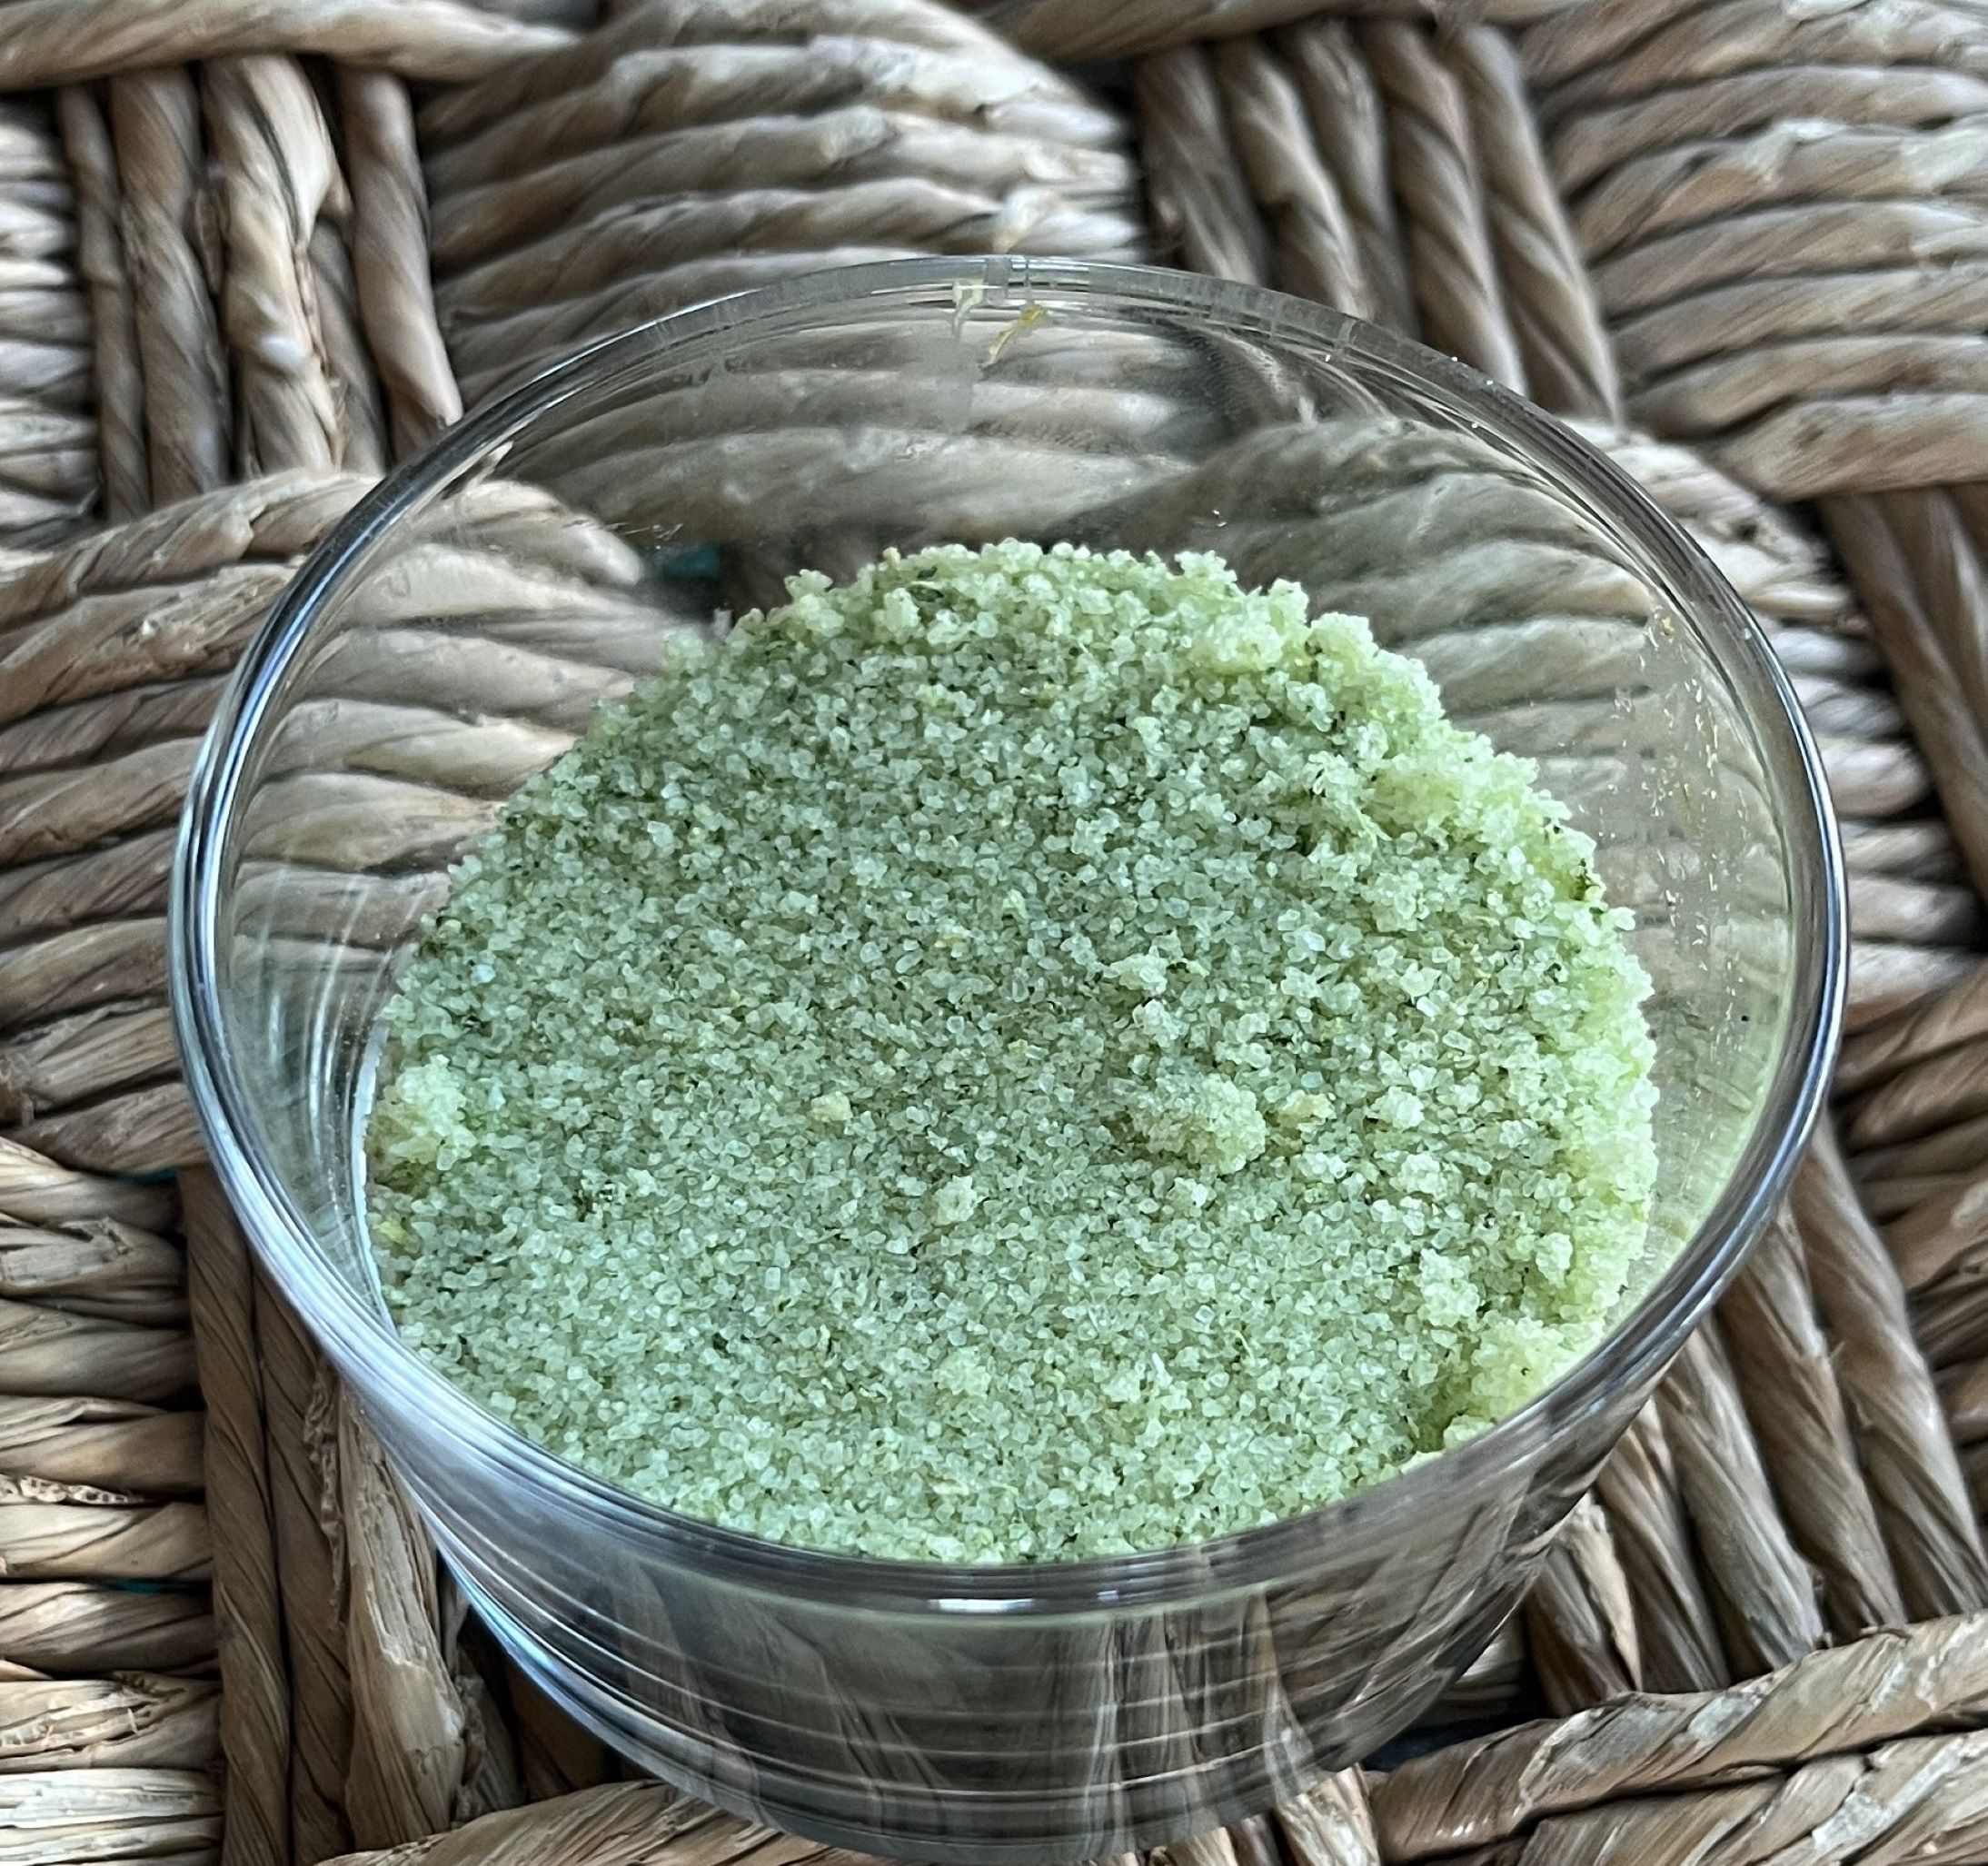
If you have a plethora of basil in your garden and aren’t sure what to do with it, try Basil Salt. I shared this recipe with my daughter, Megan, who had SO much basil. She made the salt and it is delicious!
Basil Salt
INGREDIENTS:
2 cups basil
1 cup sea salt
DIRECTIONS:
Wash and dry the basil leaves.
Preheat oven to 250 degrees Fahrenheit.
Blend the dry basil leaves and salt until well blended.
Spread the salt mixture on parchment paper in a baking pan and bake for 25-30 minutes.
Once cool, break it up and blend the mixture again.
Store in an air-tight container. Keeps well for a year.
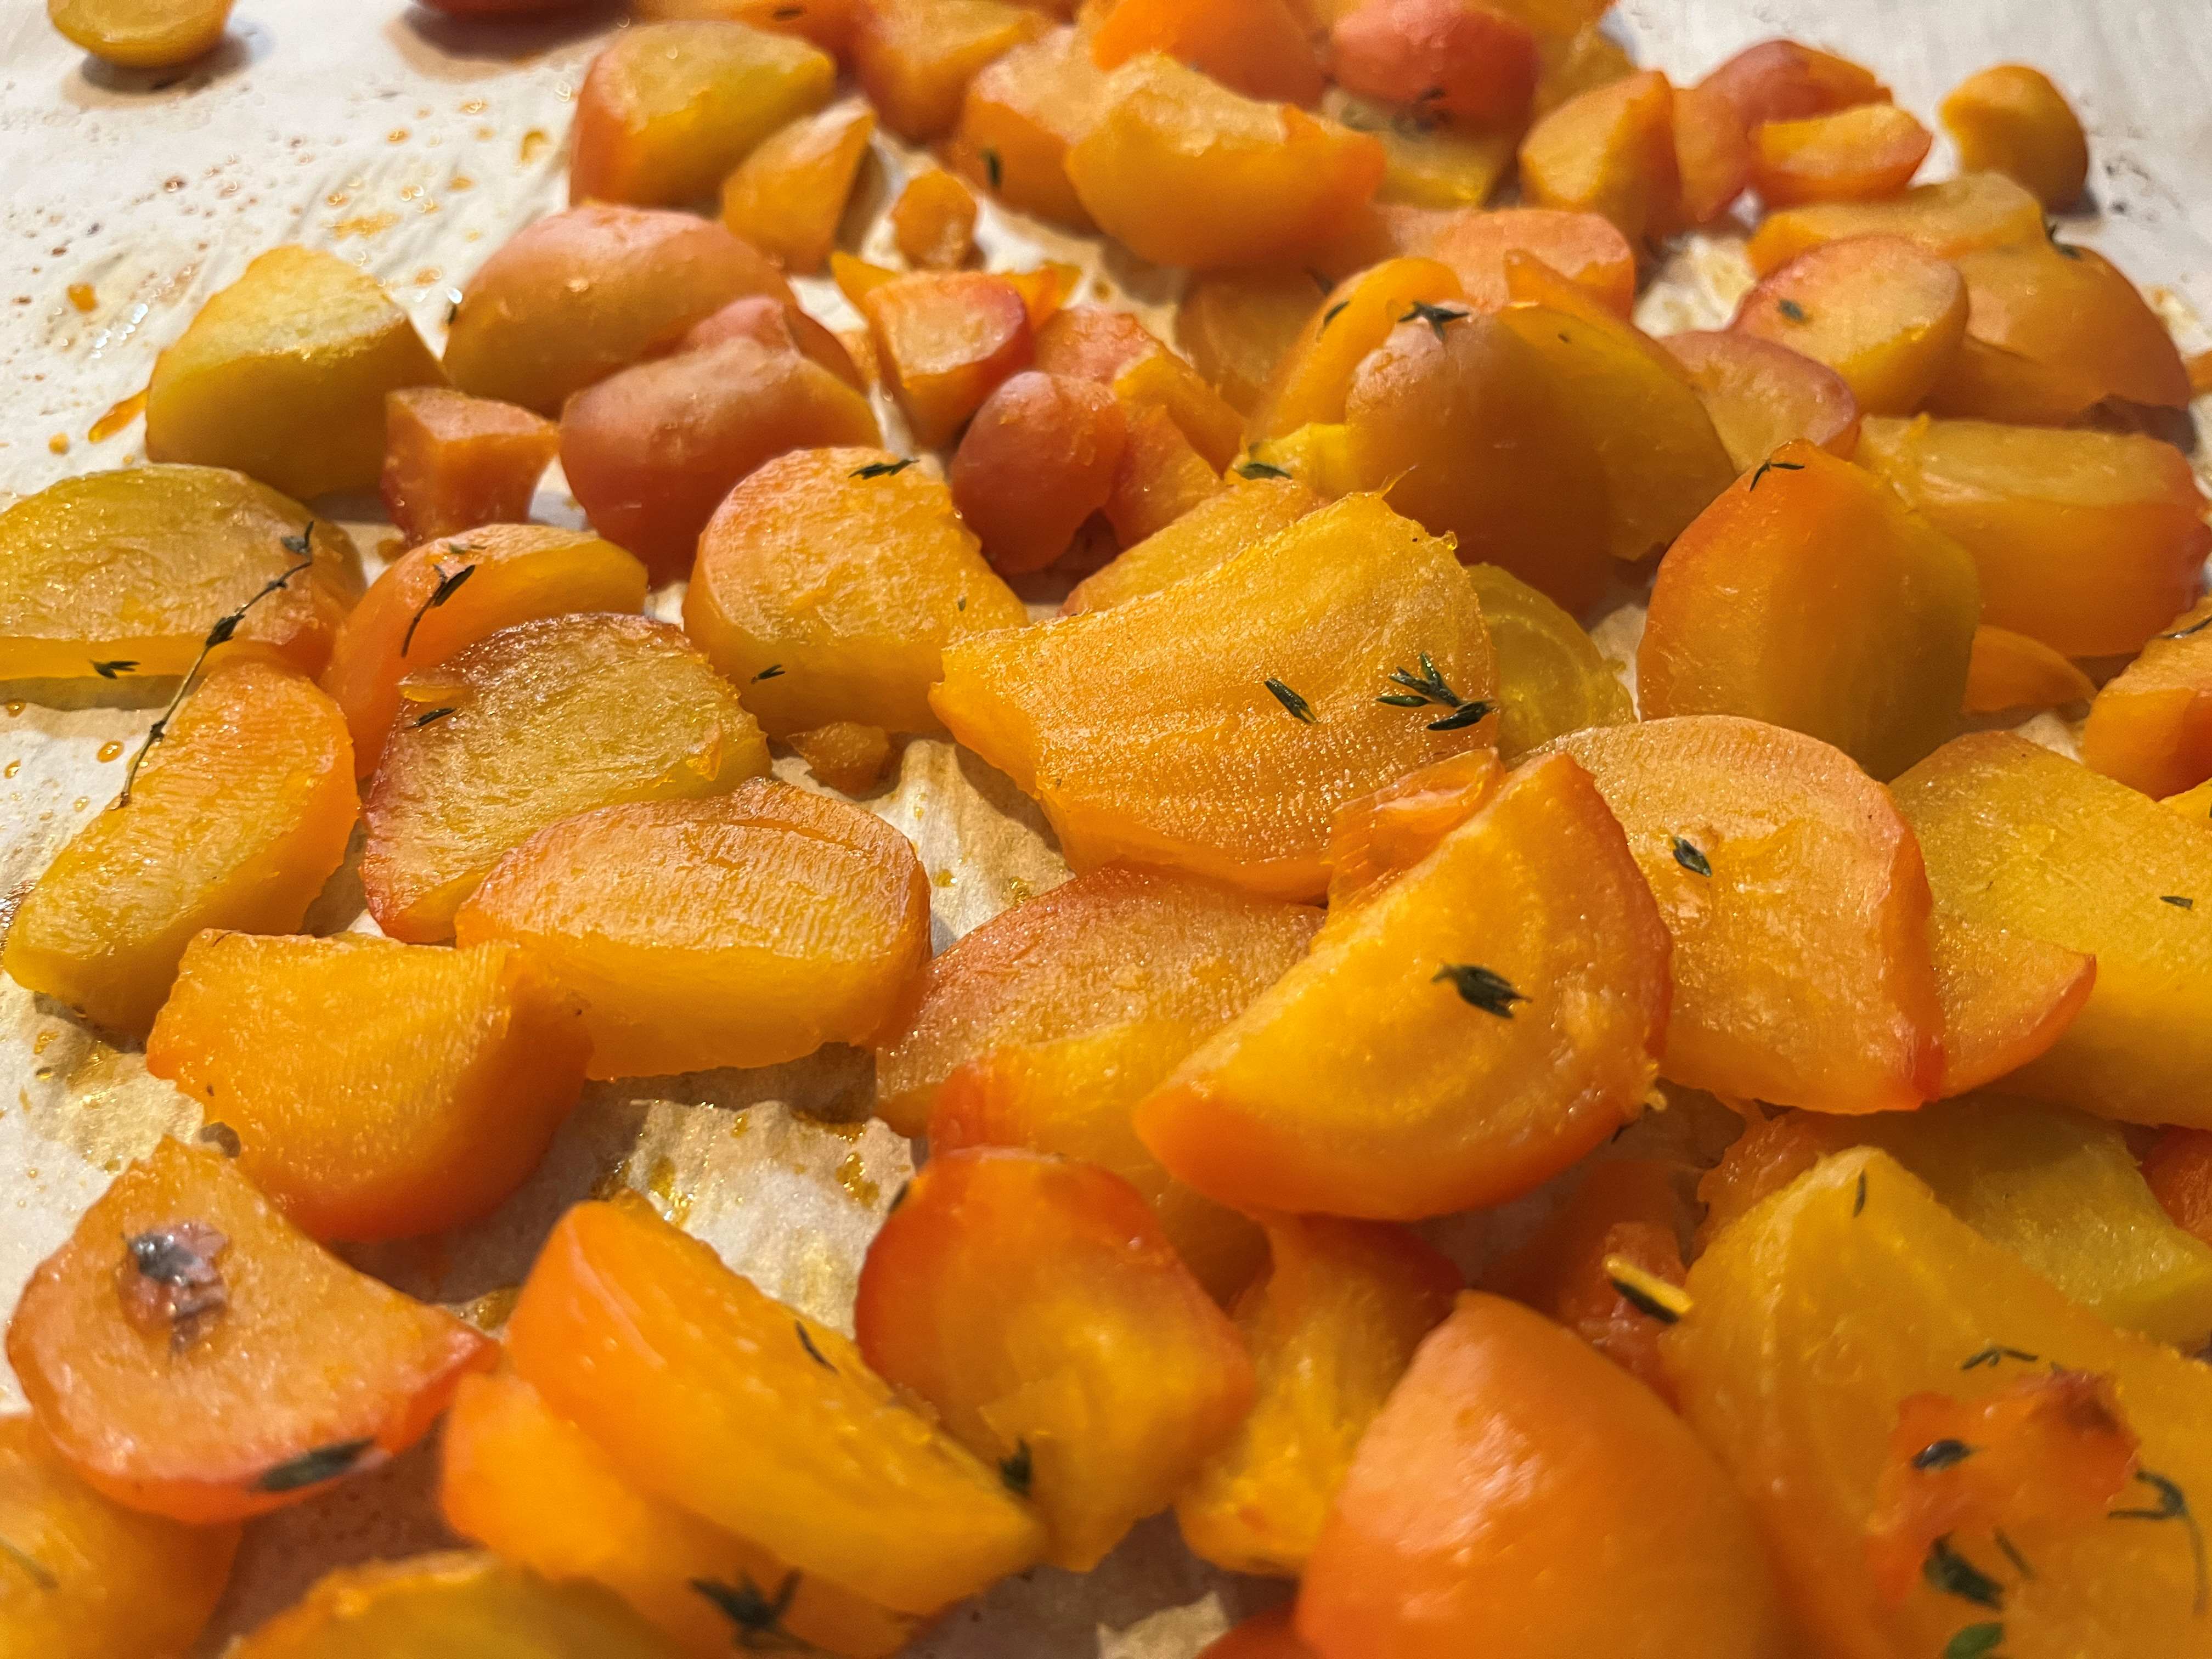
Golden beets have become a staple in my garden. Besides roasting them, the top/greens are also delicious. They are so sweet and roasting them with honey and lemon juice adds a new twist. Leftovers can be used in salad or on their own.
Roasted Golden Beets with Honey
INGREDIENTS:
3 cups roasted golden beets
avocado or canola oil for roasting
1/2 tsp fresh thyme
2 tsp fresh lemon juice
drizzle with honey
salt and pepper
DIRECTIONS:
Preheat oven to 400 degrees Fahrenheit.
Clean the beets and remove the tops and stems. Place the raw, cleaned beats in a large square of aluminum foil. Sprinkle with salt. Close the foil to seal the beets.
Roast for 35-40 minutes or until beets are tender. Remove from oven and cool.
When cool, the skins of the beets should come off easily.
Slice the beets and place in a bowl. Add thyme, lemon juice, salt and pepper. Drizzle with honey. Stir to combine.
Place beets on baking sheet lined with parchment paper. Roast for another 10-15 minutes to carmelize.
This recipe was created by Cathy after looking at numerous recipes and methods.
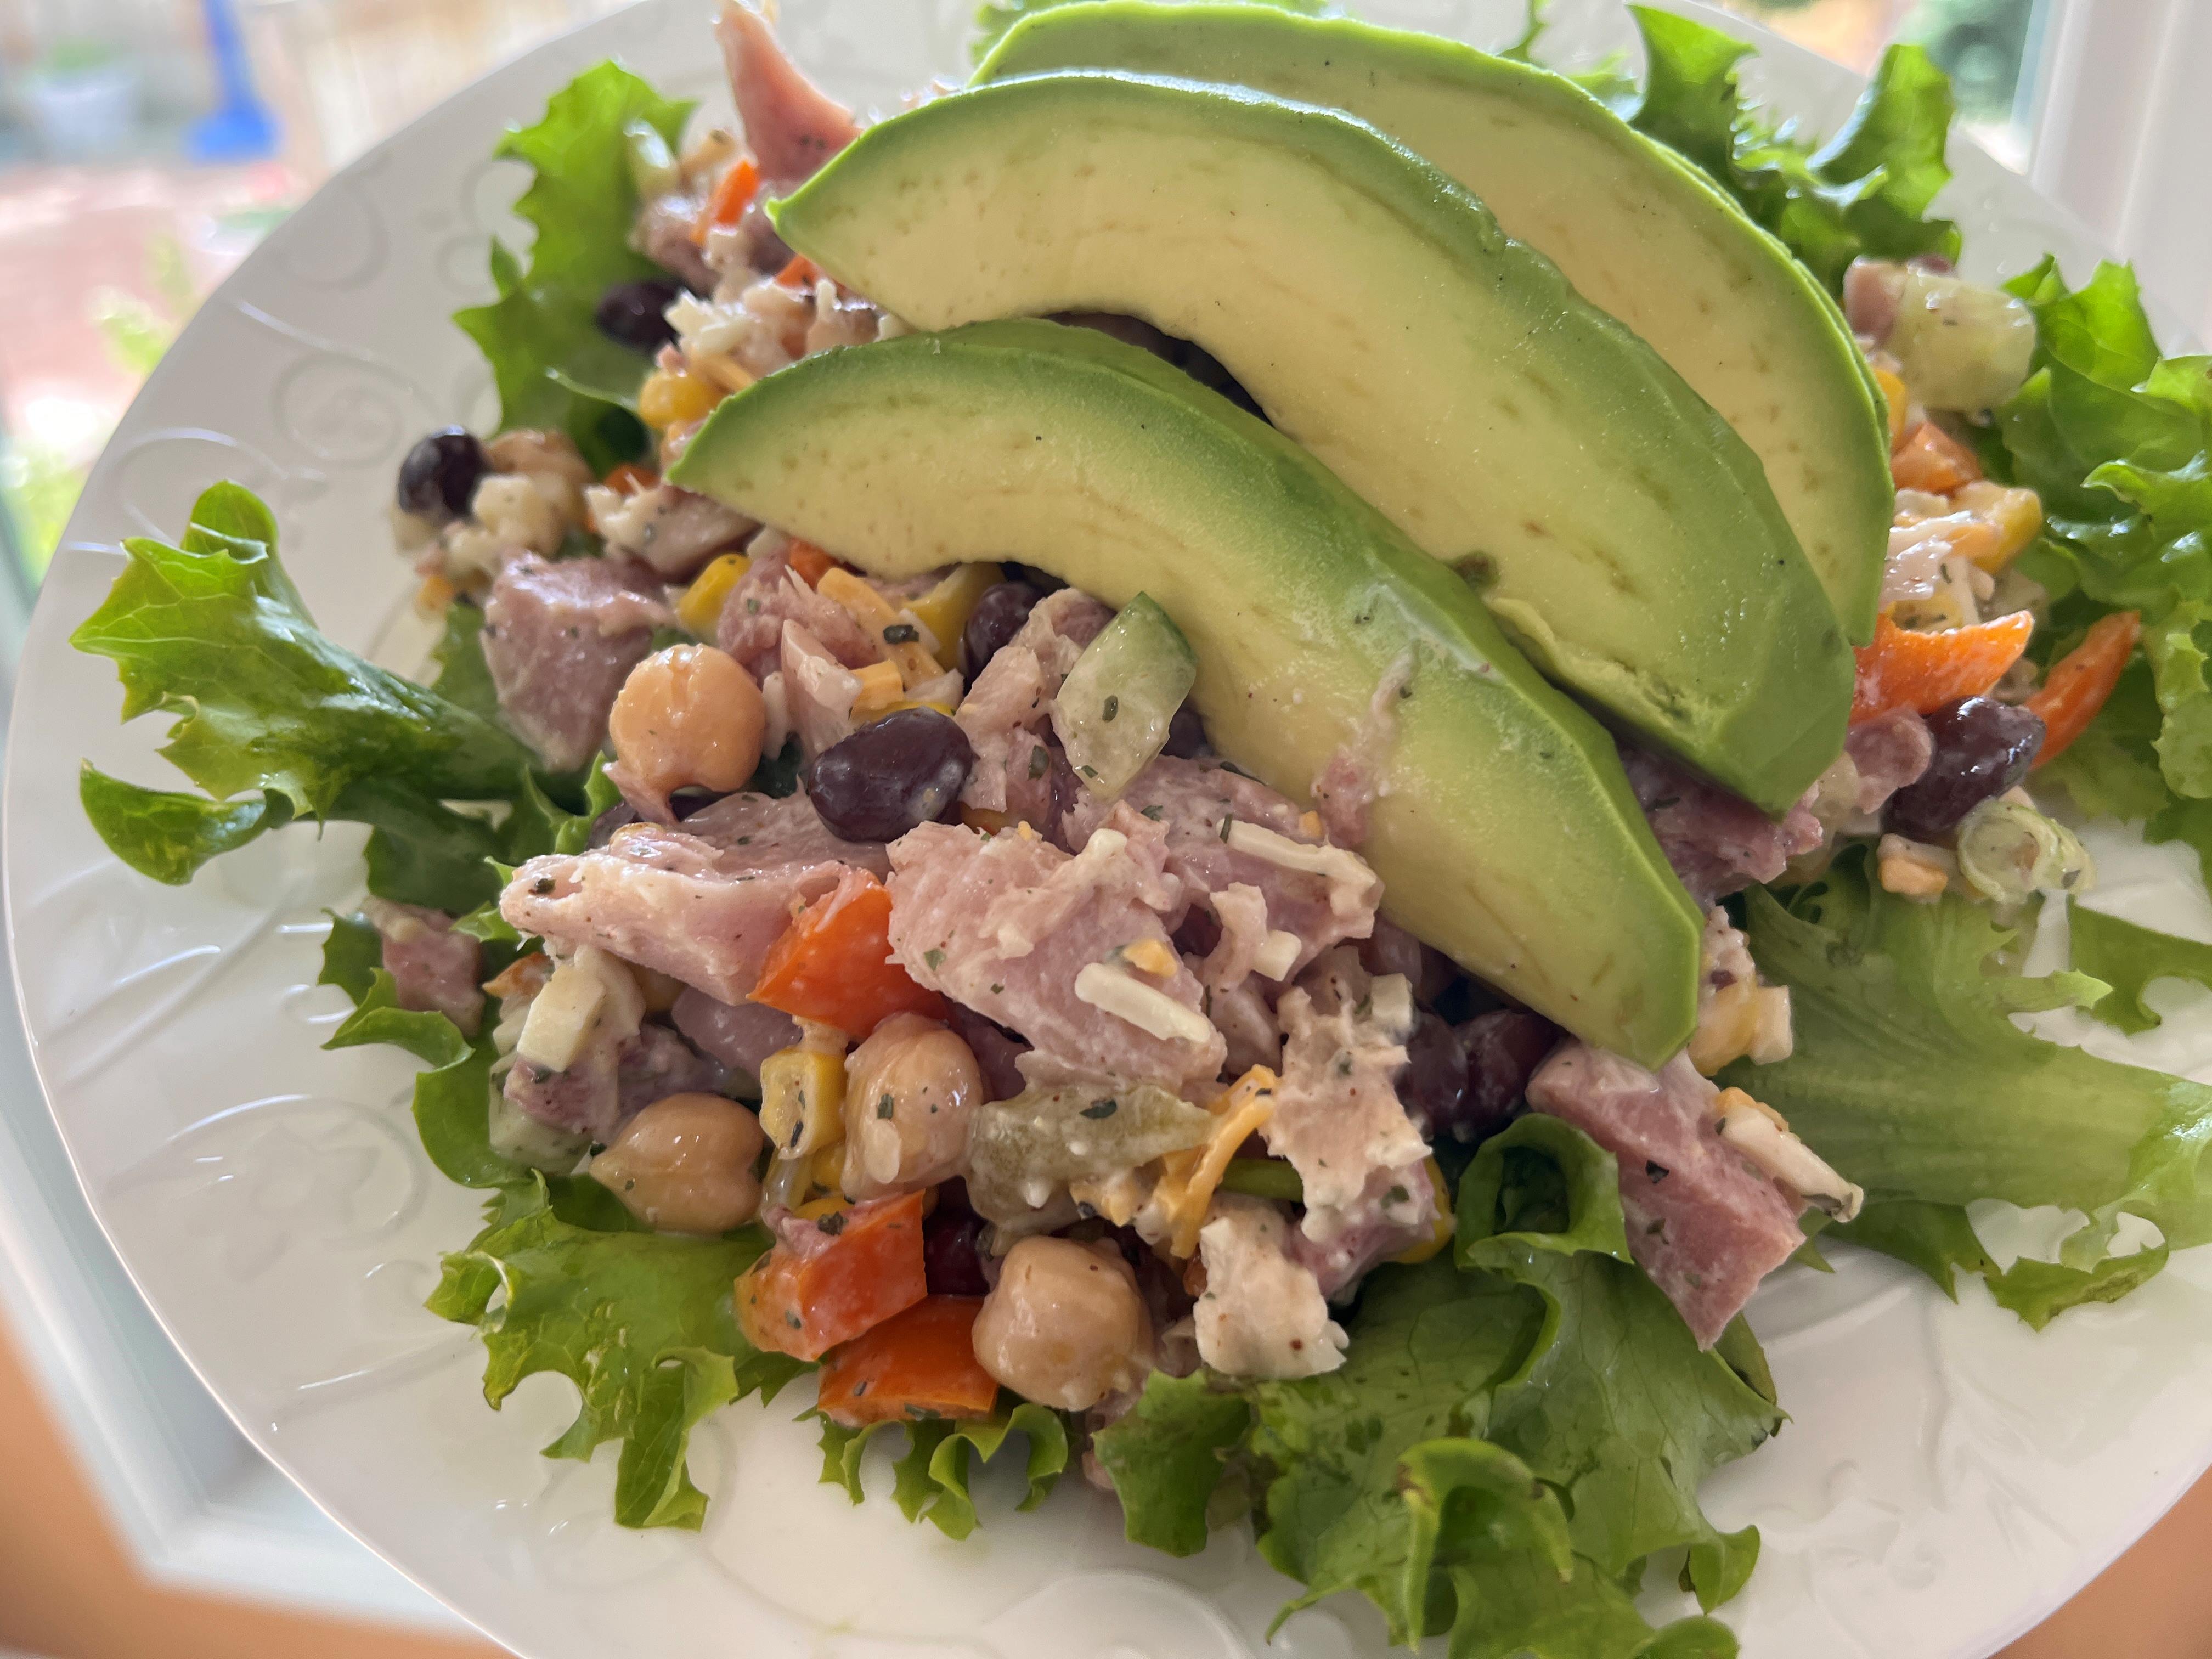
Summer Salads are a favorite and this salad is full of protein and healthy vegetables. It is delicious for make-ahead meals. Another rotation in the summer salad schedule!
Southwest Shredded Chicken Salad
INGREDIENTS:
SOUTHWEST CHICKEN SALAD
1-1.5 lbs. chicken tenderloin (I used rotisserie chicken)
¾ cup black beans, rinsed, drained and dried
¾ cup red bell pepper, diced
¾ cup chickpeas, rinsed, drained and dried
¾ cup whole kernel corn, rinsed, drained and dried
¾ cup cucumber, cored and diced
⅓ cup shallots, finely diced
¼ cup jalapeno, finely diced (optional)
¼ cup cilantro, chopped small
¼ cup shredded cheddar cheese
kosher salt, to taste
cracked black pepper, to taste
CHILI LIME YOGURT DRESSING
½ cup 0% Greek yogurt
2 tablespoons lime juice, fresh squeezed
2 tablespoons diced green chilis, mild, canned works best
½ teaspoon cumin
½ teaspoon chili powder
½ teaspoon garlic powder
¼ teaspoon kosher salt
2 tablespoons warm water, add more or less based on your preferred thickness
OPTIONAL GARNISHES
2 tablespoons green onion, chopped small
½ avocado, thinly sliced
1 lime,cut into wedges
tortilla chips
DIRECTIONS:
Boil a pot of water and add the chicken tenderloin. Cook for 15-18 minutes or until the internal temperature reaches 165 degrees. Drain off the water and allow the chicken to cool. Then shred the chicken using two forks. (I used a cooked rotisserie chicken).
Next, grab a small mixing bowl and combine the 0% Greek yogurt, fresh squeezed lime juice, mild canned diced green chilis (with the juice), garlic powder, cumin, chili powder, kosher salt and warm water. Whisk well and set aside. For a thicker dressing add less water, for a thinner dressing add more water. You can adjust based on your preference.
Then, prep all the veggies and herbs. You’ll need, drained and rinsed black beans, drained and rinsed chickpeas, drained and dried whole kernel corn, diced cucumber (be sure to remove the core), diced red bell pepper, finely diced shallots, finely diced jalapeno (remove the veins and seeds).
Add the shredded chicken, vegetables, shredded cheese and herbs to a large mixing bowl. Season with kosher salt and cracked black pepper. Taste and adjust accordingly. Then, pour as much or as little chili lime yogurt dressing as you desire. I used about half. Toss until everything is well coated.
Extra dressing can be stored covered in the refrigerator for three to four days. Garnish with chopped green onions and sliced avocado. Serve with tortilla chips and lime wedges.
This salad! Wow! I made it expecting it to be good but it was amazing! I shared the salad with my two daughters, who agree this is a winner. The dressing is amazing and I will have on hand most of the summer for other salads as well. For leftovers, perhaps omit the avocado and serve it fresh with the salad to avoid brown avocado bits the next day. We are planning a family dinner with other Asian dumplings and dishes to serve with this new favorite, refreshing summer salad.
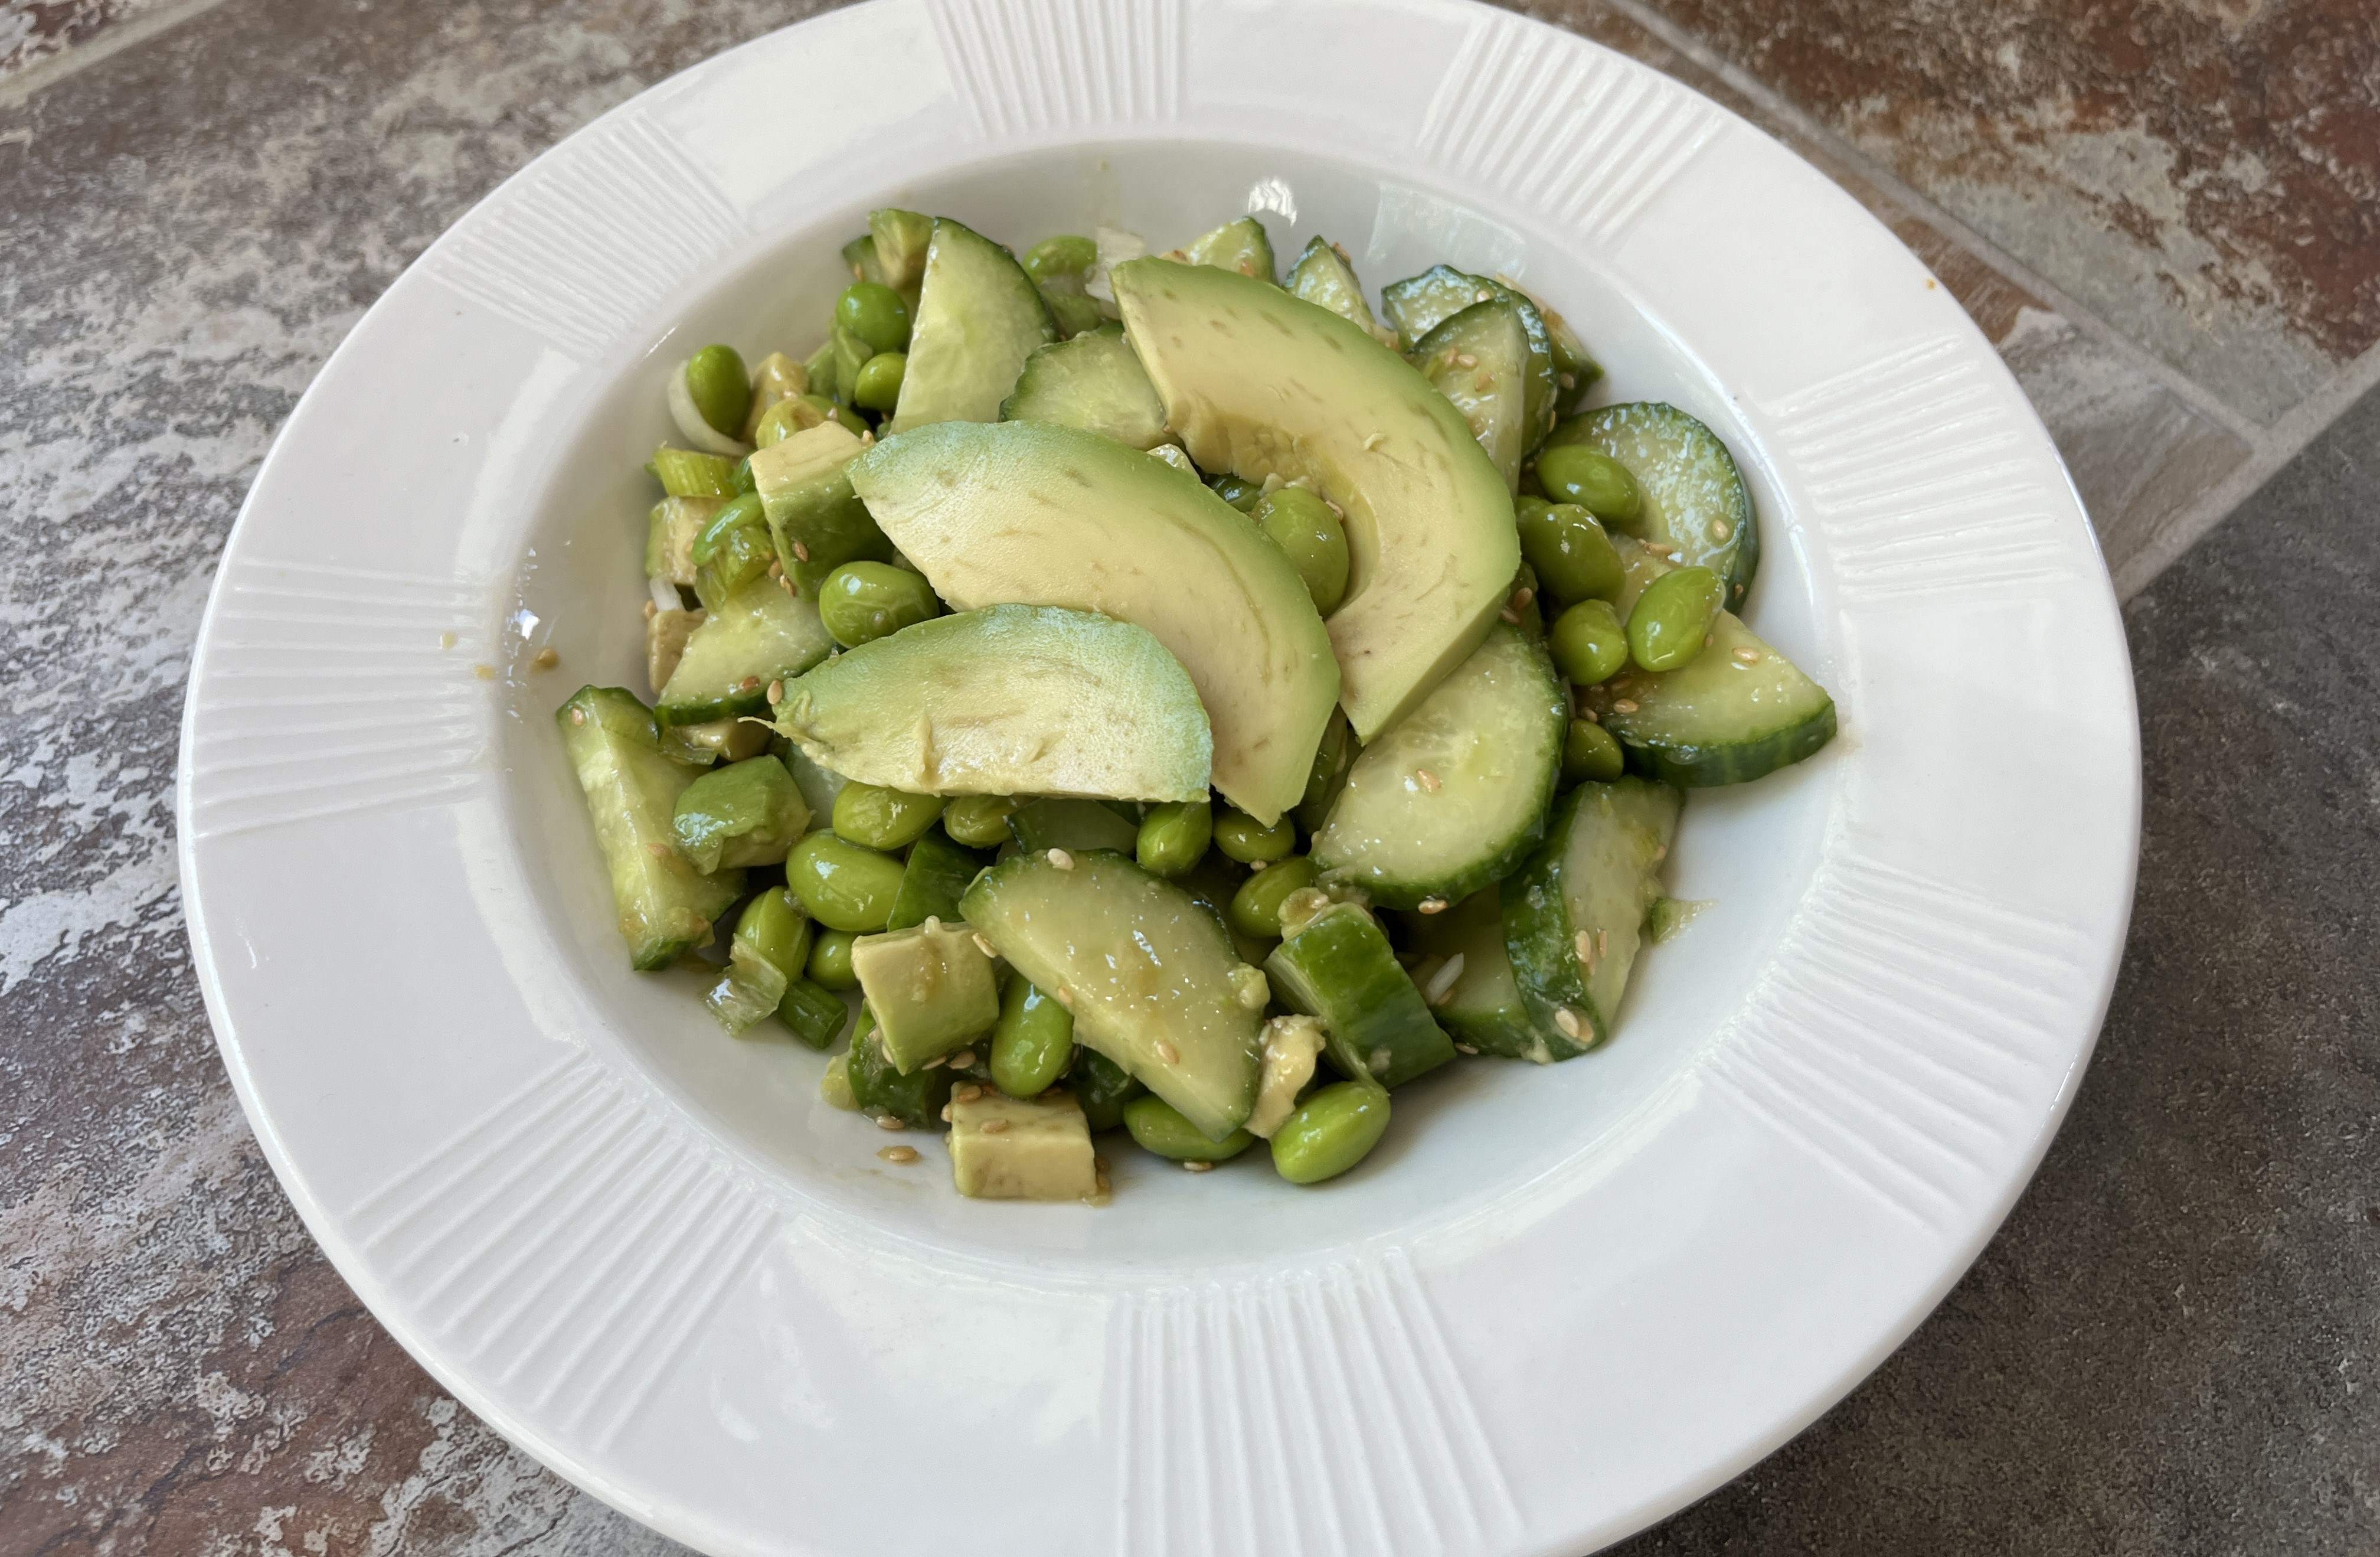
Cucumber Edamame Salad with Sesame-Ginger Dressing
INGREDIENTS:
Sesame-Ginger Dressing
3 Tbsp. avocado oil (or grapeseed oil)
3 Tbsp. rice vinegar
2 Tbsp. toasted sesame oil
2 tsp. lower-sodium tamari or soy sauce
1 1/2 tsp. freshly grated ginger
1 garlic clove, grated or minced
Cucumber Edamame Salad
1 lb. English or Persian cucumbers, thinly sliced
1 cup shelled edamame
1 large avocado, cut into cubes
1/2 cup thinly sliced green onion
2 Tbsp. toasted sesame seeds
A pinch of Aleppo pepper flakes (optional)
DIRECTIONS:
Prepare Sesame-Ginger Dressing by combining all dressing ingredients in mixing bowl or large glass measuring cup; whisk well to combine.
In a large bowl, combine cucumber, edamame, avocado, green onion, and sesame seeds. Season ingredients with a pinch of sea salt.
Add dressing and a pinch of Aleppo pepper flakes; toss to coat. Serve immediately, or refrigerate in an airtight container for up to 3 days.
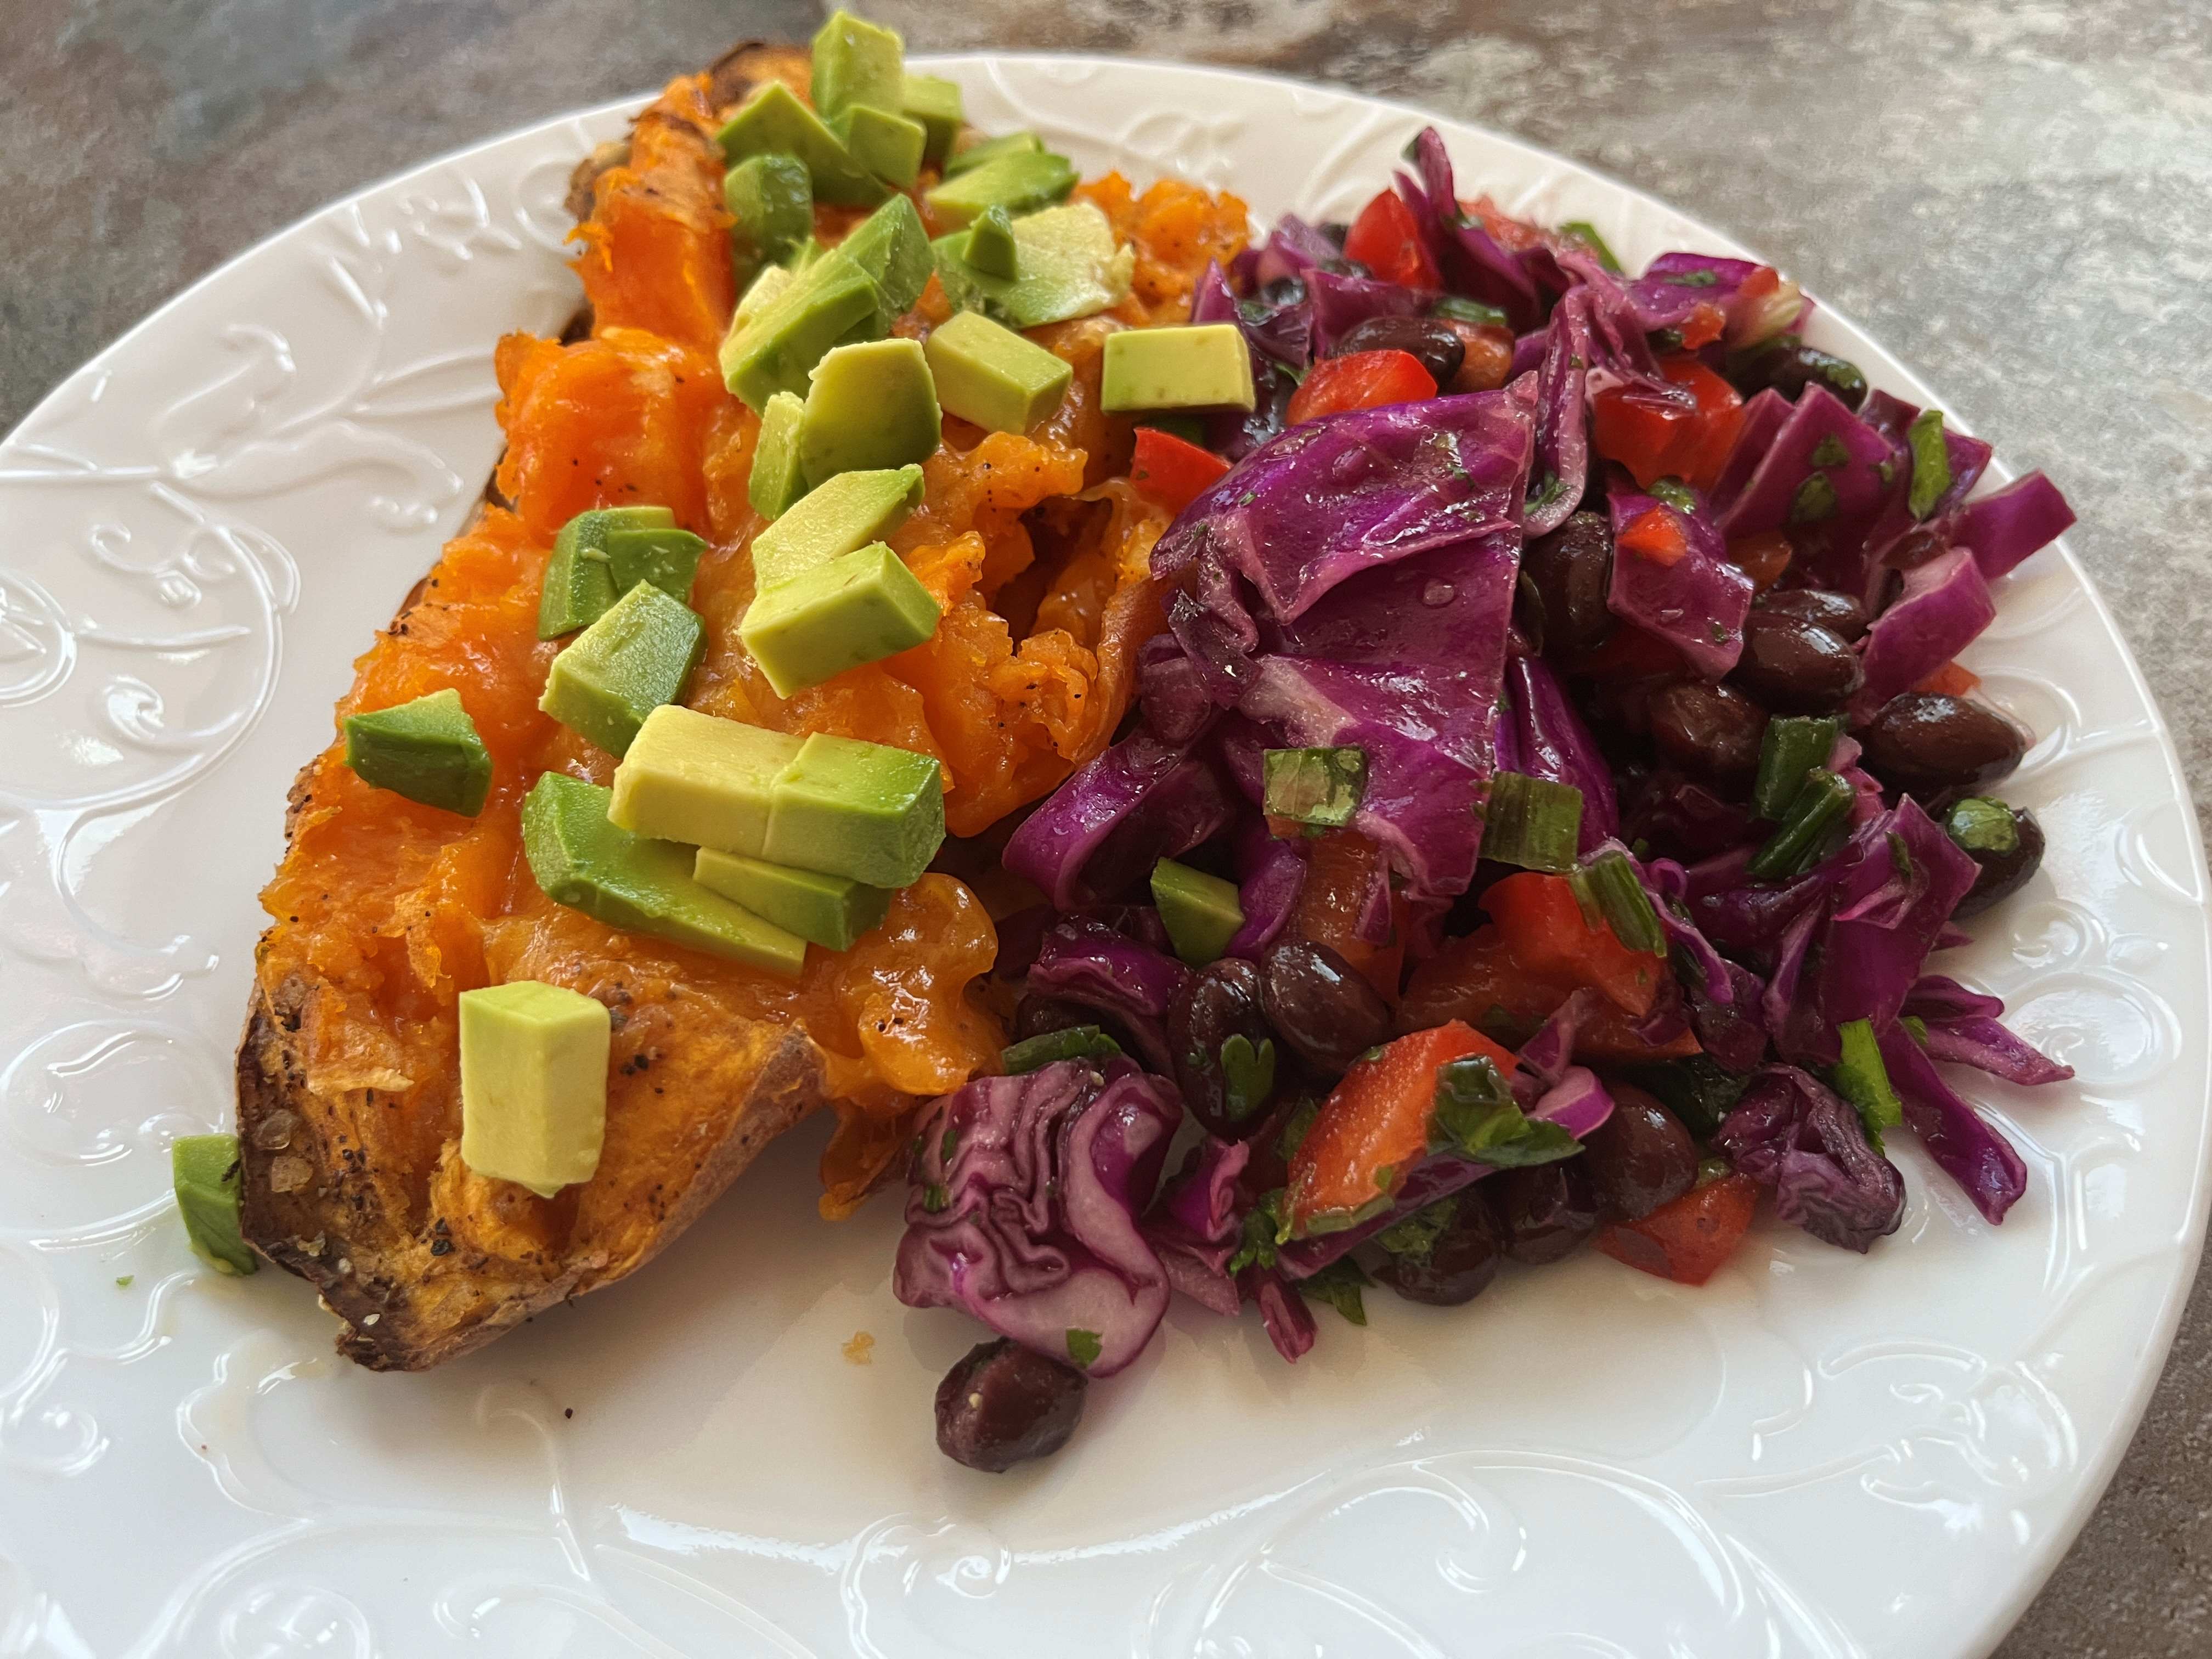
Veggie Sweet Potato Boats are delicious, healthy and makes for delicious leftovers. As I get older, I tend to enjoy vegetable dishes more and more. The cabbage slaw as delicious by itself and, as suggested, would be great served on tacos.
Veggie Sweet Potato Boats
INGREDIENTS:
2 medium sweet potatoes, cut in half
1 tbsp. extra virgin olive oil
1/2 tsp. chili powder
1/2 tsp. cumin
1/2 tsp. kosher salt
freshly ground black pepper
1 cup shredded Monterey jack, pepper jack, or cheddar cheese
Salad:
1/4 head red cabbage cored and thinly sliced
1 red pepper, diced
15 oz. can black beans, drained and rinsed
1/3 cup chopped, fresh cilantro
3 scallions, thinly sliced (white and green parts)
Dressing:
zest and juice of one lime and wedges for individual servings
1 tbsp. extra virgin olive oil
1/2 tsp. kosher salt
black pepper
1 avocado, diced
Toasted pepitas and hot sauce, for serving (optional)
DIRECTIONS:
Heat oven to 425 degrees.
Whisk 1 tbsp. oil with the chili powder, cumin, salt and black pepper. Brush over the sweet potatoes. Place sweet potatoes cut side down on baking sheet and roast until tender, about 25-30 minutes.
Meanwhile, make the slaw: Combine cabbage, red pepper, black beans, cilantro, and scallions in a bowl.
Combine the lime zest and juice, 1 tbsp. olive oil, salt and pepper. Pour over the slaw. Stir to combine. Add more to salt and lime juice as needed.
When sweet potatoes are tender, smash in the individual skins, top with cheese and return to the oven until the cheese is melted.
Top sweet potato half with a generous serving of slaw, chopped avocado, pepitas, and hot sauce.
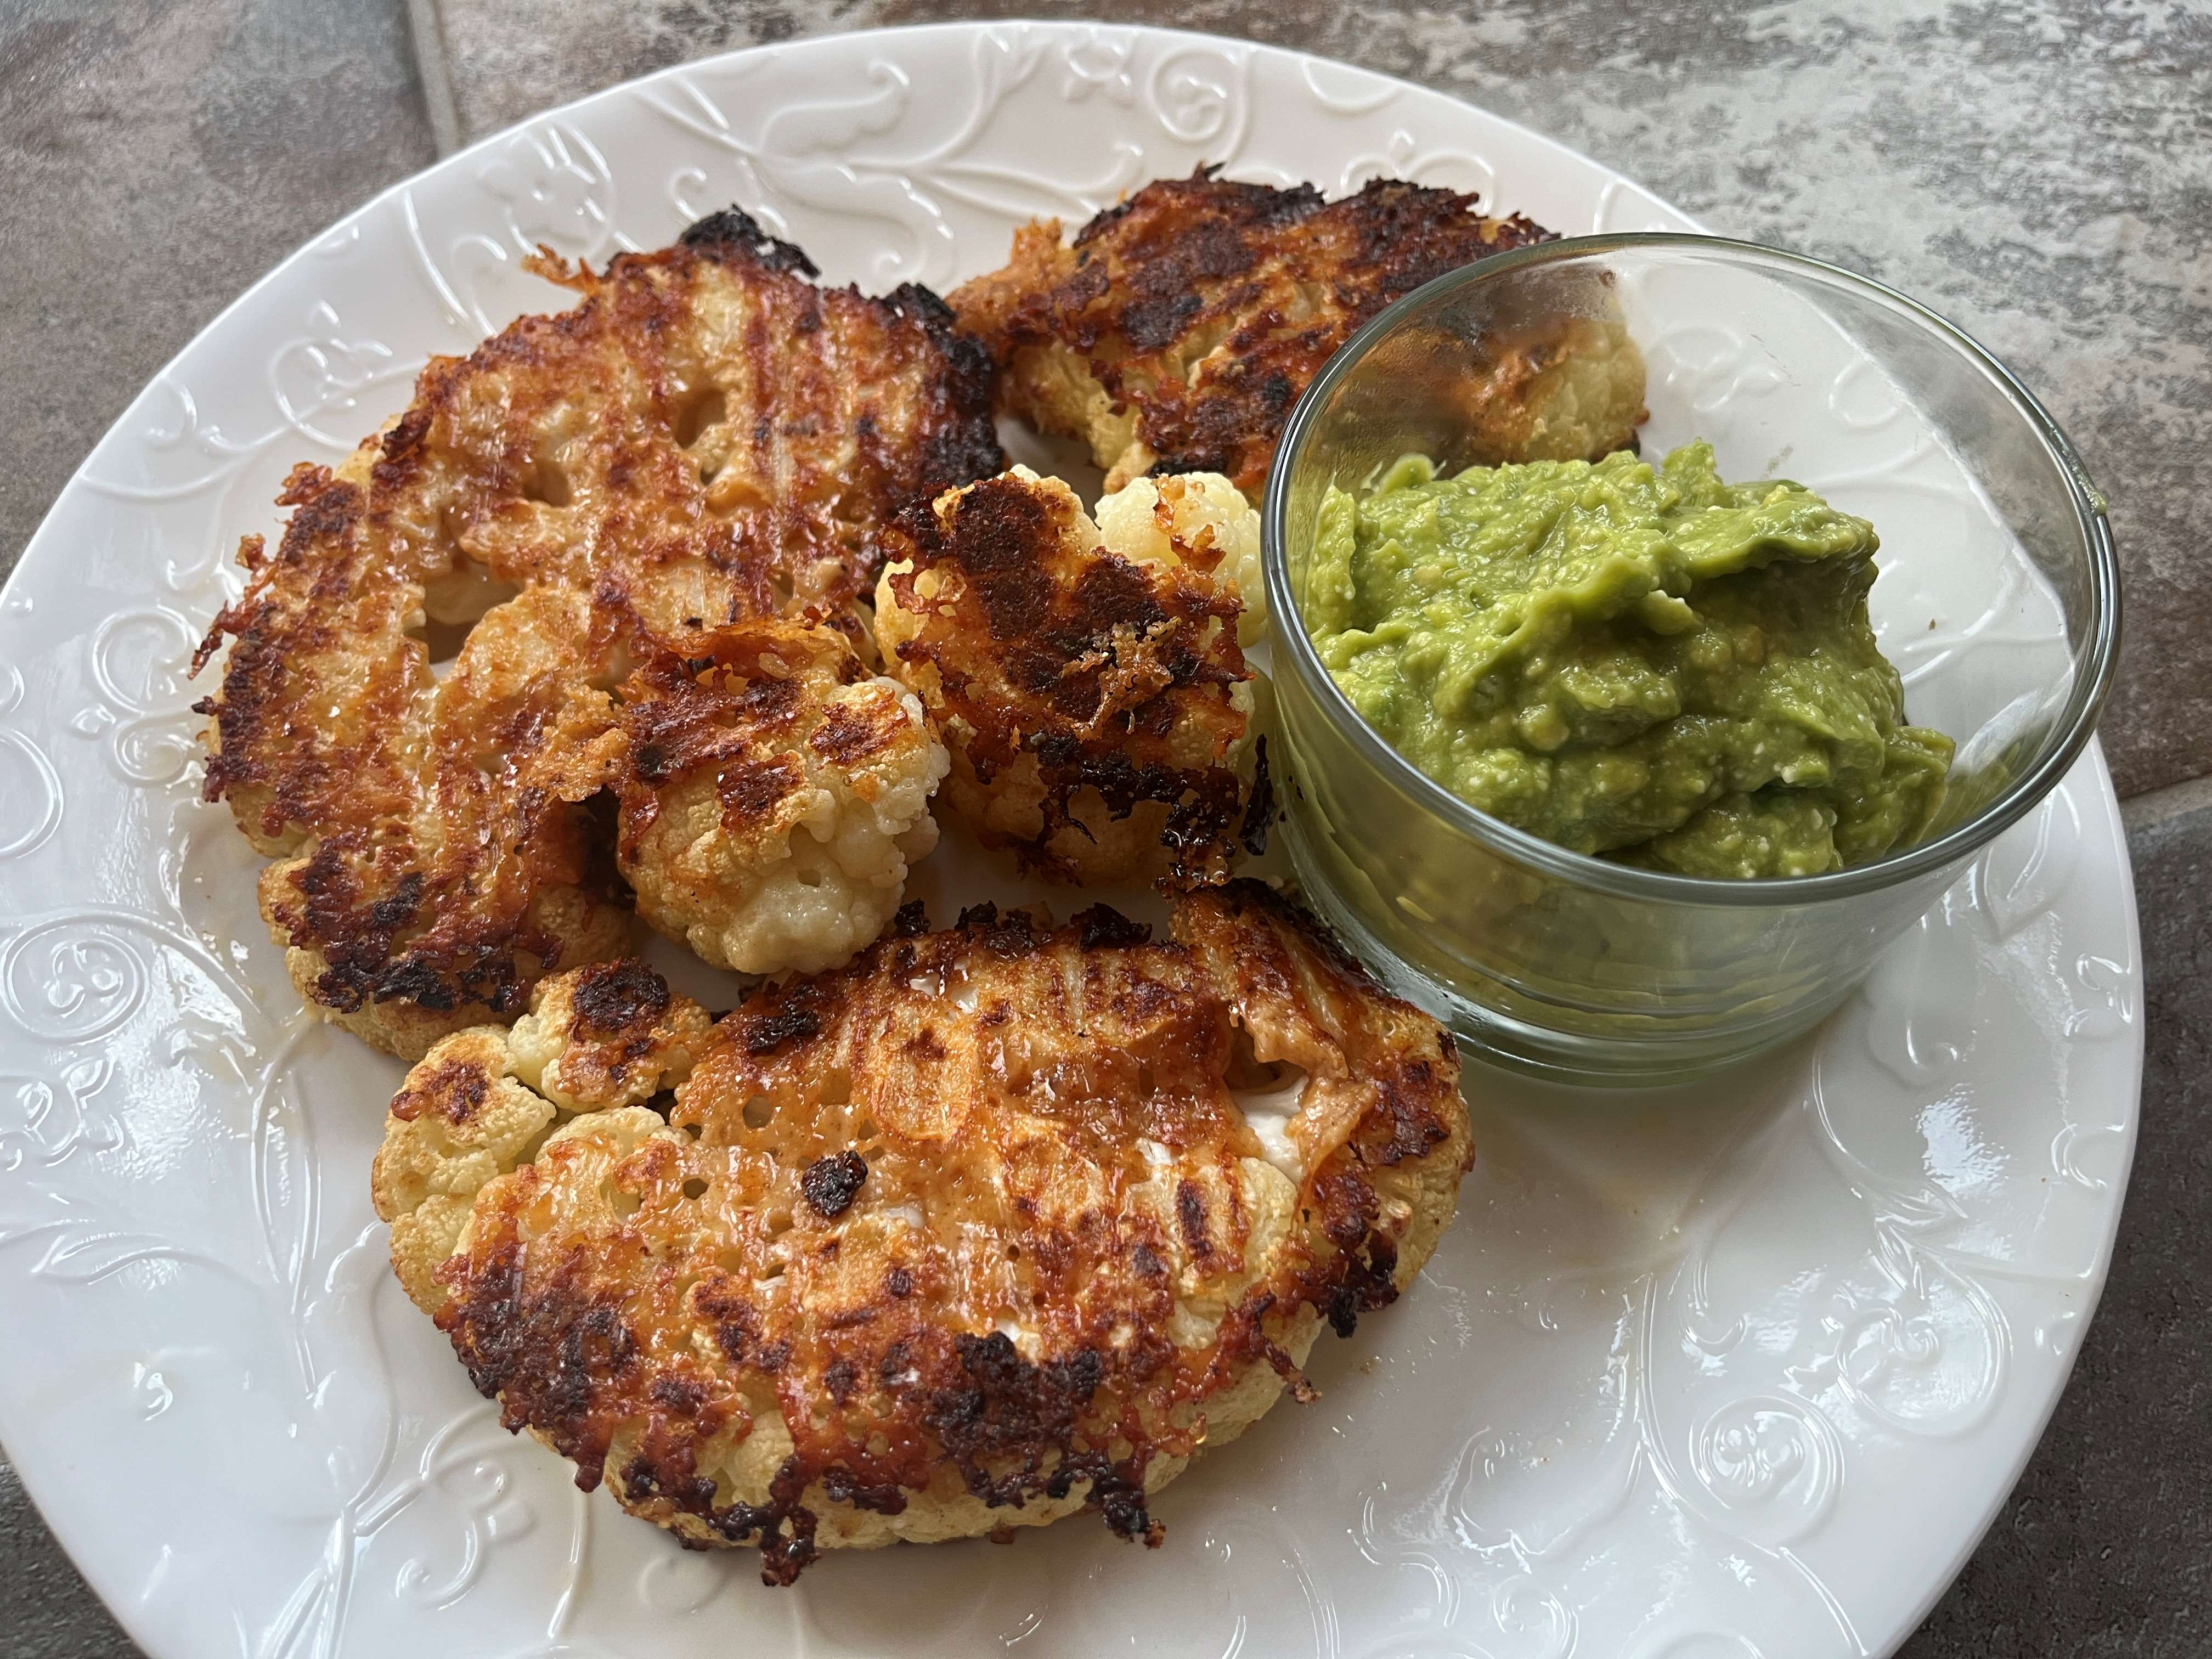
Crispy Parmesan Cauliflower Steaks with the Avocado dip are scrumptious! I am a big fan of roasted vegetables and this recipe takes them to a new level. I made it originally as a side dish but it would be great as an appetizer, cutting the steaks into smaller pieces before serving.
Crispy Parmesan Cauliflower Steaks
INGREDIENTS:
1 cauliflower head
1/4 cup olive oil
2 tbps. grated parmesan
2 cloves garlic
1/2 tsp each paprika, onion powder + salt
1/4 tsp chili pepper flakes
1/2 cup freshly grated parmesan cheese
Optional Garnish: fresh chives, chopped
Avocado dip:
1 avocado, halved
2 scallions, rough chop
1/2 lime, juiced
1 jalapeño, deseeded + rough chop
1 tbps. olive oil
1 tbps. grated parmesan (or nutritional yeast)
1/4 cup parsley
1/3 cup water
salt + pepper to taste
DIRECTIONS:
Preheat your oven to 450°F.
Dry your cauliflower well and slice in half, then slice those in half to create your steaks. Transfer to your baking sheet pan.
In a small bowl, whisk together your olive oil, 2 tbps. grated parmesan, garlic and spices. Brush the steaks with this mixture front, back and sides. Dip ONE SIDE of the steaks into the freshly grated parmesan and place parm side down on the pan.
Bake for 10 minutes at 450° F. then bump down the temperature to 425°F and bake for 20-25 more minutes. Time varies with thickness of steaks. Remove from baking tray and serve crispy side up with some fresh chives on top.
Avocado dip:
Add everything to your mini food processor and blend until smooth. Taste and adjust if needed.
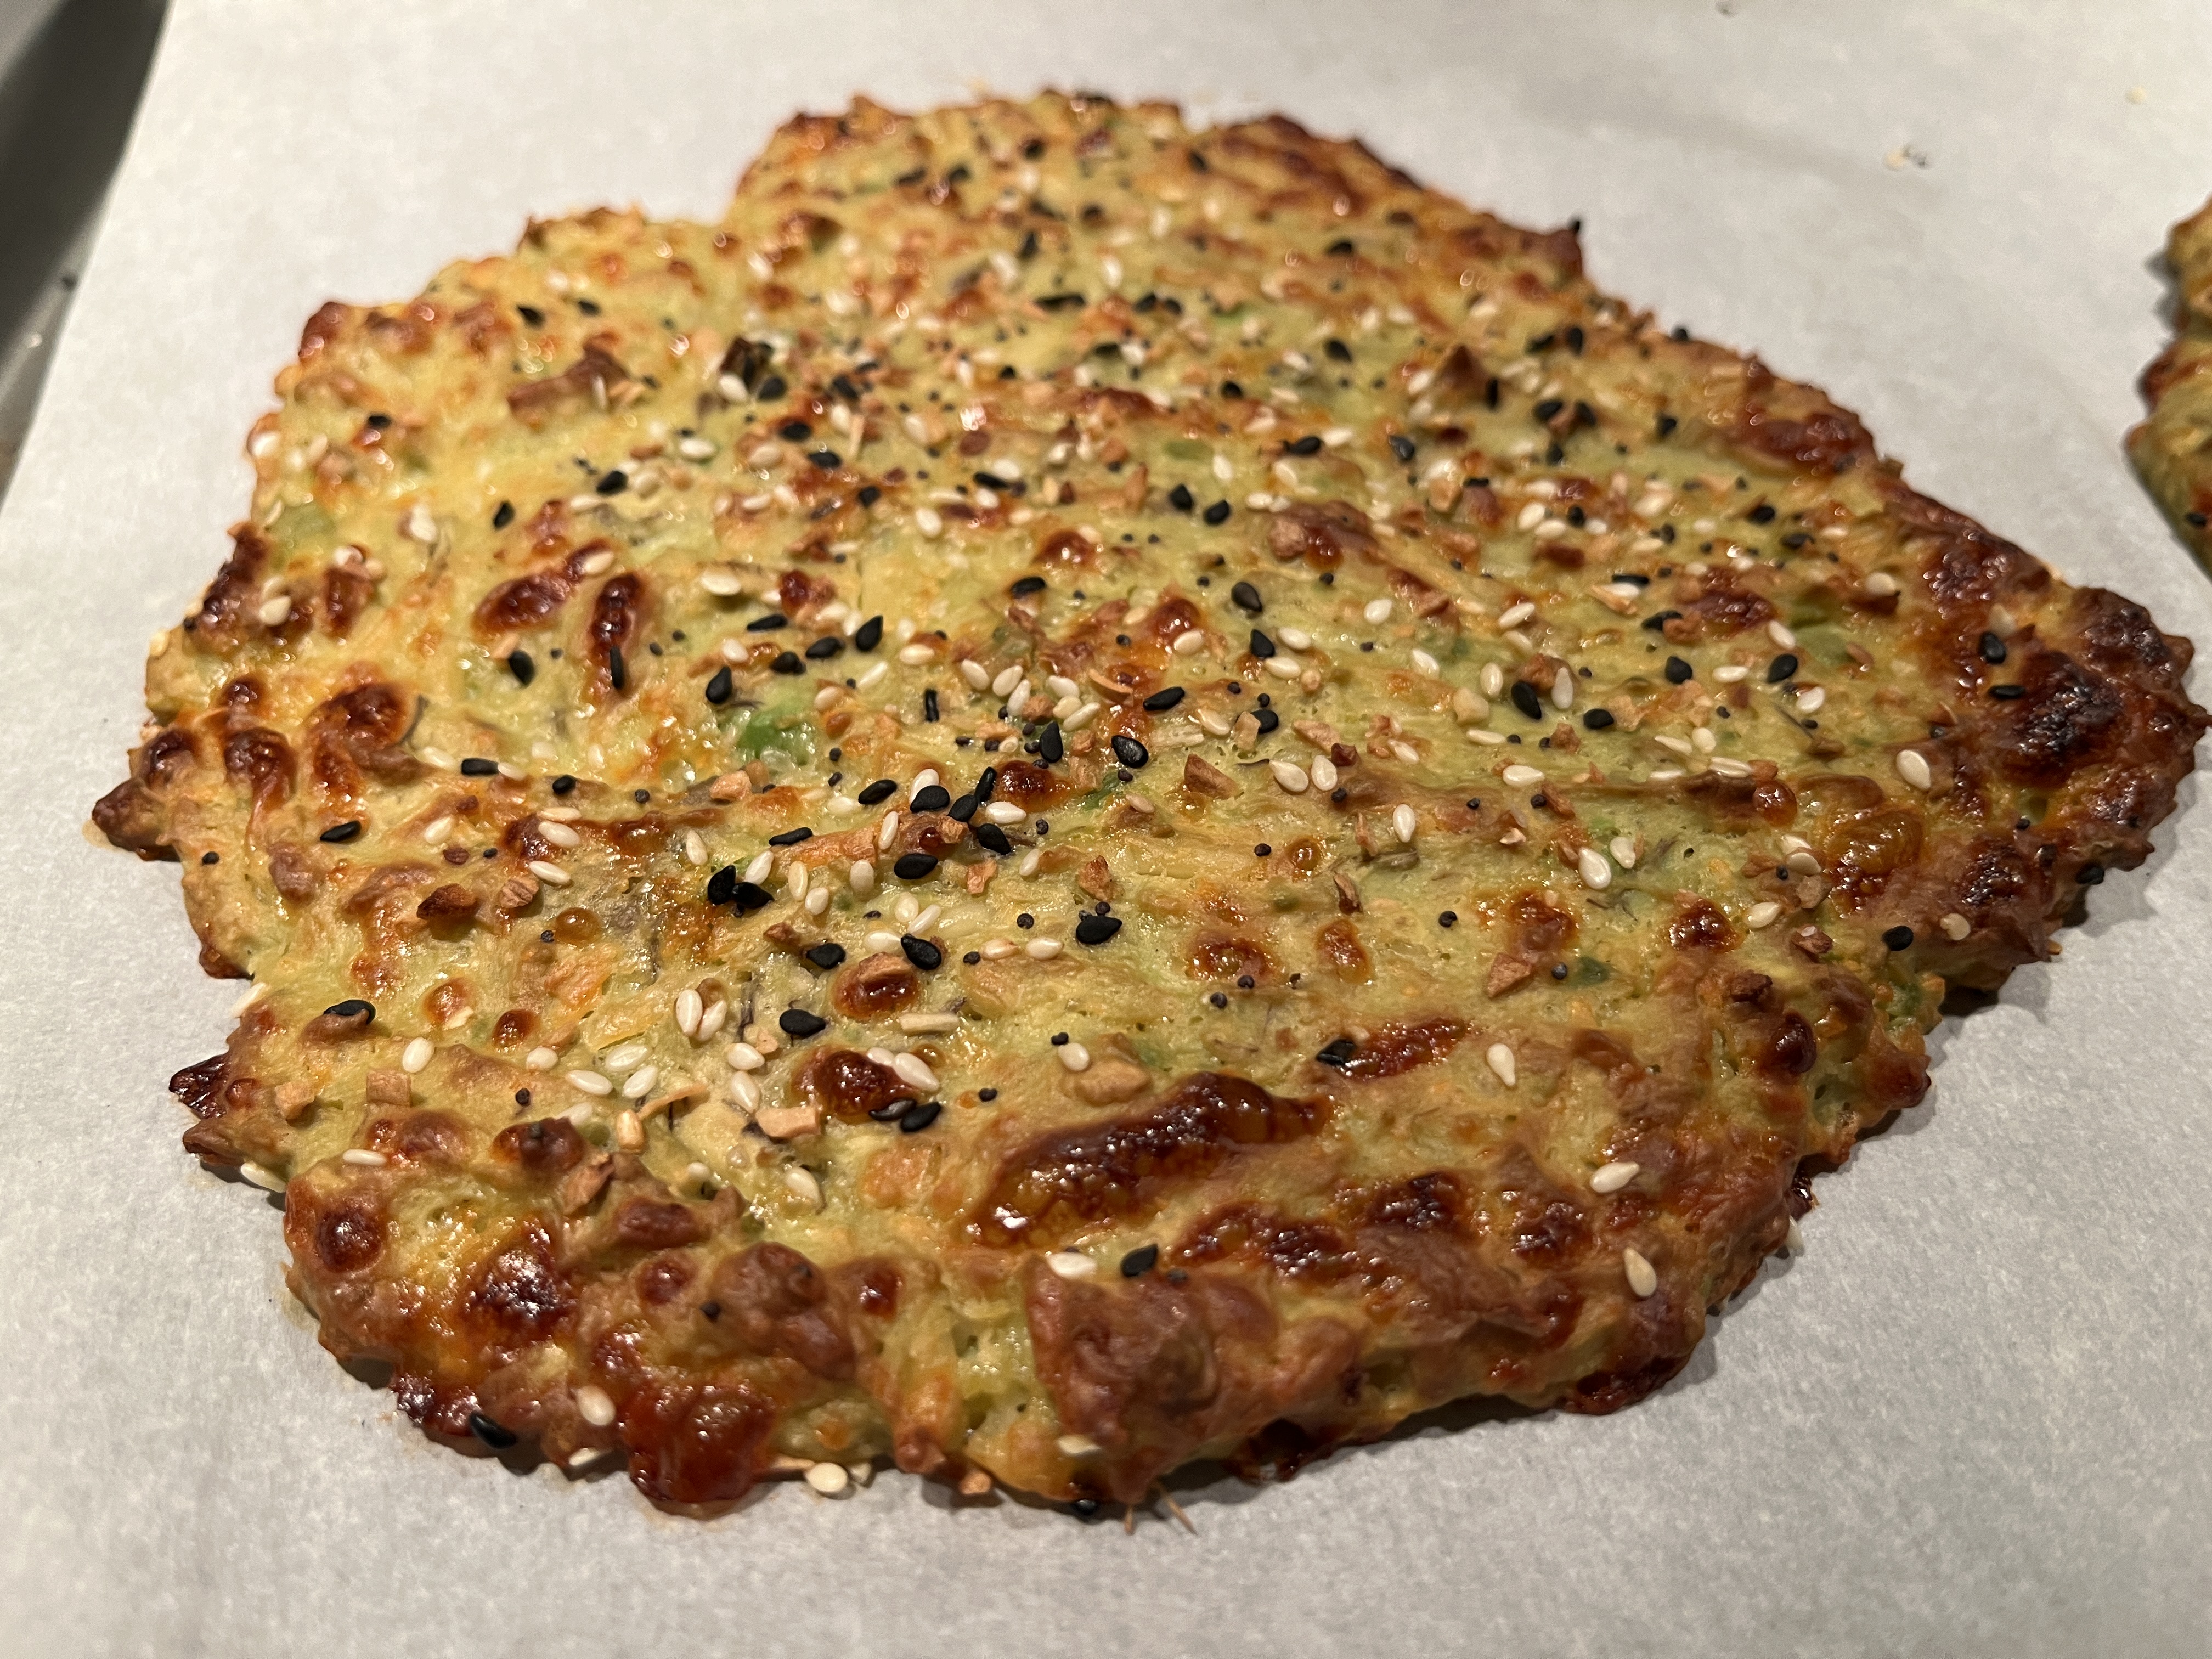
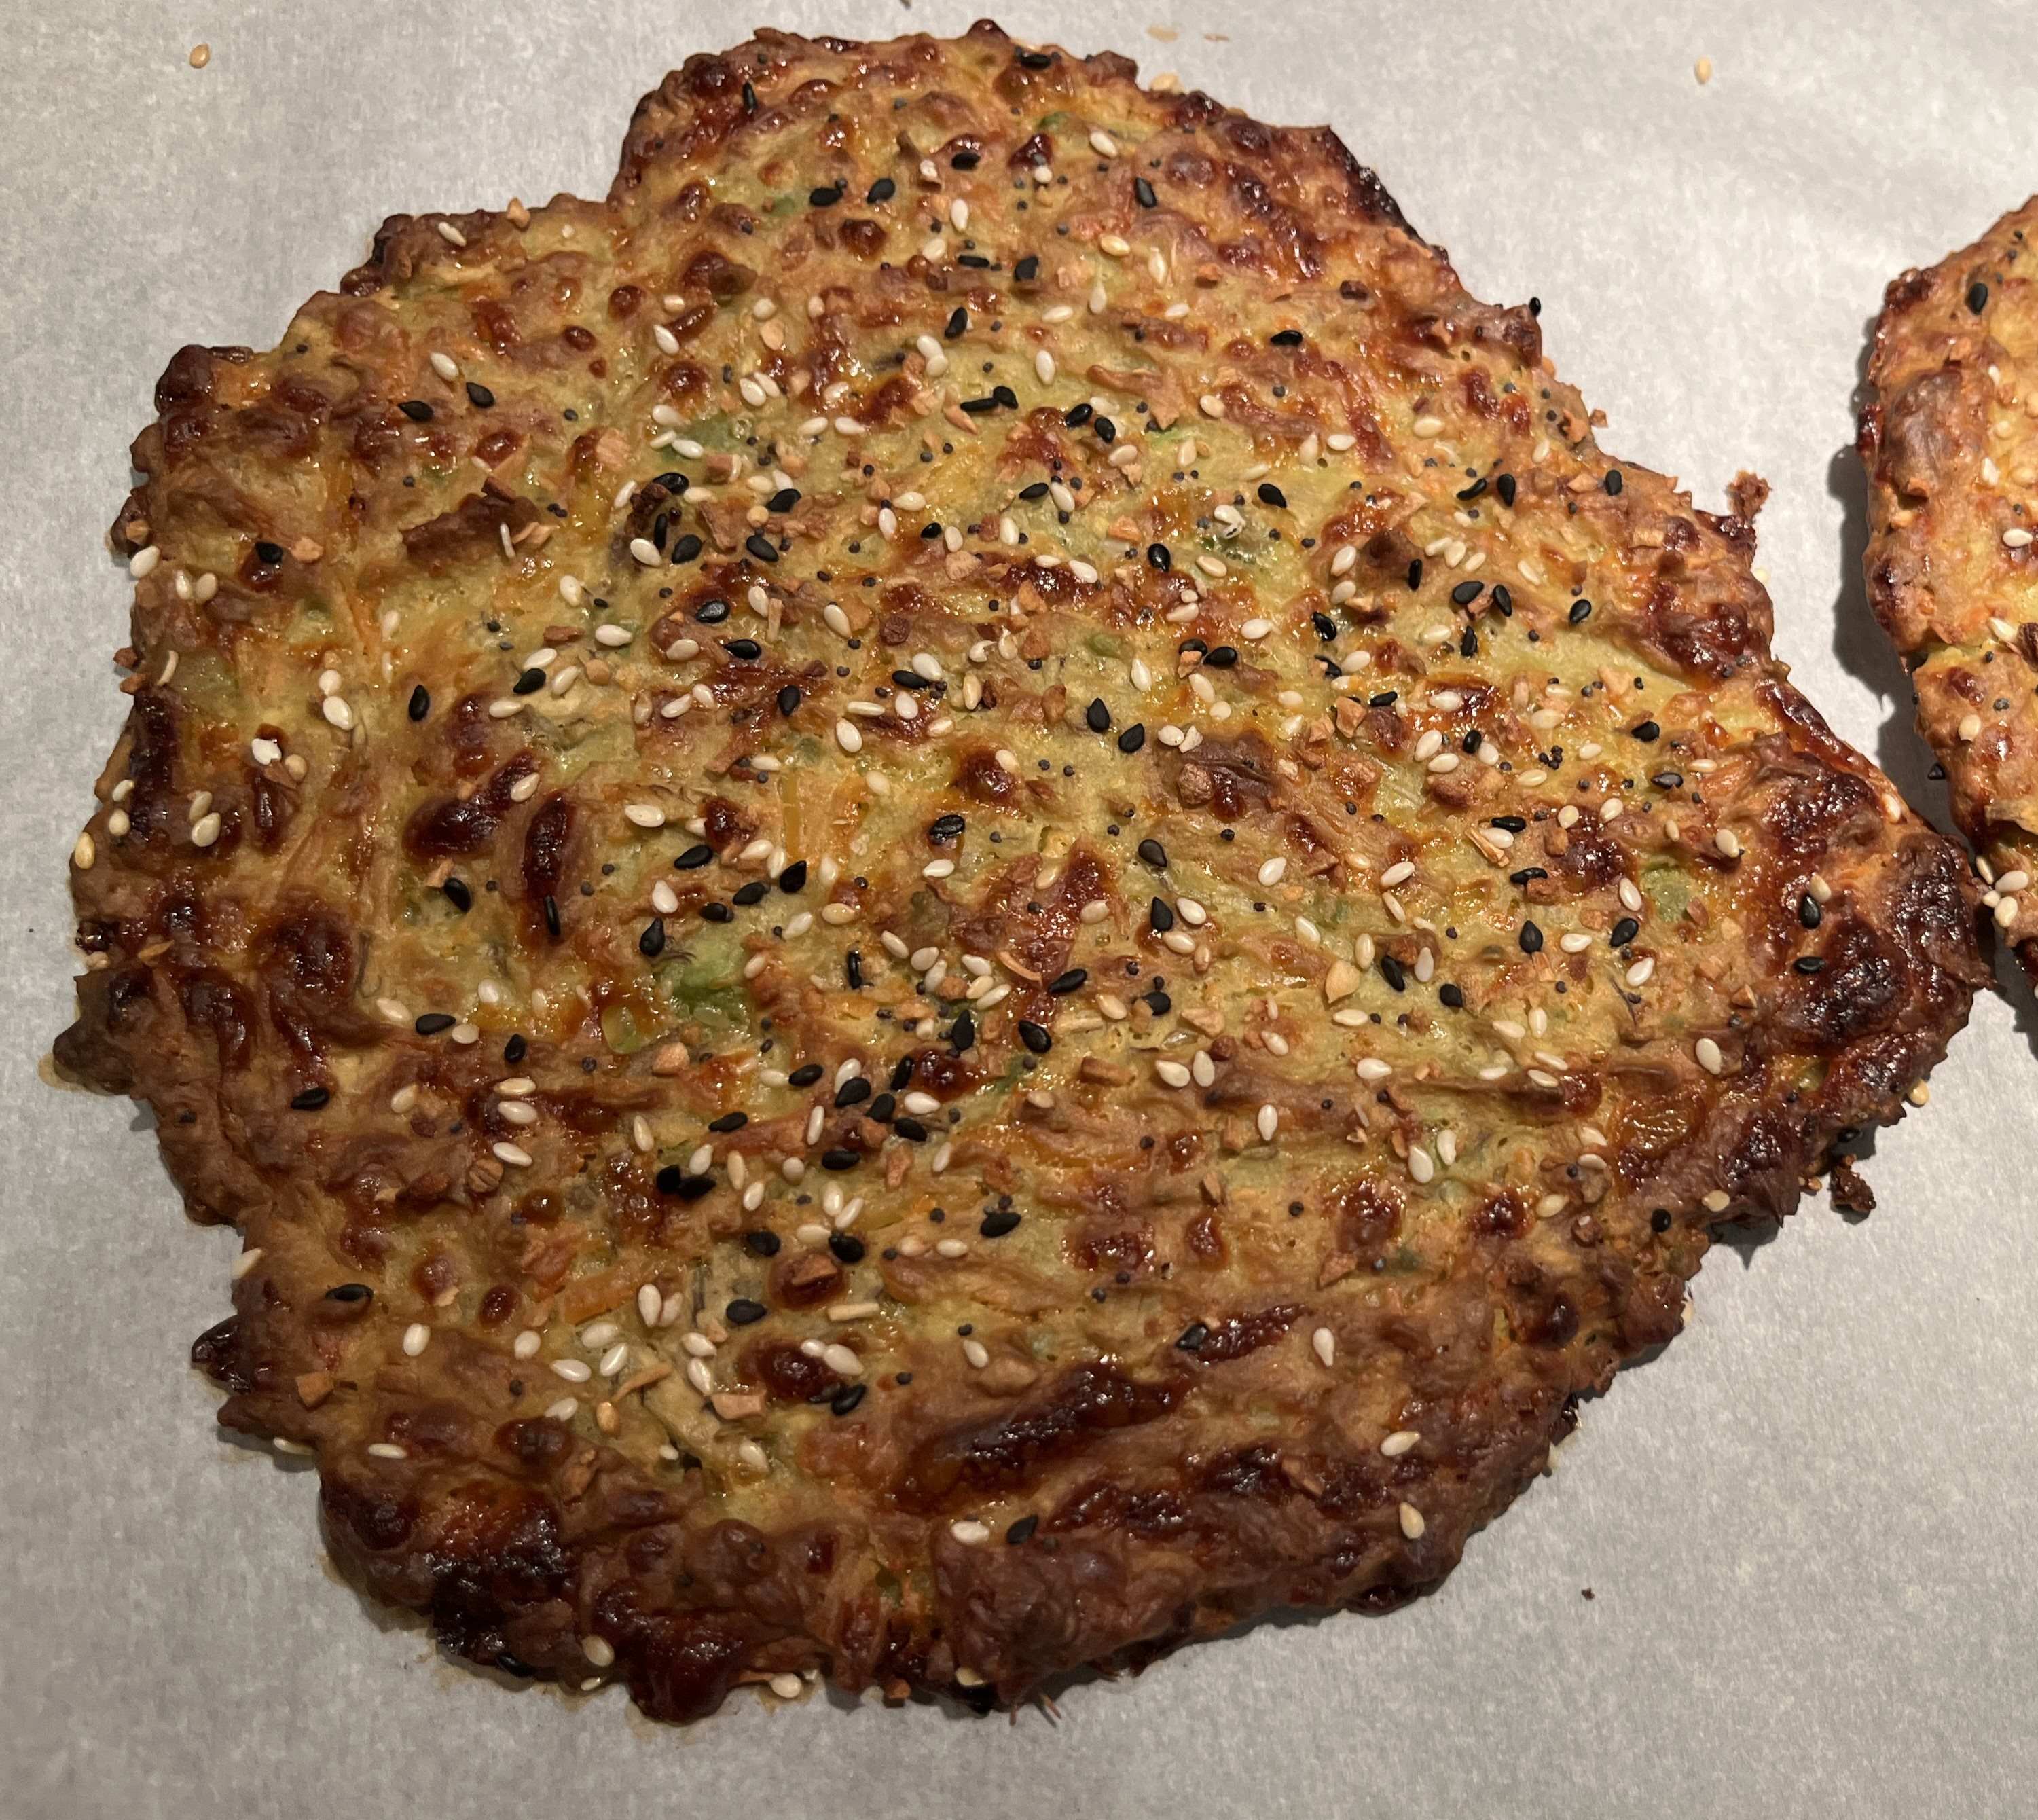
Avocados are a favorite of mine and this recipe was intriguing. With a very ripe avocado on hand, I decided to try it and was not disappointed. The baking time was 25 minutes but I found it to be too soft inside and baked for another 8-10 minutes (picture on the right). It was delicious as a side to my meal and would be interesting to make into a sandwich. If you have a perfectly ripe avocado and don’t know what to make, this is worth a try!
Avocado Bread
INGREDIENTS:
1 avocado, mashed
1 egg, beaten
1 cup shredded Parmesan cheese
Everything but the bagel seasoning (optional)
DIRECTIONS:
Preheat oven to 400 degrees Fahrenheit.
Combine avocado, egg and cheese together.
Form into two patties on greased baking sheet. Sprinkle with seasoning.
Bake for 25 -35 minutes. (I baked for a little longer–see difference between 25 minutes and 35 minutes above)
Broccoli with Garlic Egg Sauce is a family favorite and served with holiday meals or gatherings. Now I know it sounds somewhat disgusting, but, trust me, it’s delicious. I came across this recipe several years ago in the cookbook from popular Denver restaurants. The cookbook is long gone but the memory of the recipe is still with me. If anyone knows of the origin of the recipe at a Denver establishment, please comment.
Broccoli with Garlic Egg Sauce
INGREDIENTS:
1 pound fresh broccoli, washed and cut into flowerettes
3 hard-boiled eggs, shelled and diced
3-4 T. olive oil
1-2 garlic cloves, minced
bread crumbs, about 1/2-1 cup
salt and pepper to taste
DIRECTIONS:
Steam the broccoli until tender.
Heat olive oil in pan. Add minced garlic and saute. Add chopped eggs, salt and pepper. Stir in bread crumbs.
Place broccoli in a serving dish and top with the garlic egg sauce.
Crispy Parmesan Cauliflower Bites are absolutely delicious. This recipe is easy to prepare and great as an appetizer or as a side dish. I haven’t tried this with my grandkids buy I think they would eat it, too. I do love a roasted vegetable, and this one is over the top!
Crispy Parmesan Cauliflower Bites with Creamy Onion Dip
INGREDIENTS:
1 small head cauliflower, cut into thinly sliced florets (about 1/2″ thick)
3/4 cup freshly grated parmesan cheese
2 1/2 to 3 tbps unsalted butter
1/2 tsp dried oregano
1/2 tsp garlic powder
3/4 tsp salt
1/2 tsp pepper, divided
1 tbsp olive oil
2 tbsp chopped parsley (I used dried parsley)
For the dip:
1/2 cup sour cream or Greek yogurt
2 tbsp chopped parsley (I used dried parsley)
2 tbsp chopped chives
1/2 tsp onion powder
1/4 tsp salt
pinch of black pepper
Toppings (optional): fresh chopped parsley
DIRECTIONS:
Preheat over to 400 degrees Fahrenheit.
Add the butter to a large casserole dish or cookie sheet and place in the oven while it preheats to melt.
Add the parmesan cheese, oregano, garlic powder, 1/4 tsp salt and 1/4 tsp pepper to a small bowl. Mix to combine. Set aside.
Add the cauliflower to a large bowl, then add the olive oil, remaining salt and pepper, and parsley. Toss to combine.
Remove the casserole dish from the oven, add the parmesan cheese mixture to the bottom of the dish and spread evenly.
Place the cauliflower florets into the dish, flat down. Sprinkle any of the remaining parsley or cauliflower bits over the top, then sprinkle a little bit more parmesan cheese.
Place in the oven for 30-35 minutes until the parmesan on the bottom has browned. Remove the dish from the oven and allow to cool for a few minutes.
While the cauliflower roasts, make the dip. Add the sour cream or yogurt to a small dish, then add salt, onion powder, parsley, chives and pepper. Mix to combine.
Place the cauliflower on a plate, top with parsley and serve with the dip.
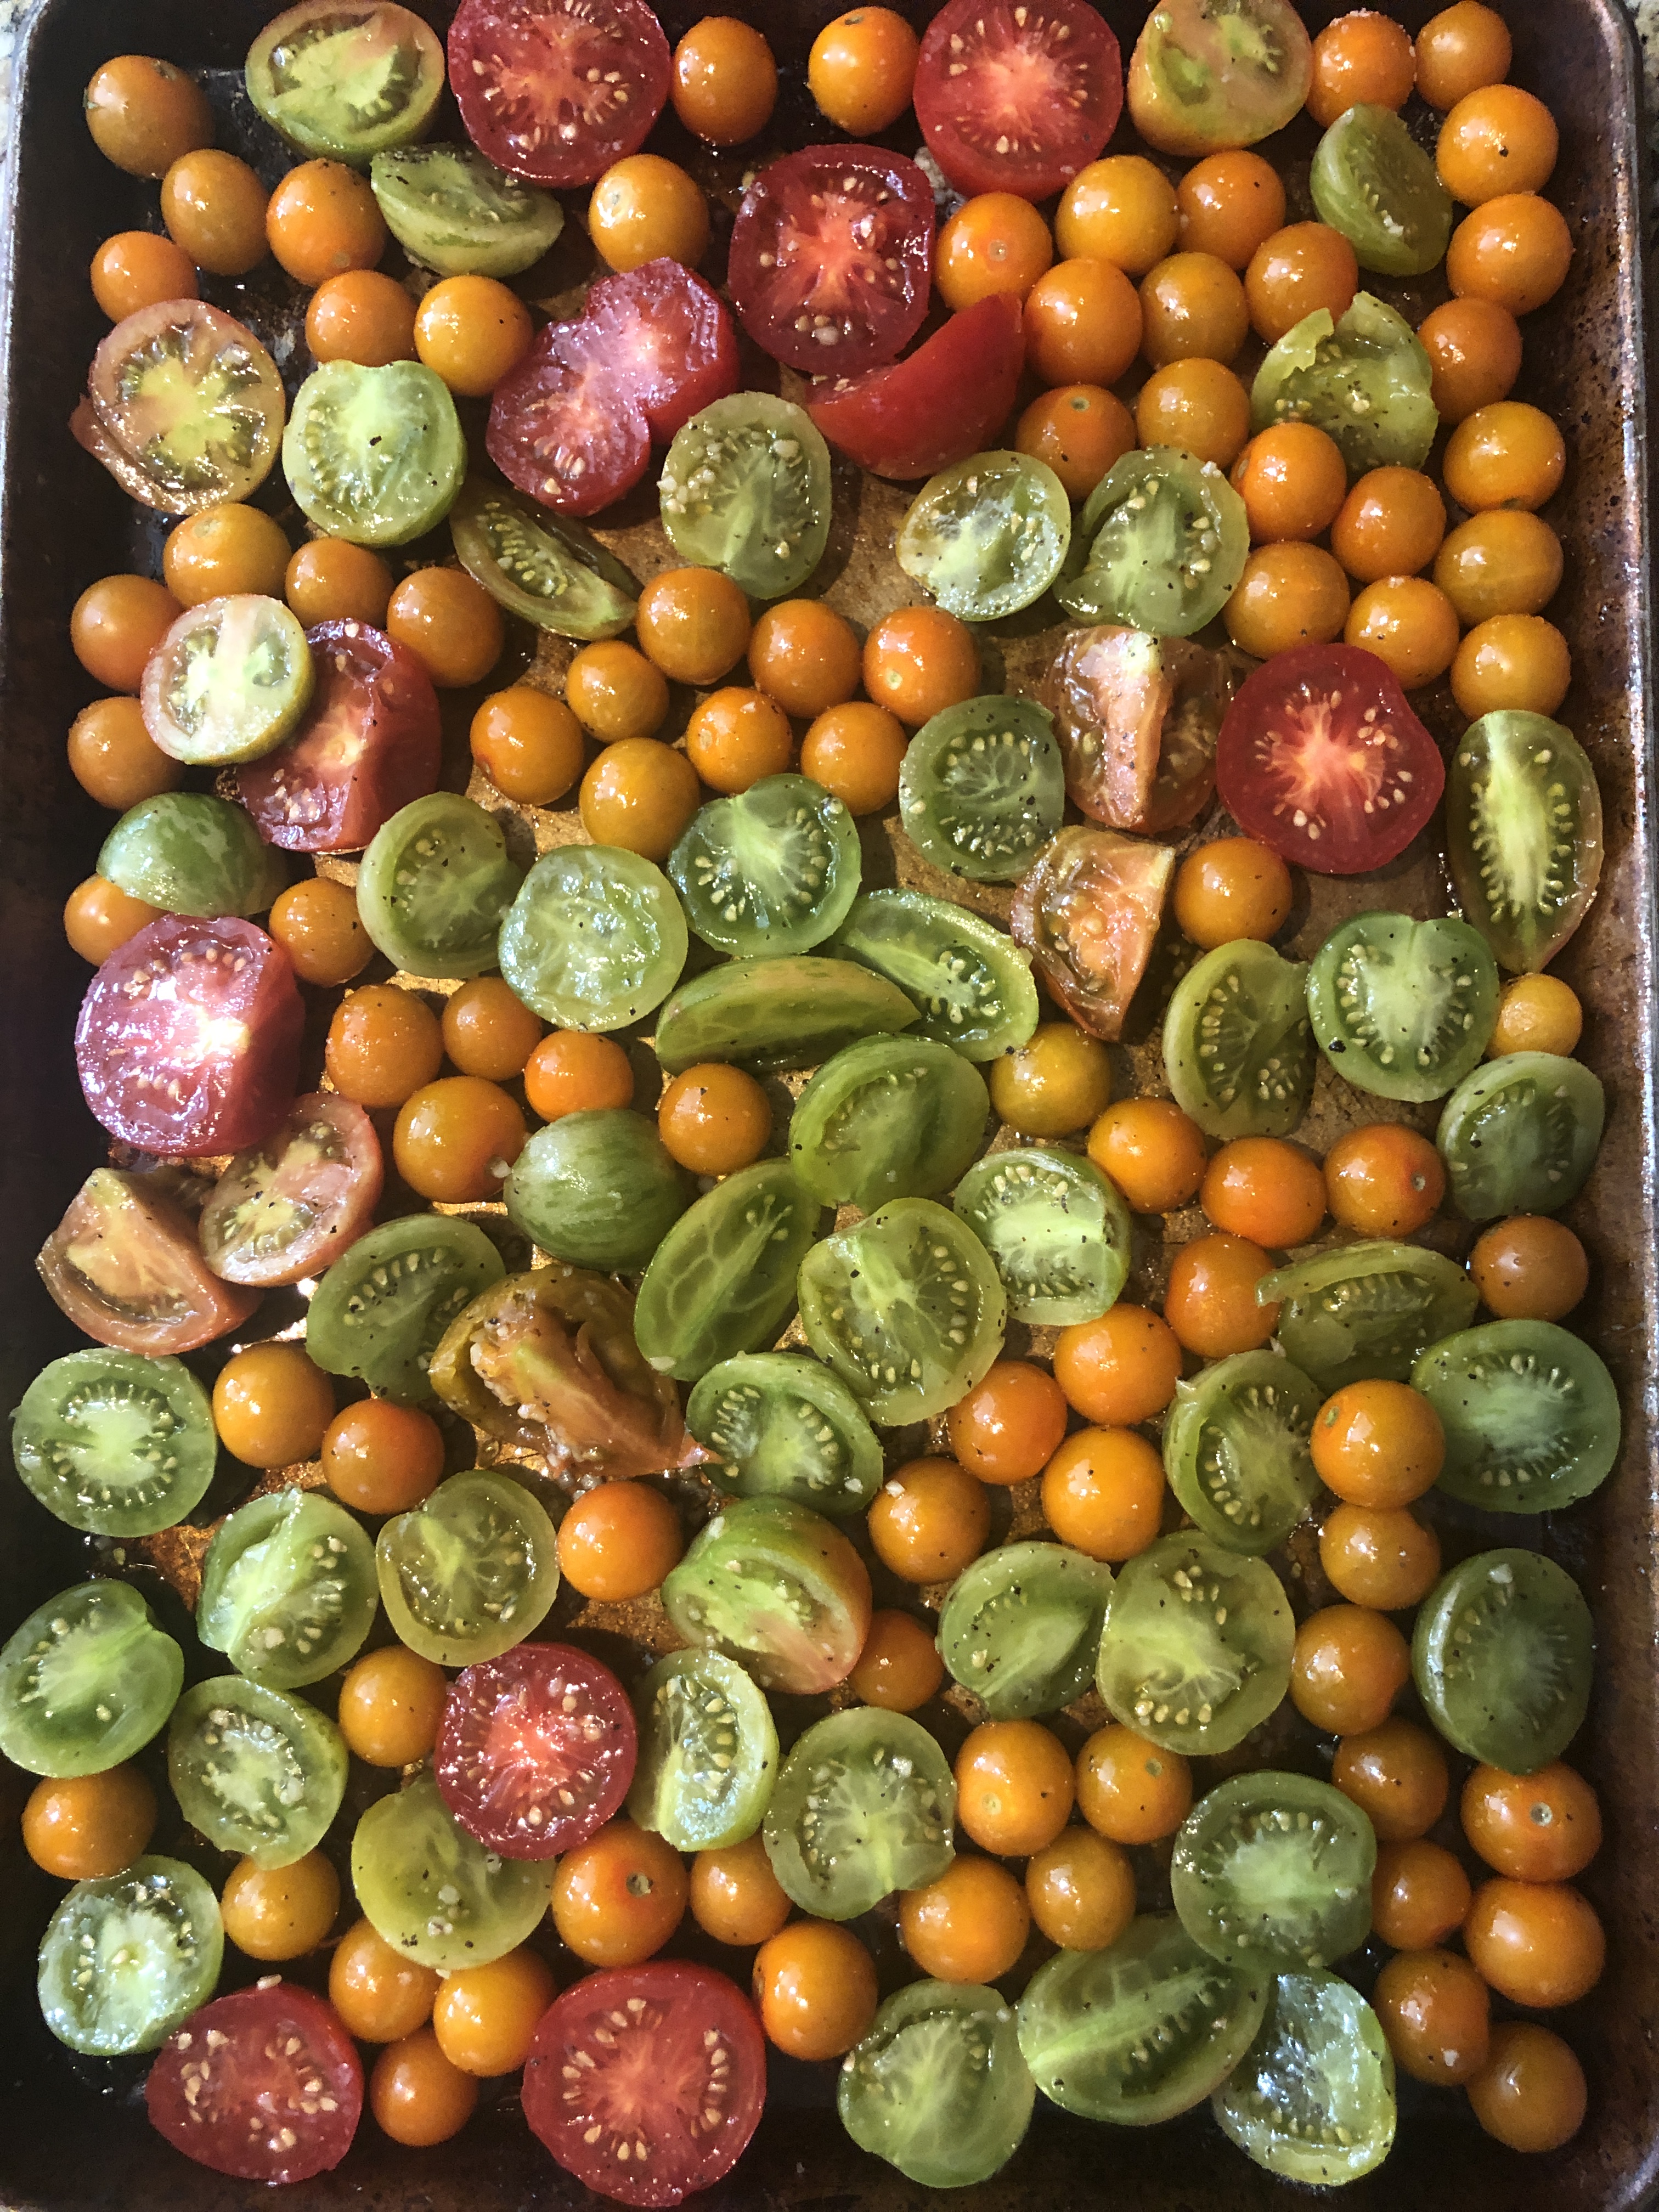
Roasted Tomatoes are a family favorite and are delicious served in a variety of ways. When my garden tomatoes are overwhelming, I turn to roasting them. Sometimes I roast them without the balsamic vinegar, with just olive oil, garlic and occasionally strips of anaheim peppers. The tomatoes are delicious by themselves or served with cream cheese, feta or goat cheese as an appetizer. Try them on a pizza or in egg cups. I’ve frozen the roasted tomatoes with good success and find them to be quite a treat in the winter
Balsamic Roasted Tomatoes
INGREDIENTS:
12 plum tomatoes, halved lengthwise, cores and seeds removed (I used a variety of tomatoes from my garden, halved and not seeded)
4 tablespoons good olive oil
1 1/2 tablespoons balsamic vinegar
2 large garlic cloves, minced
2 teaspoon sugar
1 1/2 teaspoons kosher salt
1/2 teaspoon freshly ground pepper
DIRECTIONS:
Preheat the oven to 450 degrees F.
Arrange the tomatoes on a sheet pan, cut sides up, in a single layer. Drizzle with olive oil and balsamic vinegar. Sprinkle the garlic, sugar, salt, and pepper over the tomatoes. Roast for 25 to 30 minutes, until the tomatoes are concentrated and beginning to caramelize. (I had to roast mine for 10-15 minutes longer). Serve warm or at room temperature.