I am a country girl, born and raised on a farm in Central Iowa. I am the youngest of three children by 9 and 14 years….I was the OOPS! Being younger had its advantages in that I was an Aunt at age 7 and grew up with my niece and nephews. My Father died from a farm injury when I was 12, which forever changed my life and strengthened my bond with my Mother. I tagged along with my Mother to visit older people in our community and learned about their lives in the early 1900s, enjoying the many wonderful traditional foods and family stories.
I graduated from a class of 25, which gave me the advantage of being involved in sports and clubs that would not have been possible in a large High School. At that time, Home Ec was still an elective and I loved the cooking lessons (not so hot on the sewing classes). While at the University of Northern Iowa, I began to collect and read cookbooks. Perhaps it was the absence of Mom’s home cooking that drew me to dream about cooking (and eating) wonderful food. After college I moved to St. Joseph, MO and then to Scottsdale, AZ and began to experiment with traditional recipes and discovering those of my own. It was such an adventure to discover new dishes and restaurants in historic St. Joseph, Kansas City, then Scottsdale, Phoenix, San Diego…and the list goes on.
In the early ‘80s, I moved to Denver, got married, started my telecommunications sales career and discovered the fabulous restaurants in Denver and Aspen. My career took me to cities never before experienced and the seafood in San Francisco, Cajun fare in New Orleans, Tex-Mex in Dallas, Italian in New Jersey, etc. are experiences I will cherish. In 1986 our first daughter, Megan, was born and then Sarah in 1988. Instead of indulging in dinners out, we were cooking more at home and seeking ways to have good meals with limited time. Dinners went from adult gourmet to more kid friendly meals. Megan’s tastes were more basic while Sarah adopted a gourmet palate at an early age. At age 6 her favorite meal was steamed artichokes and crab legs with drawn butter…still her favorite. Megan’s tastes expanded rapidly when she went to college and started cooking for her roommates and now loves to whip up gourmet dishes.
I am blessed to have many gal pals that also share my passion for good food. I love to try new restaurants and look forward to the ‘pot luck’ feasts at our book club meetings and other gatherings. It isn’t just the good food that brings us to together, but the great love and admiration we all have for each other.
We are addicted foodies…but we try to remember our 12-step foodie program is needed.
God grant me the serenity to only eat the food that I LOVE,
the courage to walk away from junk food,
and the wisdom to recognize the difference. Oh YEAH!
Funfetti Dip is an easy dessert, especially for kids. Who doesn’t love to dunk a Nilla Wafer or animal cracker into a yummy dip. We served this for a baby shower but it would be great for a kids or adult party.
Funfetti Dip
INGREDIENTS:
1 box Funfetti cake mix (unprepared)
8 oz cream cheese softened
8 oz cool whip thawed
1/2 cup milk
Sprinkles for topping
DIRECTIONS:
Cream together cream cheese and whipped topping until smooth with a hand mixer.
Add cake mix (unprepared) and half of the milk and mix, gradually adding in more milk until desired texture is established.
Top with extra bright colored sprinkles
Serve with Nilla wafers, animal crackers or graham crackers
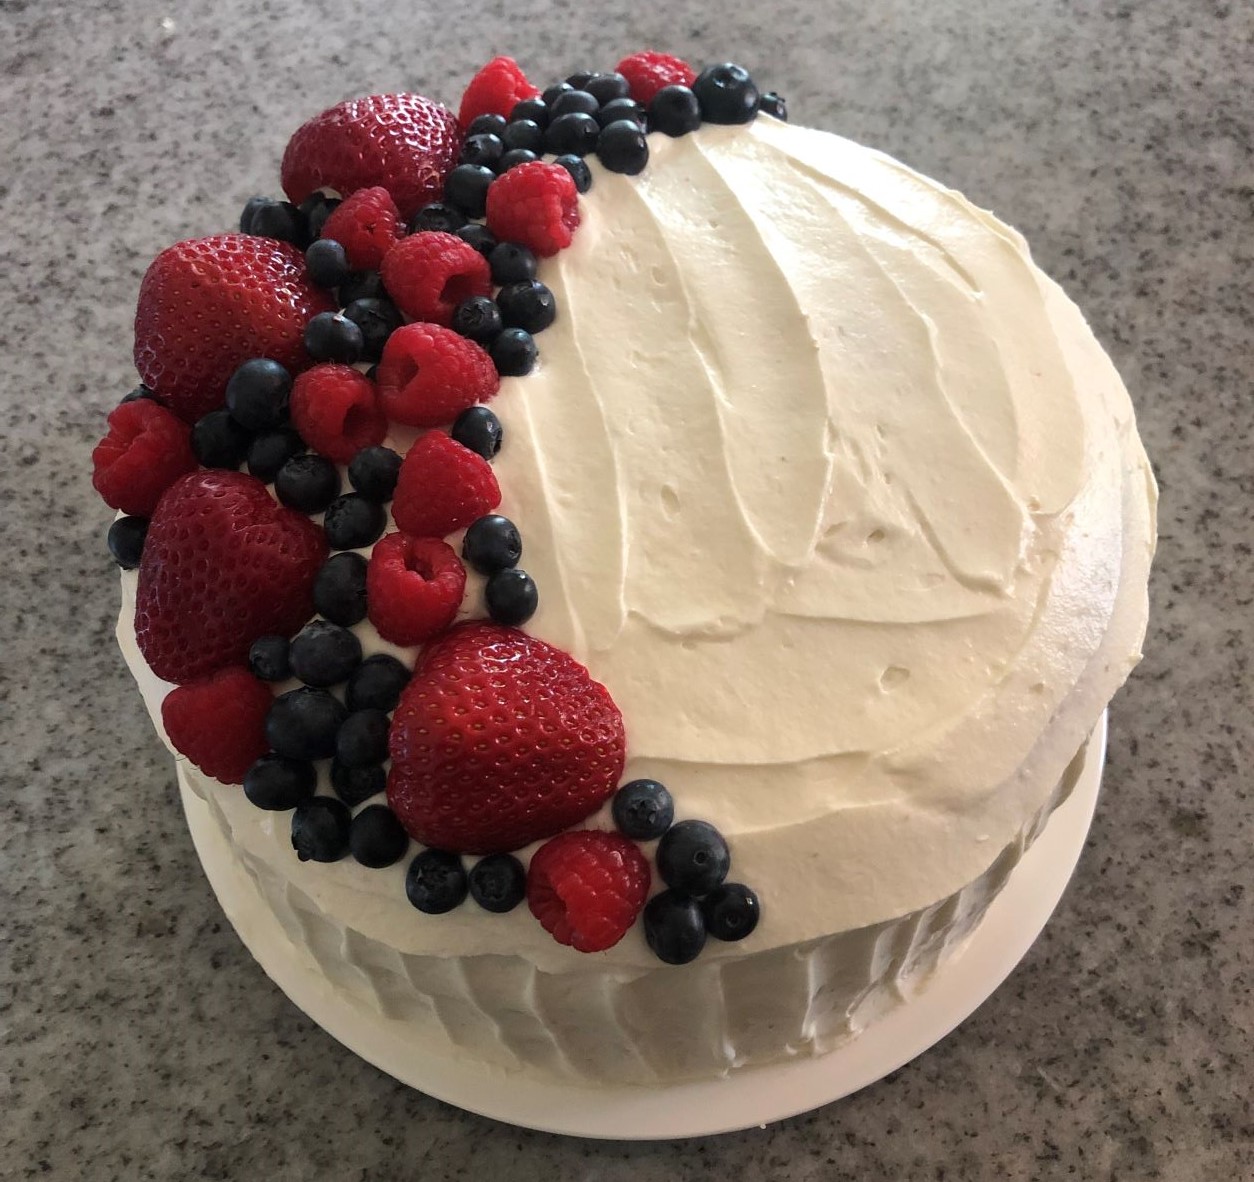
Chantilly Cake is stunning and this cake was baked by daughter, Megan. Megan is the official family baker, and no one complains!
Chantilly Cake
INGREDIENTS:
Moist Yellow Cake
3 cup flour
1 teaspoon baking soda
1 teaspoon baking powder
1 teaspoon salt
2 cup sugar
½ cup vegetable oil
½ stick unsalted butter
2 eggs
1 cup buttermilk
2 teaspoon vanilla (or sub 1 tsp almond extract)
1 cup water
1 teaspoon vinegar
Chantilly Frosting
(recipe can be halved)
1 stick unsalted butter, room temp
16 oz mascarpone cheese, room temp
8 oz. cream cheese, room temp
2½ – 3 cups confectioner’s sugar
⅛ tsp. salt
1 cup heavy whipping cream (1 half pint)
1 tsp. almond extract, optional
Berry Syrup optional
½ cup water
¼ cup sugar
2 heaping tablespoons of berry jam (I used strawberry)
Apricot Glaze
3 Tablespoons apricot jam
splash of water
Garnish
Strawberries
Blueberries
Raspberries
DIRECTIONS:
For the Cake
Preheat the oven to 350 F
In a medium bowl, combine the dry ingredients and mix well.
In a separate bowl or measuring cup, melt the butter and let cool slightly (it should still be melted). Then add the oil, buttermilk, water, vinegar and then the eggs. (It is best to combine the ingredients in that order so the butter is guaranteed room temperature so as not to cook the eggs).
Pour the wet ingredients into the dry ingredients and mix until just combined.
Distribute between 2, 8 inch cake rounds that have been greased with butter and dusted with flour.
Lower the temperature of the oven to 325 F. (Do not wait for the oven temperature to reach 325. Put the cakes in immediately)
Bake for 30-35 minutes, or until a knife or cake tester comes out clean. (If baking cupcakes, bake for about 20)
Chantilly Frosting
Cream the butter, cream cheese, and mascarpone until light and fluffy. Then add the salt and confectioners sugar and mix to combine.
In a separate bowl, whip together the heavy whipping cream until stiff peaks form. Make sure not to over mix because it will become grainy and change the texture and appearance of your frosting.
Gently fold the whipped cream into the mascarpone cream cheese mixture until fully incorporated.
If not using immediately, cover and refrigerate and take out 10 minutes to bring to room temperature before applying to the cake.
Berry Syrup
In a small sauce pot, mix together the water, sugar and jam. Cook over medium heat until the sugar has completely dissolved. Let cool. (this can also be done in the microwave)
Assembly
If making a 4 layer cake: Using a large bread knife, trace the outside of the cake and then slowly saw back and forth through the cake, making sure the knife is as parallel as possible.
Spread a layer of the berry syrup on top of the first layer of cake (this should be the rough, cut side if making a 4 layer cake)
Pipe or spread a thin layer of icing on top of the berry syrup.
Evenly distribute sliced berries on top of the icing layer.
Place the second layer of cake on top, and so on. Do not put any berry syrup on the very top layer of the cake, because the frosting is too difficult to spread and your cake will look too crumby.
Roughly spread the frosting all over the cake to create a crumb coating. I like to refrigerate or freeze my cake for 10 minutes before proceeding. Ice the rest of the cake and garnish with fresh berries.
Glaze the berries with simple syrup or apricot glaze (microwave for about 15 seconds, or until thin and pourable) and refrigerate until serving.
Recipe Notes:
This incredibly moist cake paired with the sinful, yet not too sweet, mascarpone frosting will send you straight to cake heaven. (If you would like a lighter and fluffier frosting, use 2 cups of heavy whipping cream instead of 1, and only 8 oz of mascarpone cheese) This frosting recipe makes enough for two cakes, so if not doubling the cake recipe, cut the frosting ingredients by half.
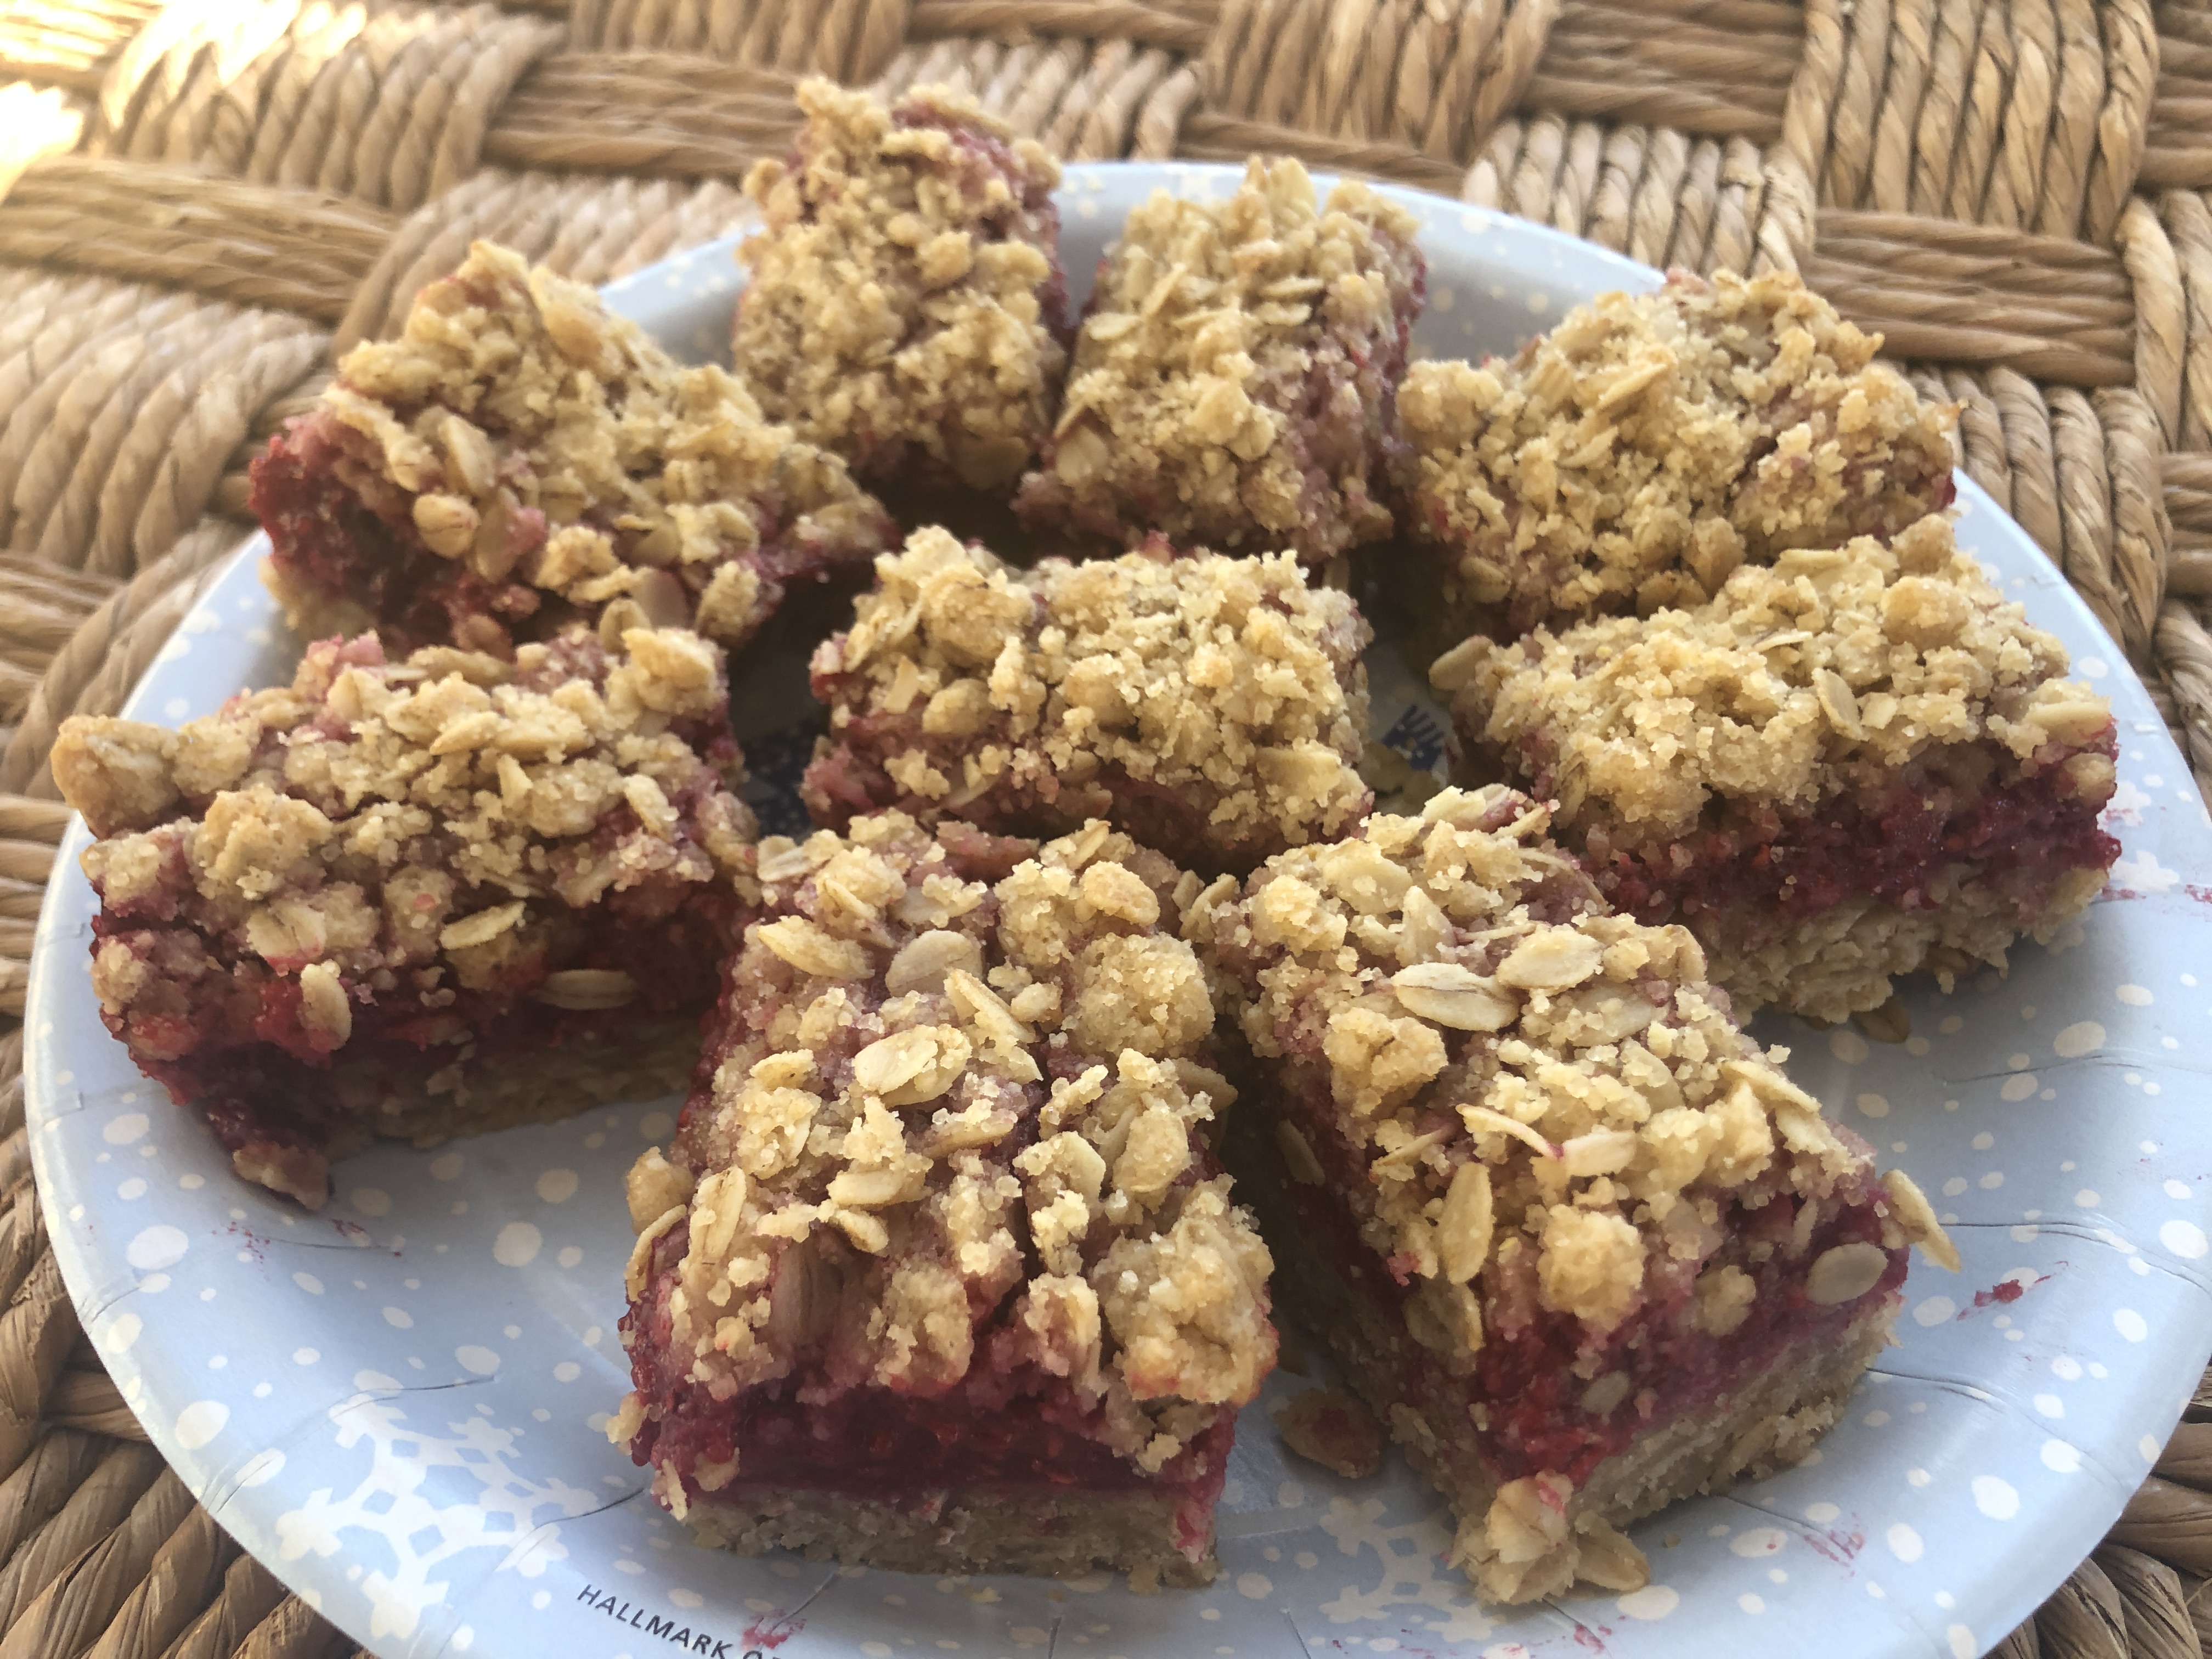
Raspberry Crumble Bars are so delicious and easy. Daughter, Megan, introduced me to this great recipe and it hits the mark with my love of raspberries and a crunchy oatmeal base. For some reason, the childhood saying of ‘yummy, yummy in my tummy’ comes to mind.
Raspberry Crumble Bars
INGREDIENTS:
Raspberry Filling
two 12-ounce bags of frozen raspberries (see notes)
1/2 cup granulated sugar (more depending on tartness of your berries)
2 tablespoons flour
1 tablespoon cornstarch
juice of one lemon
Crumble Layer
3 cups rolled oats
3 cups flour
2 cups brown sugar (loosely packed)
1 teaspoon baking powder
1 1/2 cups melted butter (I prefer salted)
1/2 teaspoon salt
DIRECTIONS:
Prep Raspberries: Preheat the oven to 350 degrees. Place raspberries in a large colander. Run warm water over them for a minute, and then let the liquid drain out for about an hour until softened and thoroughly drained (see notes). Mix raspberries with sugar, flour, cornstarch, and lemon juice.
Soft Delicious Crust: Mix the oats, flour, sugar, baking powder, butter, and salt together into a crumble-like mixture. Press two thirds of the crumble into the bottom of a 9×13 pan lined with parchment paper. Bake for 10 minutes.
Bake: Arrange the raspberry layer on top of the baked bottom layer. Sprinkle with remaining crumble. Bake for another 25-30 minutes.
Finish: Remove from oven. They will need a little time to set up into “bar” formation, so chill them for a few hours to get them really solid. Orrrr… cut into it right away and eat it like a soft fruit crisp! You should be able to remove them from the pan easily by pulling up on the edges of the parchment paper.
Chocolate Crinkles were a favorite cookie of my childhood. Through the years I made them for my kids as well. Now the grandkids can enjoy them and help, especially rolling the dough in the two sugars. We made our cookies bite size and they were perfect. Little bites of chocolate perfection and…bonus…dairy free!
Chocolate Crinkles (Dairy Free)
INGREDIENTS:
1 cups all-purpose flour (130 grams)
1/2 cup unsweetened cocoa powder (65 grams)
1/2 cups brown sugar, packed (165 grams)
¼ cup white sugar (50 grams)
1 teaspoon baking powder
¼ teaspoon baking soda
1/2 teaspoon salt
2 eggs
1/4 cup oil (60 milliliters)
2 teaspoon vanilla sugar or 1 teaspoon of vanilla extract
For rolling
1/2 cup white sugar (100 grams)
1/2 cup powdered sugar (65 grams)
DIRECTIONS:
Whisk together flour, cocoa, brown sugar, granulated sugar, baking powder, baking soda, and salt in a mixing bowl.
Add eggs, vegetable oil, and vanilla. Mix using your hands. At first it will seem like there isn’t enough liquids and like the mixture is dry and grainy. This is fine. Keep mixing until you see the mixture develop into dough.
Roll the dough into about 1 inch or 2.5 centimeters size balls.
Roll each ball first in the granulated sugar. Then roll each ball generously in powdered sugar.
Place the balls on a parchment paper lined baking sheet. Add more powdered sugar on top of the balls.
Preheat the oven to 325°F or 160°C . Bake for 10 to 12 minutes. Remove from oven and let cool for 5 minutes before moving them to a cooling rack.
Making pies and cakes from real dirt was part of my childhood. I gave that up years ago, but this Dirt Cake, made by daughter, Megan, was a real treat. A kid of any age loves this cake. Megan made with real whipped cream–delicious!
Gluten-free, dairy-free peanut butter cookies with only 4-5 ingredients. Wow! These cookies are amazingly good. I love the salt and sweet combination. If you don’t like the salt, leave it out. My daughter, Megan, made these and the grandkids loved them, as did the adults.
Salted Peanut Butter Cookies
INGREDIENTS:
1 3/4 cups packed light brown sugar
2 large eggs, at room temperature
1/2 teaspoon vanilla extract
1 3/4 cups smooth peanut butter (see note at end)
Coarse-grained sea salt, to finish
DIRECTIONS:
Preheat the oven to 350°F. Line a rimmed sheet pan with parchment paper.
In a medium bowl, vigorously whisk together the light brown sugar and eggs until incorporated. Whisk in the vanilla extract. Add the peanut butter and mix with a spatula until smooth and completely incorporated, and until no ribbons of peanut butter can be seen. You know the dough is ready when it has the consistency of Play-Doh.
Using a scoop or a spoon, form the dough into 12 approximately 2-inch (2- to 2 1/4-ounce) balls and place them on the prepared rimmed sheet pan. For smaller cookies, use a heaping tablespoon.
Sprinkle the dough balls lightly with coarse-grained sea salt just before baking. Bake for 20 to 22 minutes, turning the rimmed sheet pan once halfway through baking (for smaller cookies, bake for 16 to 18 minutes). When finished, the cookies will be lightly golden and cracked on top. Let cool completely before serving.
You can bake these cookies as soon as the dough is prepared, but they will retain their shape better if you freeze them for 15 minutes before baking.
Chef’s Tip: While the all-natural stuff works just fine, Skippy is our peanut butter brand of choice for this recipe as we’ve found it retains the dough shape best. These tasty cookies are gluten-free!
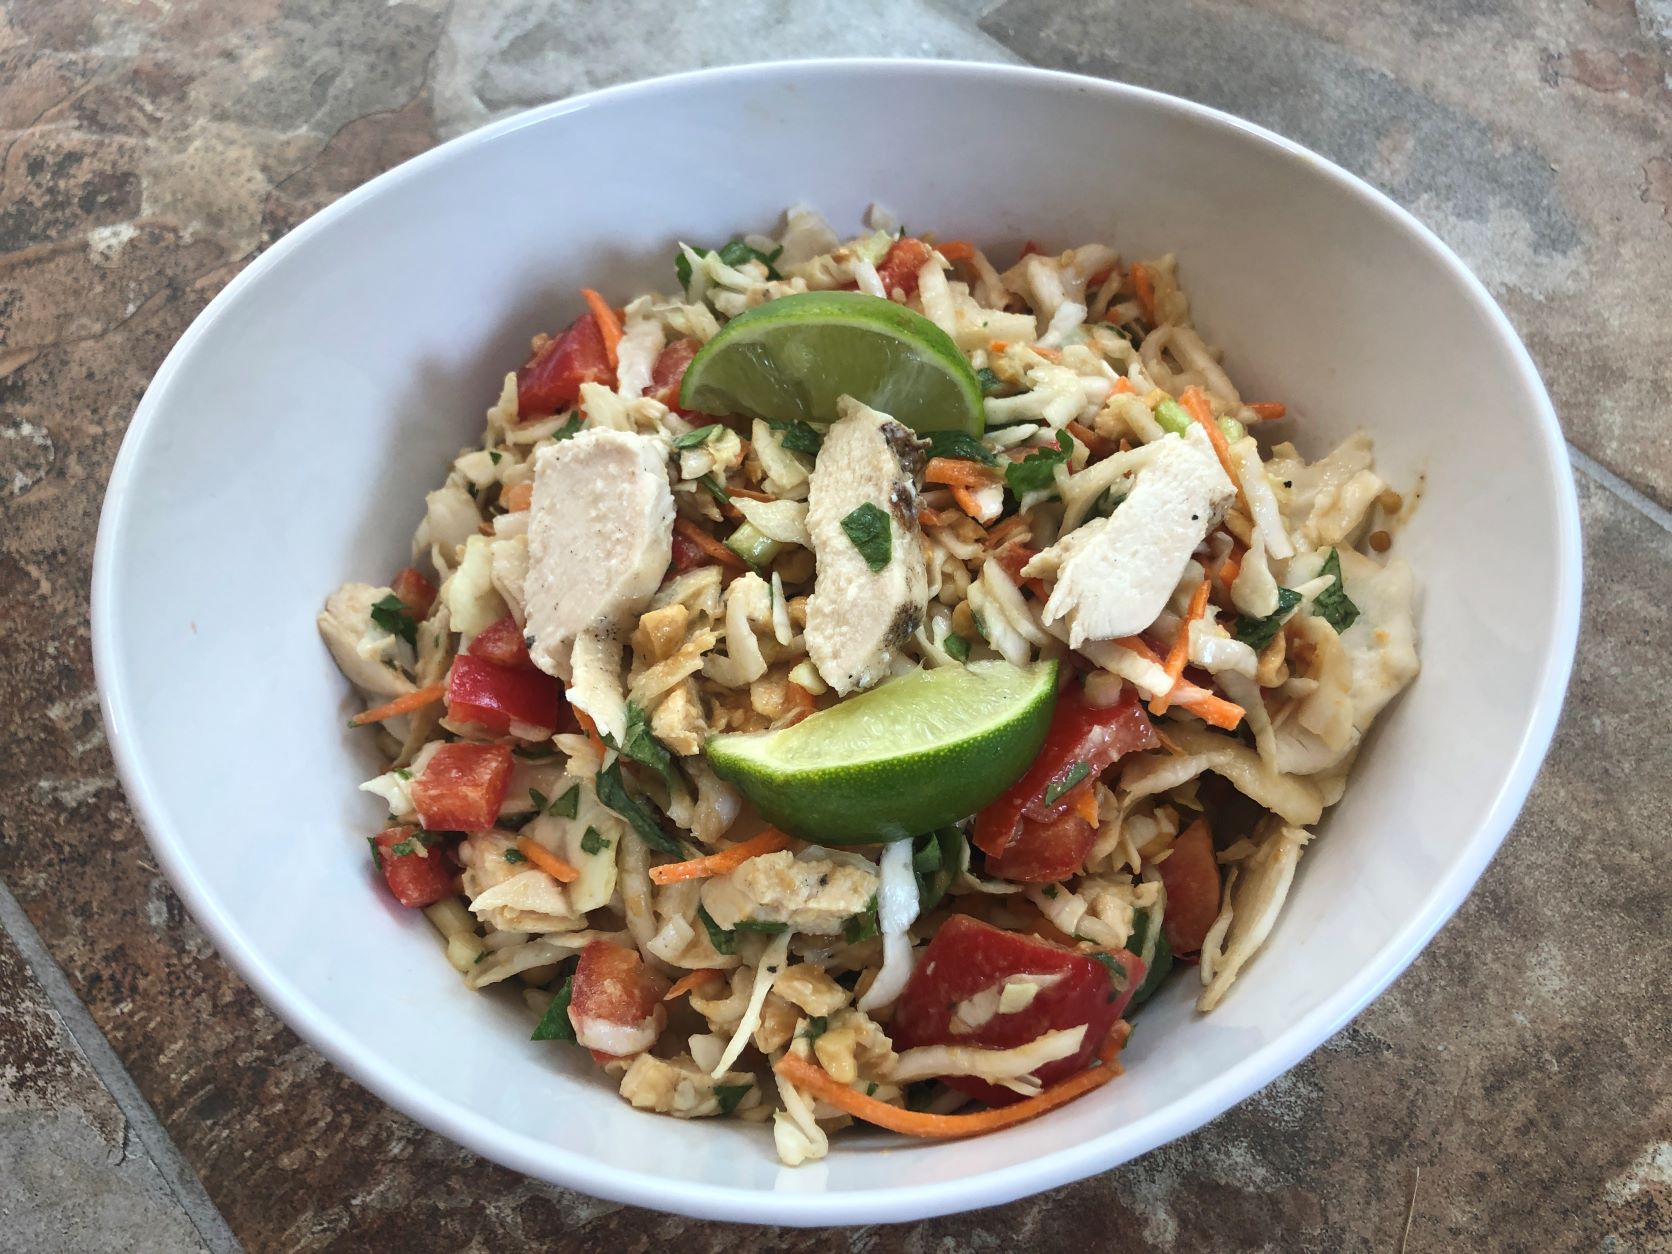
Thai food is a favorite, especially if it includes a peanut dressing. I love the IowaGirlEats.com blog and, again, this one did not disappoint. It would be a great side salad, sans the chicken, as well. It’s so yummy! You can make the salad, adding dressing only to the portion you are currently eating. This is a new favorite for my menu planning!
Thai Crunch Salad with Peanut Dressing
INGREDIENTS:
3 cups coleslaw mix (green cabbage, red cabbage, carrot mix)
1/2 red pepper, sliced into thin matchsticks
1 chicken breast, cooked then shredded
2 green onions, chopped
3 Tablespoons peanuts, finely chopped
3 Tablespoons chopped cilantro
For the Thai Peanut Dressing:
4 Tablespoons smooth peanut butter (I used Smucker’s Natural)
2 Tablespoons honey
2 Tablespoons warm water
1-1/2 Tablespoons gluten-free Tamari or soy sauce (dish will not be GF if using traditional soy sauce)
1 Tablespoon rice vinegar
juice of 1/2 large lime (slice remaining 1/2 lime into wedges)
1 teaspoon toasted sesame seeds
1 teaspoon toasted sesame oil
heaping 1/4 teaspoon ground ginger
1 large or 2 small cloves garlic, pressed or minced
salt and pepper
DIRECTIONS:
Add ingredients for Thai Peanut Dressing into a mason jar or bowl then shake or whisk to combine. Taste then adjust lime juice and/or add water to thin if necessary.
Add remaining ingredients into a large bowl. Drizzle desired amount of dressing on top then toss well to combine. Scoop into bowls then serve with lime wedges.
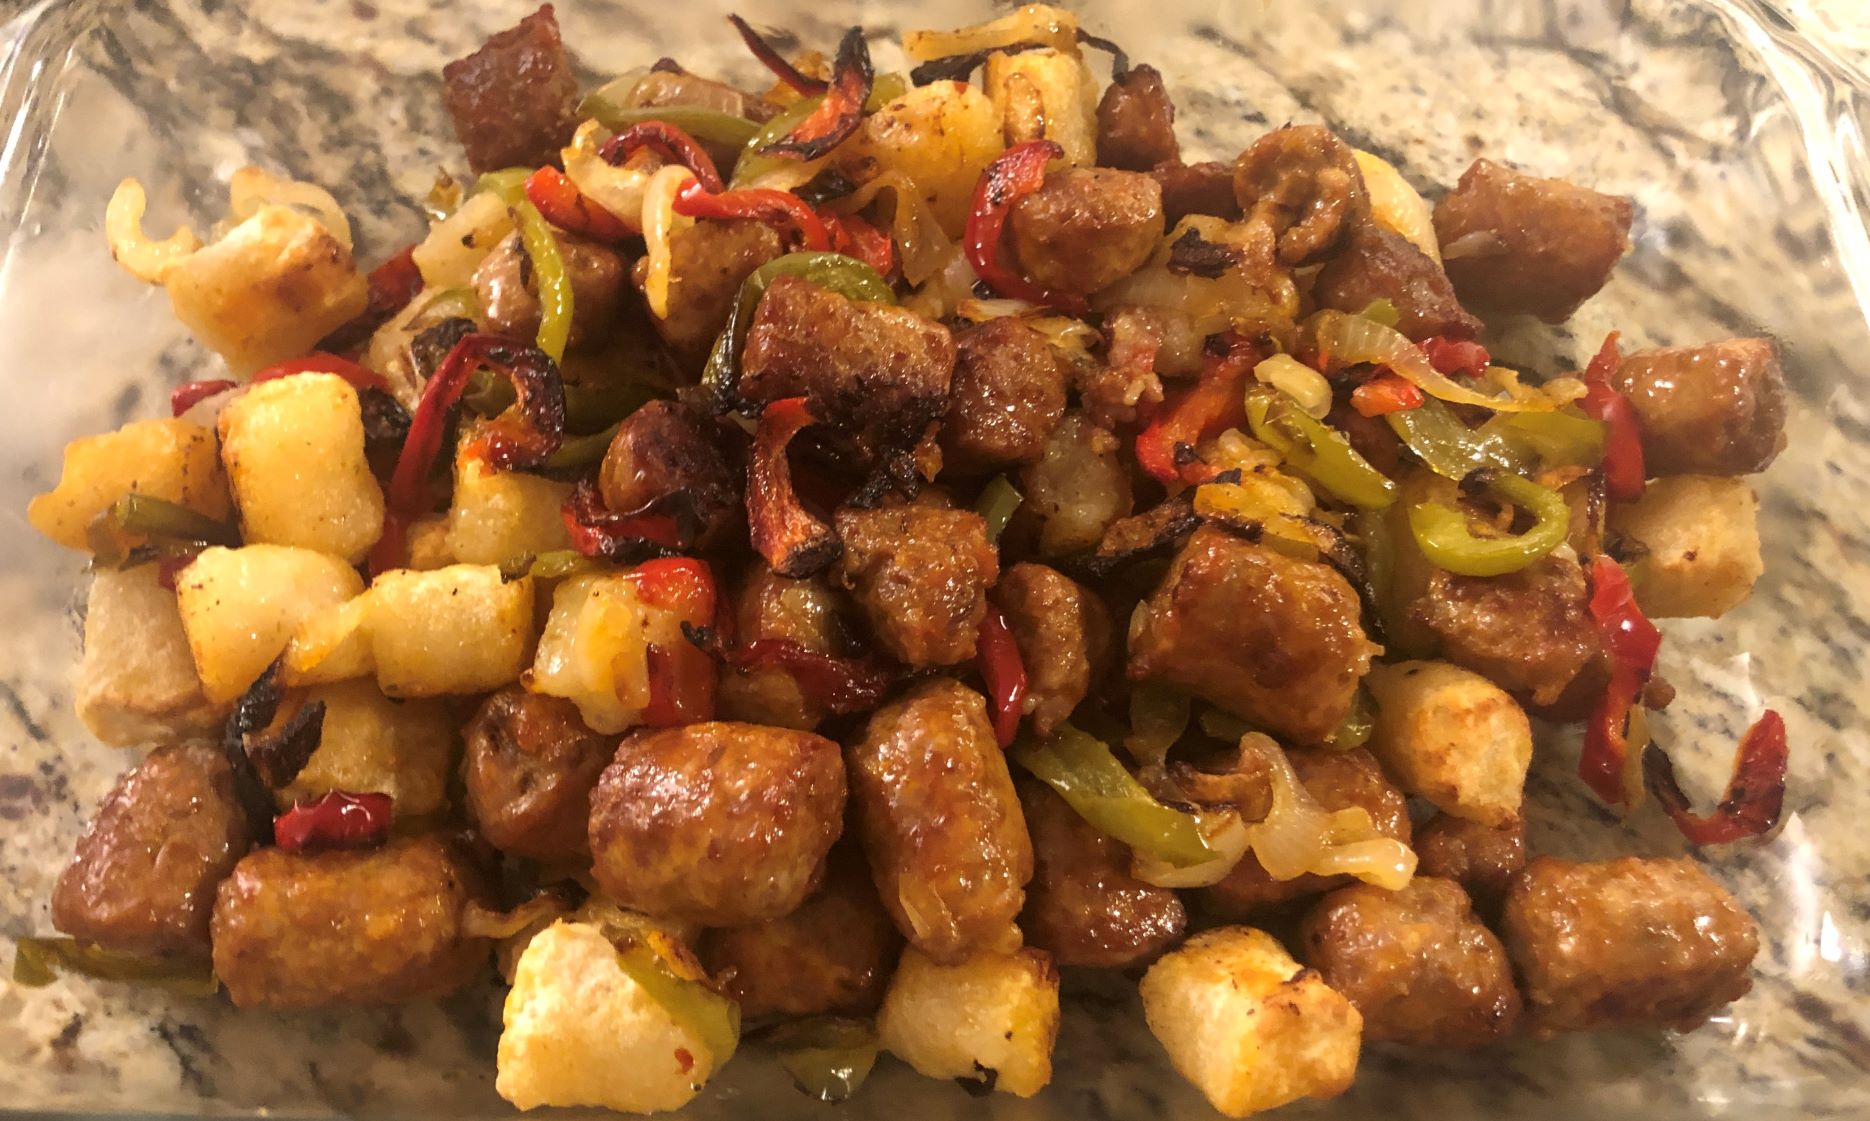
Cauliflower Gnocchi at Trader Joe’s has been on my list for the past year. While I had my reservations about it, I was blown away with how good it was in this dish. I browned the sausage a bit before baking to release some of the grease. It is now a favorite recipe and so easy to prepare!
Italian Sausage & Peppers with Cauliflower Gnocchi
INGREDIENTS:
1 onion, yellow or sweet, sliced
1 green bell pepper, sliced
1 red bell pepper, sliced
extra virgin olive oil
garlic salt
4 sweet Italian sausages, cut into fifths
Bag of Trader Joe’s frozen cauliflower gnocchi (or gnocchi of your choice)
DIRECTIONS:
Preheat oven to 425 degrees.
Line a sheet pan with parchment paper.
Add onion, peppers to the center of the pan, drizzle with olive oil and season generously with garlic salt. Toss to coat.
Spread into an even layer and roast for 10 minutes.
Add Italian sausages and frozen gnocchi and roast for 20-30 minutes until sausages and vegetables are cooked through and gnocchi are golden grown. Stir halfway through the process.
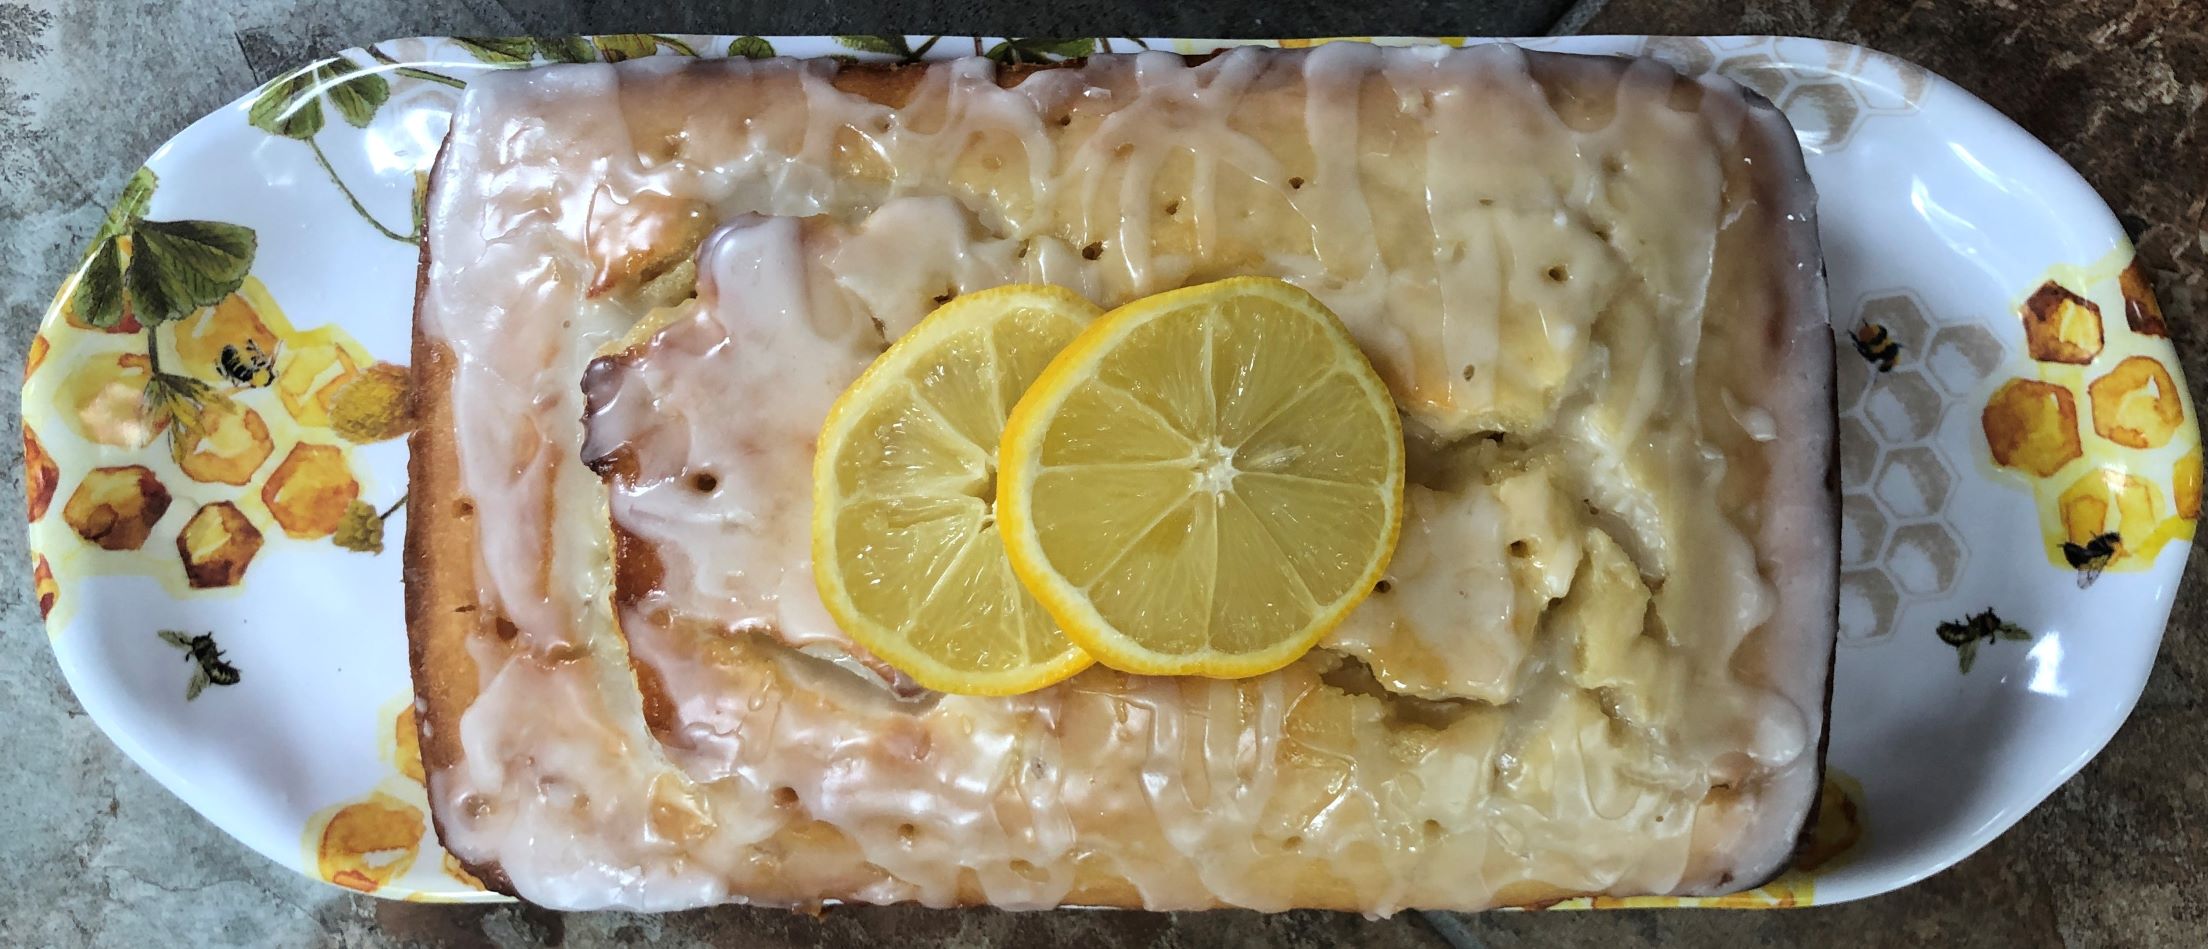
Lemon Yogurt Cake is a moist, delicious cake that can be served on its own or served with fresh berries. I must admit I messed up the recipe and it still turned out great. The recipe read in such a way that I thought the 1/3 cup lemon juice was added to the cake batter. Yikes! I quickly added another 2/3 cup flour to the batter and crossed my fingers. It turned out just fine and added more intense lemon flavor to the cake. I poked holes in the lemon cake (much like my Rum Cake) to assure that the lemon juice/sugar mixture penetrated the cake. I liked the result but that’s the reason for the holes in the cake. I added the glaze and had to take a taste! So, so good. I froze half of the bread and it was good as fresh when I pulled it out of the freezer.
Lemon Yogurt Cake
INGREDIENTS:
1 1/2 cups all-purpose flour
2 teaspoons baking powder
1/2 teaspoon kosher salt
1 cup plain whole-milk yogurt
1 1/3 cups sugar, divided (reserve 1/3 cup for step 3)
3 extra-large eggs
2 teaspoons grated lemon zest (2 lemons)
1/2 teaspoon pure vanilla extract
1/2 cup vegetable oil
1/3 cup freshly squeezed lemon juice (reserve for step 3)
For the glaze:
1 cup confectioner’s sugar
2 tablespoons freshly squeezed lemon juice
DIRECTIONS:
Preheat the oven to 350 degrees. Grease an 8 1/2 x 4 1/4 x 2 1/2-inch loaf pan. Line the bottom with parchment paper. Grease and flour the pan.
Sift together the flour, baking powder, and salt into one bowl. In another bowl, whisk together the yogurt, 1 cup sugar, the eggs, lemon zest, and vanilla. Slowly whisk the dry ingredients into the wet ingredients. With a rubber spatula, fold the vegetable oil into the batter, making sure it’s all incorporated. Pour the batter into the prepared pan and bake for about 50 minutes, or until a cake tester placed in the center of the loaf comes out clean.
Meanwhile, cook the 1/3 cup lemon juice and remaining 1/3 cup sugar in a small pan until the sugar dissolves and the mixture is clear. Set aside.
When the cake is done, allow it to cool in the pan for 10 minutes. Carefully place on a baking rack over a sheet pan. While the cake is still warm, pour the lemon-sugar mixture over the cake and allow it to soak in. Cool.
For the glaze, combine the confectioners’ sugar and lemon juice and pour over the cake.
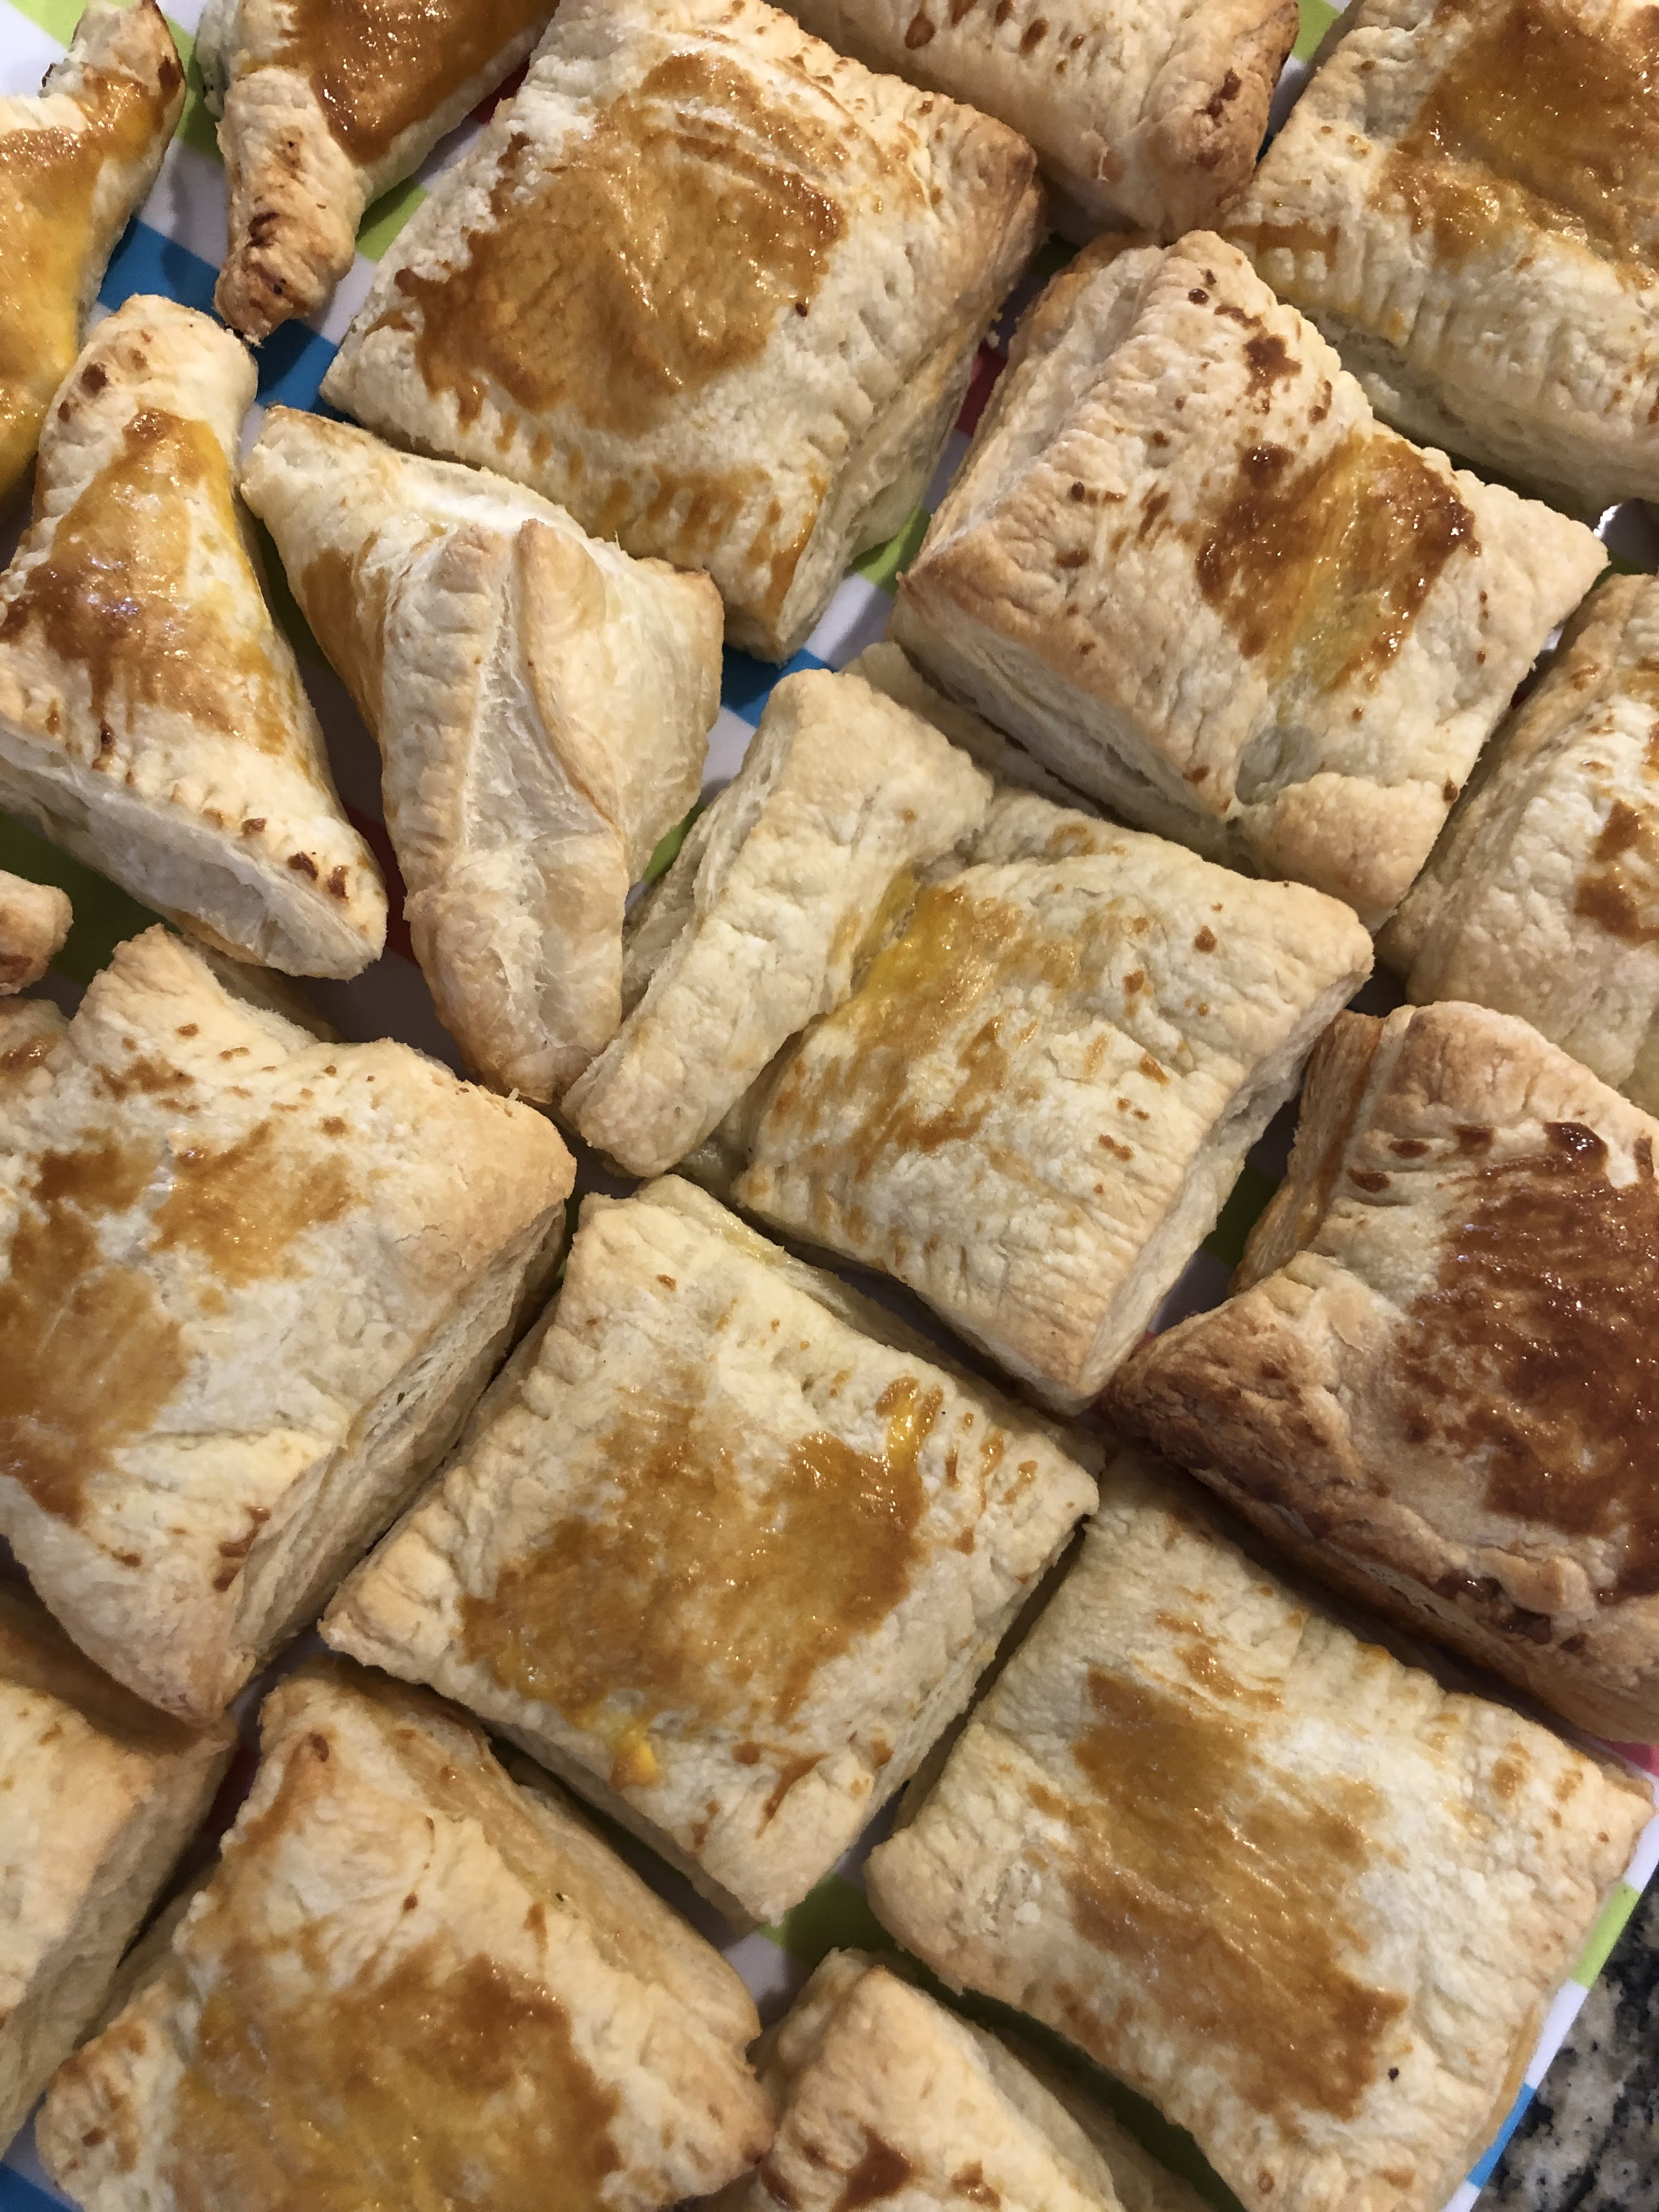
Cooking with Chef Lucas during the COVID lockdown and cautionary period was a bright light in during dark days. Our family came together to cook together and enjoy a wonderful meal of unique dishes. Mint and Cheese Greek Pies did not disappoint. Thanks to Chef Lucas and InVINtions for offering such a great program and helping our family create wonderful memories.
1 package puff pastry sheets or phyllo dough (puff pastry is easier to handle)
DIRECTIONS:
Preheat the oven to 400 degrees F.
Combine egg and cheese in a bowl. Mix thoroughly.
Depending on what size appetizer you desire, cut puff pastry into equal size pieces (use phyllo as directed on package). Place a spoonful of filling onto pastry, wet edges of pastry.
Fold pastry and seal with tines of a fork. Cut into 12 squares.
Place pastry onto lined baking sheet, brush with slightly beaten egg white.