Family · Garden · Home · Home

Our Robin Adventure

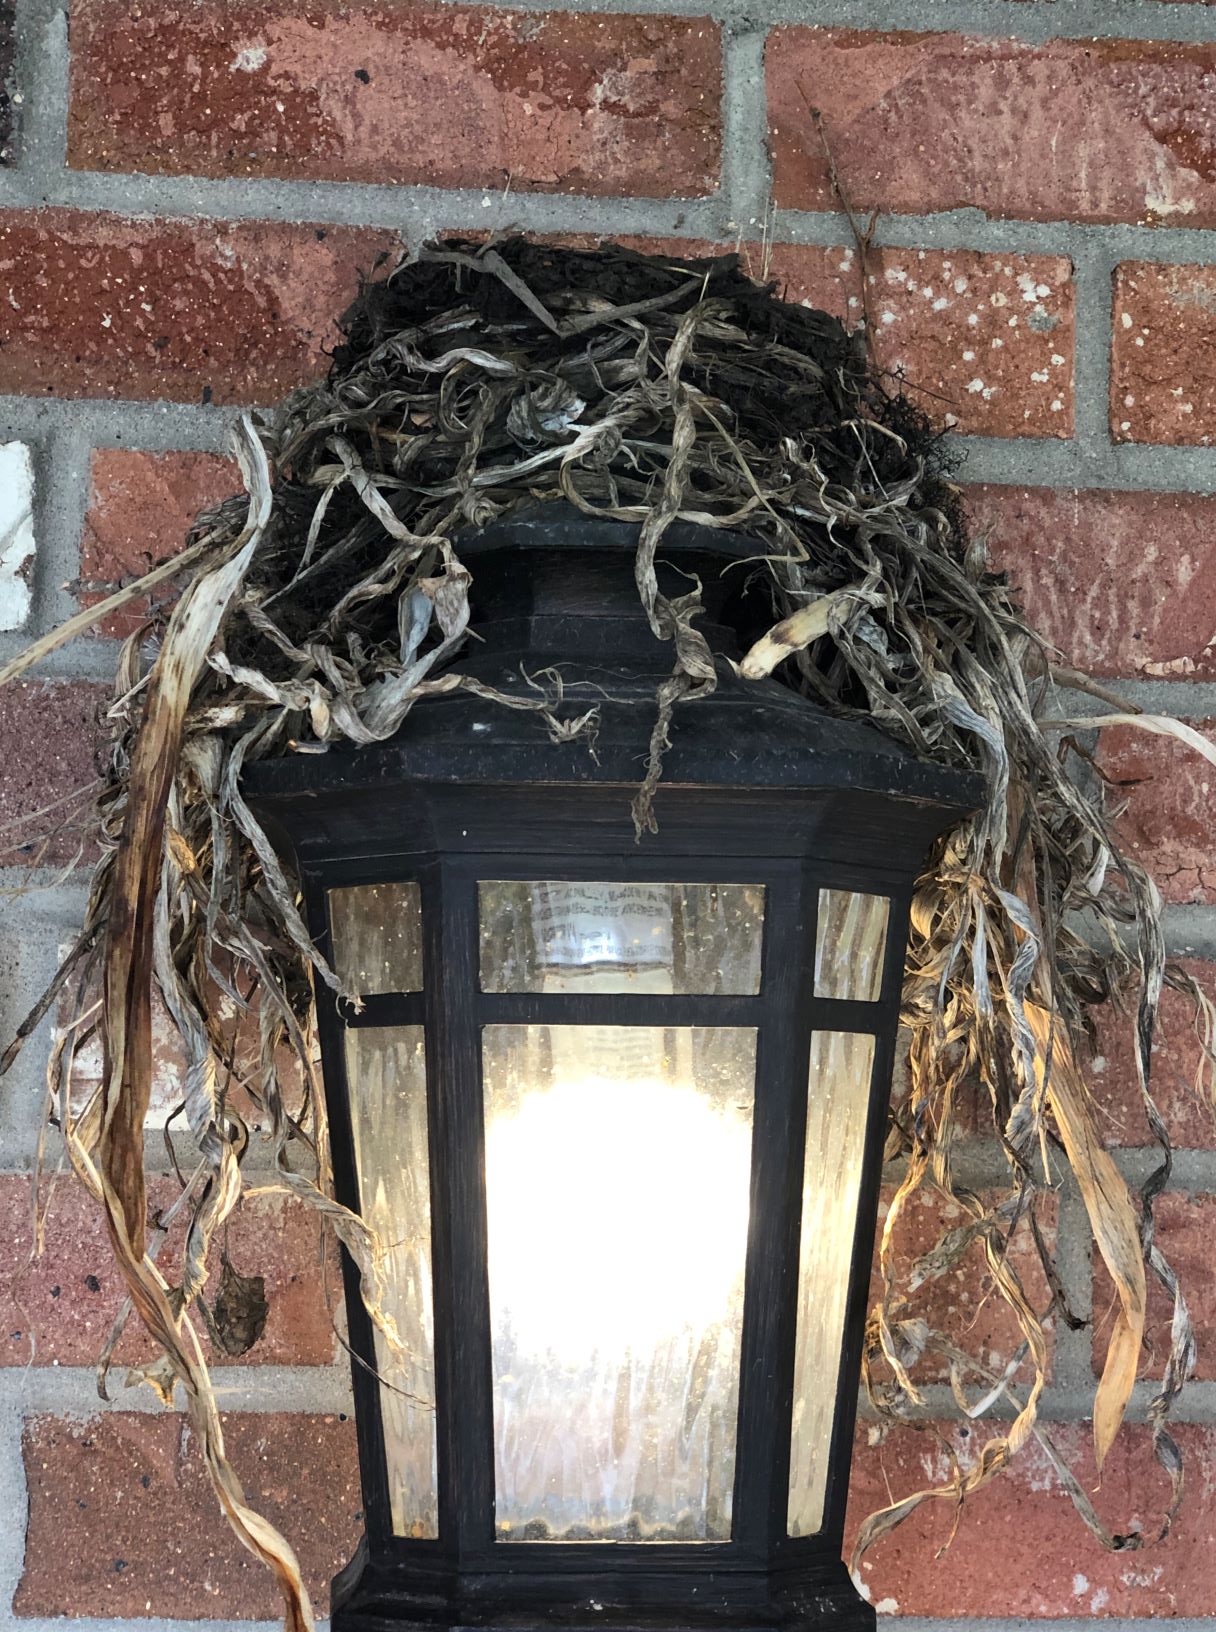
May 7,  I stepped onto my front porch and noticed a few unsightly weeds hanging from my front porch light.  I pulled them down and went about my day.  The next morning, lo and behold, there was a beautiful nest perched on top of the porch light.

I marveled at the intelligence of Mama and Papa Robin, selecting a nest site that was under the cover of the porch and warmed by the light 24x 7 because they built the nest over the light sensor!

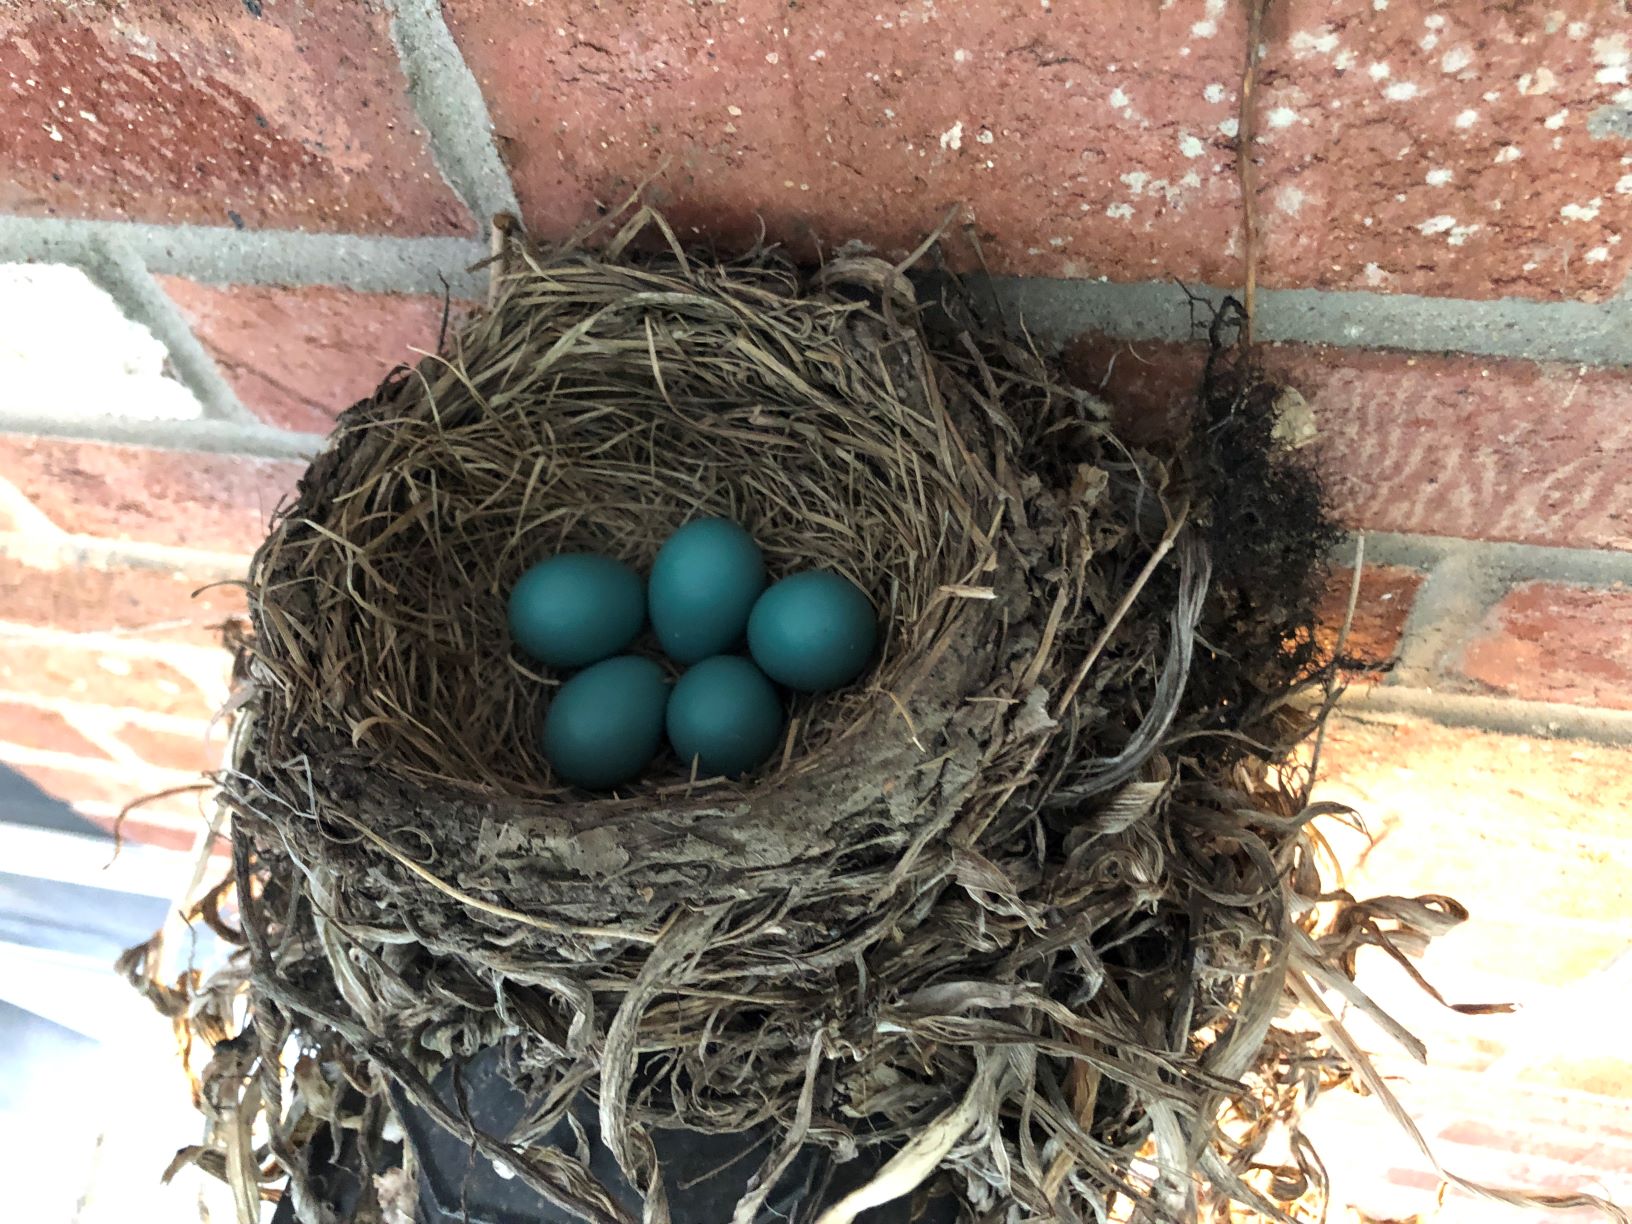
On May 12, the eggs started to appear, first two, then a total of 5.  The Colorado May weather was unusually cold so Mama was on the nest most of the time.


Mama Robin lays her eggs May 12-15

Excitement was building as our family watched the Robin’s nest with great anticipation.  The grandkids were so excited to see photos and watch the wonder of nature.

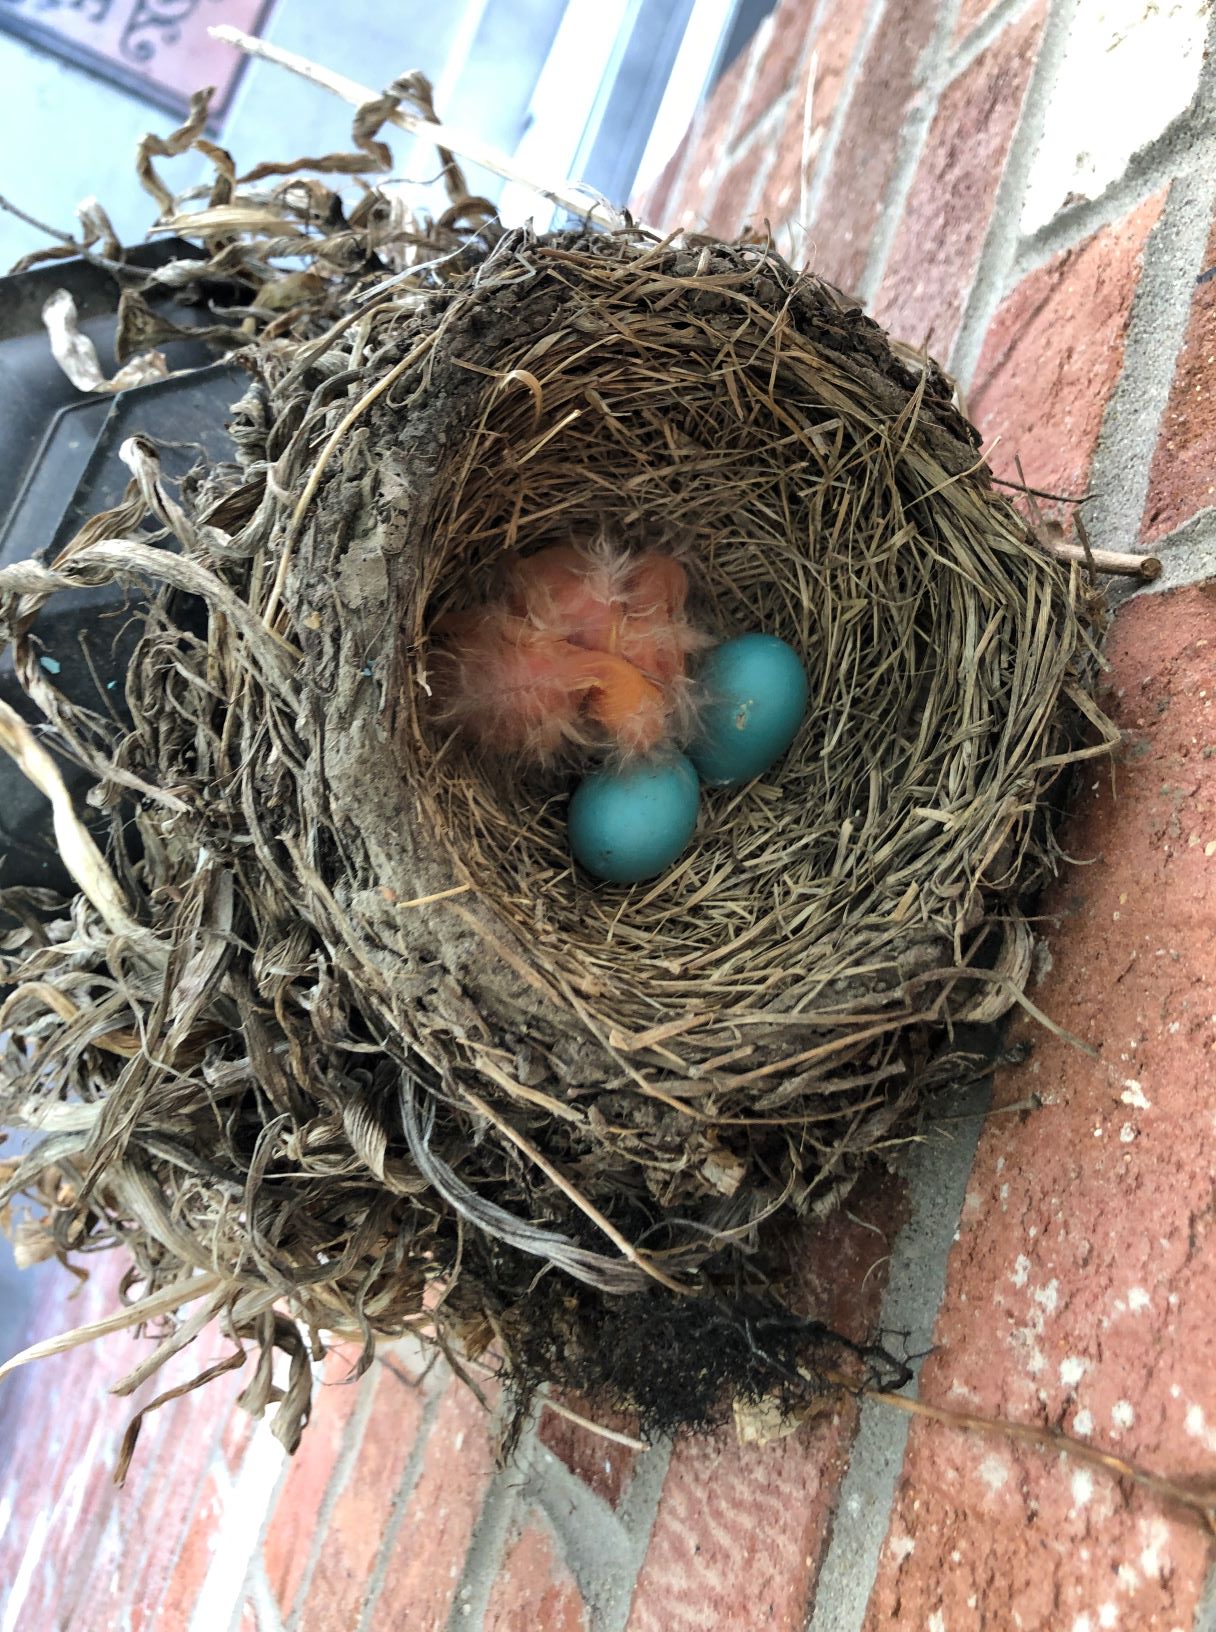
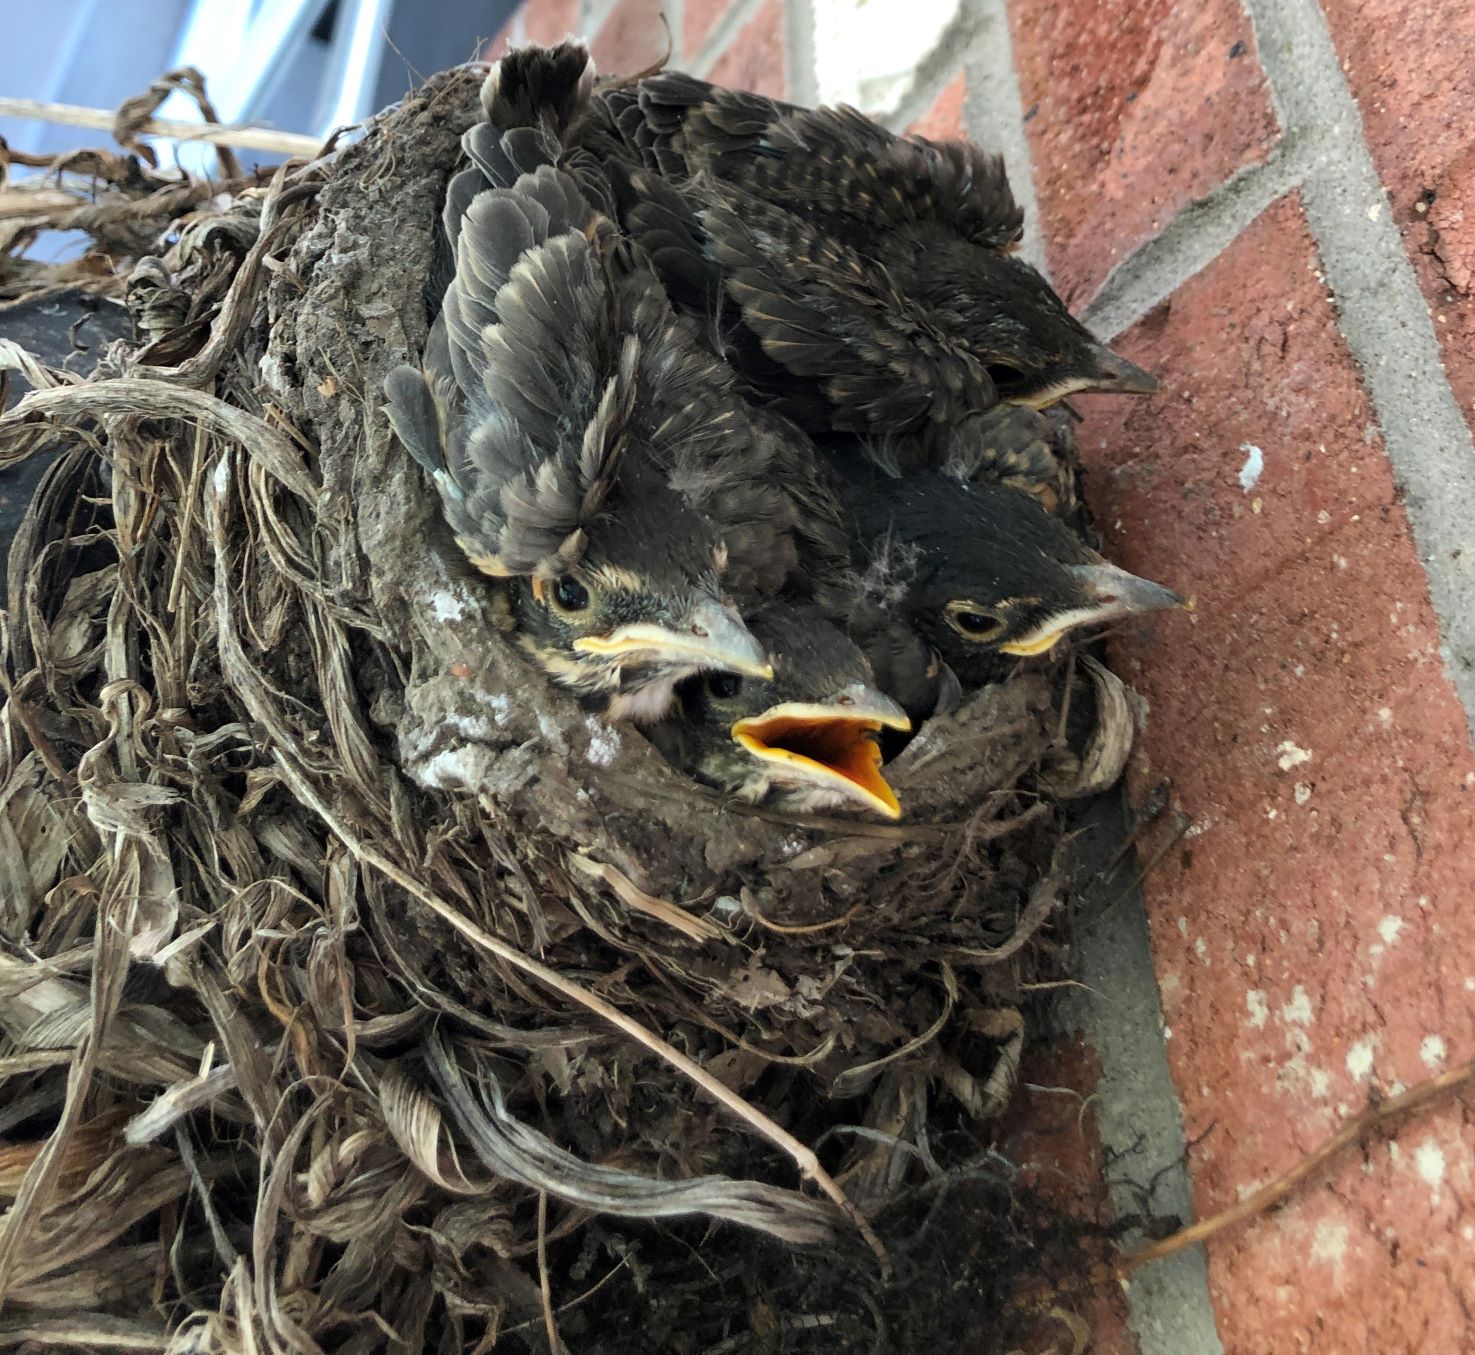
Fifteen days later the eggs started to hatch, one by one.  To be able to see (never touch) these sweet babies up close was amazing.  The nest was too tall to actually look into the nest, iphone photos and video to the rescue (centering of the photos was often an issue).


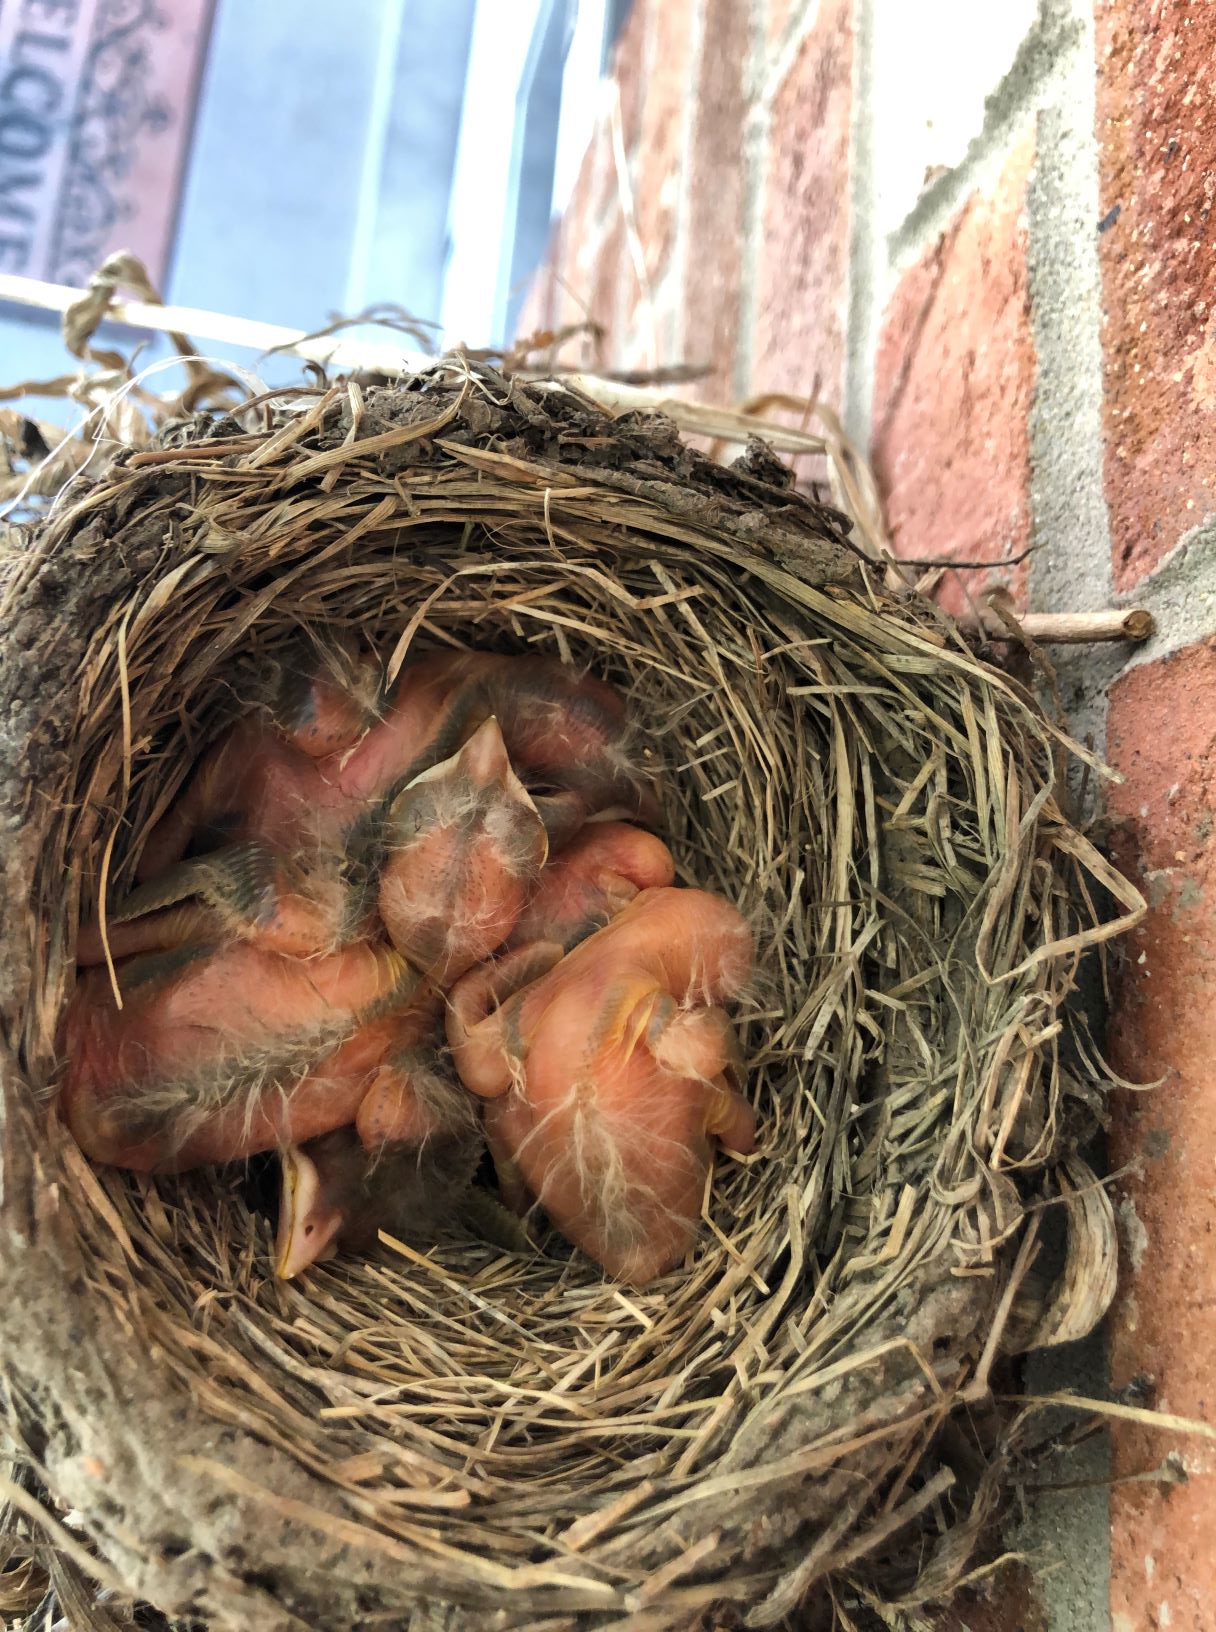
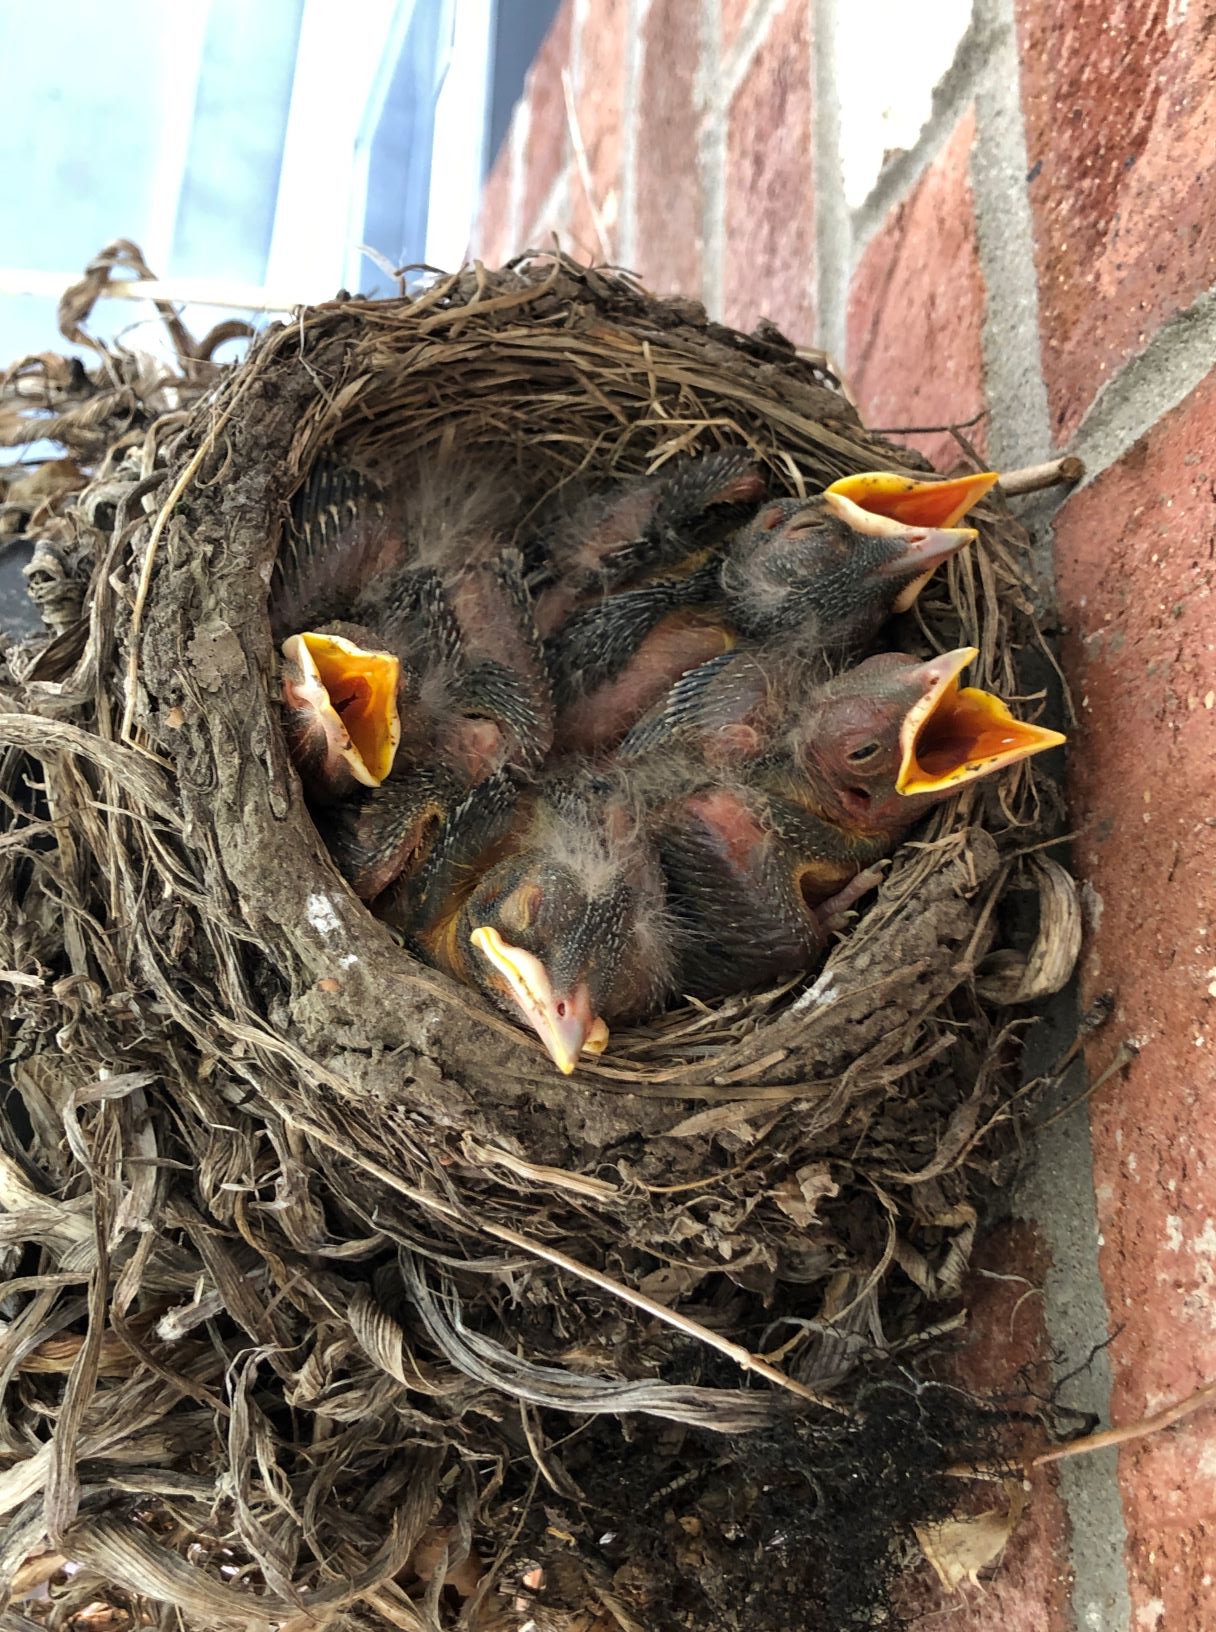
Mama and Daddy Robin were consumed with feeding these hungry babies and they became very protective whenever we stepped out on the porch, swooping by and touching my hair to give warning.

Eleven days after the first hatch, two of the babies flew from the nest.

June 8: Two babies prepare to leave the nest

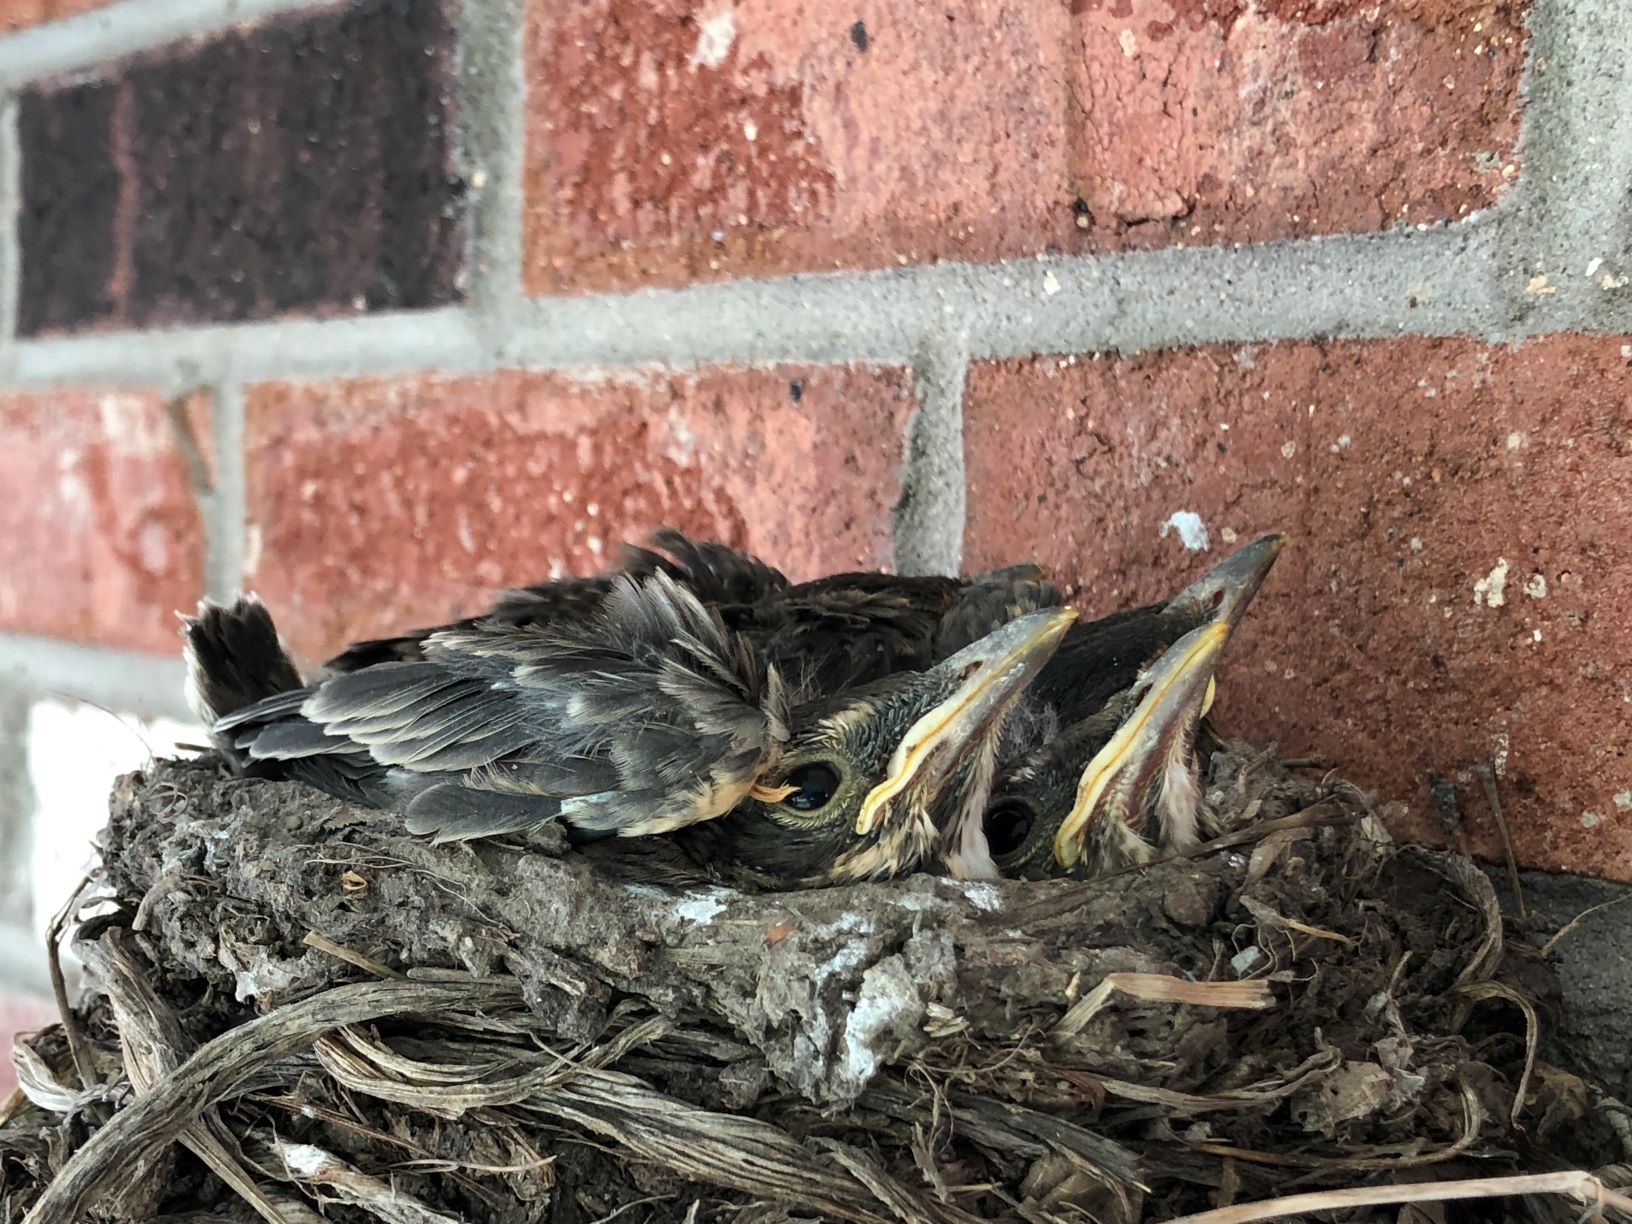
Mama was talking to them and away they went.  A few days later the last two babies also left the nest.  Their soaring abilities were very good and I hope they have learned to soar and be safe.

In the meantime, the grandkids are disappointed that the birds are gone, as am I.  Thank you, Mother Nature, for the great adventure and we hope we’ll have the opportunity again next year.

Below is a link to a short video of our Robin Adventure.

Breads · Family · Family Favorites · Garden · New Favorite

Lemon Yellow Summer Squash Bread

When yellow squash and zucchini are plentiful and I’ve made every possible recipe, I go to the web and try to find something different to make.  This bread was a phenomenal find. I’ve always been fond of lemon cake and this bread is addictive. No, you can’t have just one slice, I guarantee it!

IMG_7593

LEMON YELLOW SUMMER SQUASH BREAD

There is no reason you couldn’t substitute zucchini in this recipe; would be pretty with the green zucchini and yellow lemon zest!  I did not make the Sweet Roasted Lemon Garnish).
Serves: 2 loaves

1 cup melted butter
2 cups sugar
¼ cup lemon juice
2 tsp. lemon zest
1 tsp. vanilla
3 eggs
3 cups flour
1 tsp. salt
½ tsp. baking powder
1 tsp. baking soda
2 cups grated summer squash

For the Glaze:

1 Tbsp. melted butter
½ cup powdered sugar
1 Tbsp. lemon juice
1 tsp. lemon zest

For the Sweet Roasted Lemon Garnish (edible and optional!):

1 lemon, halved lengthwise, thinly sliced, seeds removed
½ tsp. sugar
1 Tbsp. olive oil

  • Preheat oven to 325 degrees.
  • Grease and flour 2 regular loaf pans or 4 mini pans.
  • Mix butter, sugar, lemon juice, lemon zest and vanilla until well blended.
  • Add eggs one at a time and once all are incorporated beat for 2-3 minutes until light and fluffy.
  • Sift flour, salt, baking powder and baking soda. Add dry ingredients to wet mixture and mix thoroughly.
  • Add squash and stir just to blend.
  • Pour into prepared pans and bake at 325 degrees for 45 minutes for small loaf pans or 1 hour for regular size loaf pans.
  • Allow the pan to cool; remove the bread and place top down on a serving plate (makes for a nice presentation for the glaze and lemons).
Make the Roasted Lemons:
  • Cook lemon slices in a medium saucepan of boiling water 2 minutes to remove bitterness. Drain and pat dry.
  • Gently toss lemon slices with sugar, and 1 Tbsp. oil in a medium bowl. Spread out on a parchment-lined baking sheet and bake until lemons are no longer wet and only slightly colored, 15–20 minutes. Let cool.
Make the Glaze:
  • Combine the melted butter and powdered sugar and stir until smooth; add the lemon juice and lemon zest and stir to combine.
  • Add water or milk if necessary to get the right consistency.
  • Pour the glaze over the top; covering it completely and letting excess dribble down the sides.
  • Arranged sweet, roasted lemons on top.
  • Serve warm or at room temperature.

Recipe from CreativeCulinary.com

Family · Garden · Home · Italian Dishes · New Favorite · Pastas · Vegan · Vegetarian

Roasted Tomato, Sausage and Pesto Sauce

Fall brings the bounty of tomatoes, basil and much more. Older daughter, Megan, told me about a roasted tomato and pesto sauce she made. I tweaked it a bit to serve my tastes. I love the idea of adding pesto to a rich, red tomato sauce. It was delicious and definitely a new recipe for my collection.

ROASTED TOMATO AND PESTO SAUCE

1 pound Italian sausage, cooked and drained
3 cups roasted tomatoes and peppers, cooled and blended (recipe below)
1/2 cup chopped onion
1 tablespoon olive oil
3-4 garlic cloves, diced
Cube of pesto (about 1/3 cup)
26.5 ounce can San Marzano tomatoes, chopped or blended
1 cup water
1 tablespoon fresh, chopped basil
1 pound cooked pasta (I used bow tie pasta) and 1 cup of pasta water
Parmesan Cheese (optional)

  • Core and slice tomatoes. Halve and remove seeds from peppers.
  • Arrange the tomatoes and peppers on a heavy cookie sheet (I line with parchment paper).  Drizzle with Avocado oil and sprinkle with sea salt or kosher salt.
  • Roast at 400 degrees until the edges of the vegetables start to char and are cooked through.
  • Blend the mixture to a smooth consistency.
  • Cook and drain the sausage. Drain and set aside.
  • Sauté onions in olive oil and when almost cooked through, add the garlic. Continue to salute until garlic is cooked through.
  • Add roasted tomatoes and peppers, pesto, San Marzano tomatoes, water, basil and sausage.
  • Heat thoroughly.
  • Add 1 cup of pasta water to sauce. Stir.  Add drained, cooked pasta, and stir to mix thoroughly.
  • Serve with Parmesan cheese.
Garden · Mexican Dishes · New Favorite · Soups and Stews

Chicken Pozole with Tomatillos

Tomatillos are plentiful this year so I’m always up for trying a new recipe. I love my standard Posole recipe with pork, but liked this idea with chicken and tomatillos. Tomatillos have almost a citrus-like taste to them so it pairs well with chicken and pozole.

The soup was great fresh and I’ve frozen a large batch for a cold winter’s night!

CHICKEN POSOLE WITH TOMATILLOS

1 pound tomatillos
6 cups chicken stock
2 cups chopped onion
1 pounds chicken, skinned (I used 2 cups of cooked, chopped chicken vs. raw)
4 garlic cloves, chopped
2 jalapeño peppers, seeded and quartered
1 (30-ounce) can white hominy, drained
1 teaspoon salt
1/2 teaspoon dried cilantro
1/2 teaspoon crushed red pepper (or more to taste)
1/2 cup chopped fresh cilantro (optional)
1/4 cup reduced-fat sour cream (optional)
8 lime wedges (optional)
Appetizers · Family Favorites · Garden · New Favorite · Vegan · Vegetarian

Fresh Corn and Tomatillo Salsa

My garden continues to produce plenty of tomatillos and when paired with fresh sweet corn, cilantro and seasonings, it makes a wonderful salsa. I’ve also used it to top my favorite Papusas from the Farmer’s Market. It wold also be wonderful paired with chicken or fish. A new favorite!

CORN AND TOMATILLO SALSA

4 ears fresh corn kernels
2 seeded and finely chopped jalapeno peppers
4 cups husked, chopped tomatillos
1/2 cup chopped green bell pepper
1/2 cup chopped onion
2 tablespoons fresh lime juice
2 tablespoons water
3 tablespoons fresh, chopped cilantro
tortilla chips

  • In a large skillet, combine the corn kernels and jalapeño peppers. Cook and stir for 10 minutes, until the jalapeños are soft.
  • Add the tomatillos, green pepper, onions, lime juice, water and coriander to the corn and jalapeño mixture. Bring to a boil. Reduce heat and simmer for 5 minutes.
  • Remove from heat. Cool. Stir in cilantro.
  • Cool salsa in the refrigerator until ready to eat.
  • Serve with tortilla chips

Recipe adapted from:  http://allrecipes.com/recipe/19686/corn-and-tomatillo-salsa/?internalSource=search%20result&referringContentType=search%20results

Family Favorites · Garden · Vegetables · Vegetarian

Zucchini Fritters

Zucchini and rabbits have a lot in common. They multiply…and multiply…and multiply.  My zucchini plant has done well this year, keeping my daughters and I supplied in plenty of zucchini for salads, pastas, breads and, one of my favorites, Zucchini Fritters.

I’ve made these for years but with the remodel, the recipe disappeared. I found this recipe online which sounded almost exactly like my tried and true recipe. It’s easy and delicious, a bit like latkes.

ZUCCHINI FRITTERS

4 cups shredded zucchini
2/3 cup all-purpose flour
2 large eggs, lightly beaten
1/3 cup sliced scallions (green and white parts)
Vegetable oil
Sour cream, for serving (optional)

  • Place the shredded zucchini in a colander set over a bowl and sprinkle the zucchini lightly with salt. Allow the zucchini to stand for 10 minutes. Using your hands, squeeze out as much liquid from the zucchini as possible. Transfer the zucchini to a large bowl.
  • Add the flour, eggs, sliced scallions, 1/4 teaspoon salt and 1/8 teaspoon pepper to the bowl, stirring until the mixture is combined. Line a plate with paper towels.
  • Liberally coat the bottom of a large sauté pan with vegetable oil and place it over medium-high heat. Once the oil is hot, scoop 3-tablespoon mounds of the zucchini mixture into the pan, pressing them lightly into rounds and spacing them at least 2 inches apart. Cook the zucchini fritters for 2 to 3 minutes, then flip them once and cook an additional 2 minutes until golden brown and cooked throughout.

  • Transfer the zucchini fritters to the paper towel-lined plate and immediately sprinkle them with salt. Repeat the scooping and cooking process with the remaining zucchini mixture.
  • Serve the zucchini fritters topped with sour cream (optional) and sliced scallions.

Recipe from Justataste.com 

Cakes · Garden · New Favorite

Chocolate Zucchini Cake…good for you, right?

Zucchini has been plentiful this year and I was craving a chocolate fix.  I found this recipe and LOVED the cake. The glaze turned into chocolate globs which I did try to spread on top of the cake.  Next time I’d either just skip the glaze, or make my own.

The cake is moist and delicious…a keeper!

CHOCOLATE ZUCCHINI CAKE

Unsalted butter, for the pan
1 1/2 cups all-purpose flour, plus more for the pan
1/2 cup plus 1/3 cup semisweet chocolate chips
1/4 cup unsweetened cocoa powder (not Dutch process)
1/2 teaspoon kosher salt
1/2 teaspoon baking soda
1/4 teaspoon ground nutmeg or allspice
1 1/4 cups sugar
1/2 cup plus 1 teaspoon extra-virgin olive oil
2 large eggs
1/2 teaspoon vanilla extract
1 medium zucchini, grated and squeezed dry
1 teaspoon honey

  • Preheat the oven to 350 degrees F. Butter the bottom and sides of a 9-inch-square cake pan. Dust the pan with flour, tapping out the excess.
  • Toss 1/2 cup chocolate chips with 1 tablespoon flour in a small bowl. Whisk the remaining flour, the cocoa powder, salt, baking soda and nutmeg in a medium bowl; set aside.
  • Beat the sugar, 1/2 cup olive oil, the eggs and vanilla in a large bowl with a mixer on medium speed until smooth and pale, about 3 minutes. Add the flour-cocoa mixture; beat on low speed until combined, about 2 minutes (the batter will be thick). Add the zucchini and beat until combined, about 2 more minutes. Fold in the flour-coated chocolate chips with a wooden spoon.
  • Transfer the batter to the prepared pan and bake until a toothpick inserted into the center comes out clean, 30 to 35 minutes. Transfer to a rack and let cool completely.
  • Make the glaze: Combine the remaining 1/3 cup chocolate chips, 1 teaspoon olive oil and the honey in a microwave-safe bowl. Microwave on medium-high power in 30-second intervals, stirring, until the chocolate is melted. Spread over the cake, then cut into pieces.

Read more at: http://www.foodnetwork.com/recipes/food-network-kitchens/chocolate-zucchini-cake-recipe.html?oc=linkback

NOTE:  I made this recipe again and used a different glaze that was perfect:

GLAZE
3/4 cup semisweet chocolate chips
3 tablespoons butter
1 tablespoon light corn syrup
1/4 teaspoon vanilla extract

Combine all ingredients in a microwave safe bowl. Microwave on high for 30 seconds. Stir. Microwave at 15 second intervals and stir each time until mixture is smooth. Pour over cake.

Appetizers · Family Favorites · Garden · Gluten Free · New Traditions · Vegan · Vegetarian

Tomatillo Salsa Fresh from the Garden

Last year was the first time I ever planted tomatillos plants in my garden. While my tomatoes struggled last year, the tomatillos went crazy and they are even crazier this year given all of the summer rain in Colorado.

My first try at tomatillos salsa went the easy – route and it was delicious. I froze a few bags for winter enjoyment, too! I plan to branch out this year and try a few other recipes, too!

GREEN TOMATILLO SALSA

8 ounces (5-6 medium) tomatillos, husked and rinsed
1 jalapeno (or 2 serranos), stemmed
5-6 sprigs fresh cilantro (thick stemmed removed), roughly chopped
1/4 cup water
1/4 cup finely chopped onion
salt to taste

  • Chop the tomatillos and the jalapeño.
  • In a blender or food processor, combine the tomatillos, jalapeño, cilantro and 1/4 cup water. Process to puree, then scrape into a serving dish.
  • Stir in the chopped onion and salt.
Appetizers · Garden · New Favorite · Vegan · Vegetarian

Cinnamon Basil Pesto

Cinnamon Basil was a garden experiment that produced more than I expected. Now, what do I do with it?

I found this interesting Cinnamon Basil Pesto recipe and decided to try it in three ways:

  • Simple spread on a wafer/cracker
  • Served on top of a mild cheese (brie, gouda, etc.) and wafer/cracker
  • Served on top of a mild cheese with wafer/cracker and drizzled with honey

This fun experiment ended with the pesto, cheese and honey winning my vote

CINNAMON BASIL DESSERT PESTO

1/3 – 1/2  cup walnut oil
2  cups firmly packed, fresh cinnamon basil leaves
1/2  cup chopped almonds
1/2  cup flaked coconut
1/4  cup freshly grated Asiago cheese (1 oz.)
2   teaspoons raw sugar or packed brown sugar

  • In a food processor or blender combine 1/3 cup of the oil, the basil, almonds, coconut, cheese, and sugar. Cover and process or blend until nearly smooth, stopping and scraping sides as necessary and adding enough remaining oil until of desired consistency.
  • If the pesto is not to be served immediately, divide it into three portions. Place each portion in a small airtight container. Refrigerate up to 24 hours or freeze up to 3 months. Makes about 1-1/3 cups pesto.
Garden · Home

Peach Lilac tree…and the ensuing battle

A few years ago, I noticed a large branch growing from the middle of one of my lilac bushes.  I’d pass it now and again and wonder what it was, but let it grow. I was sure the squirrels left a seed that eventually sprouted into something new.

One year, this mysterious branch had blossoms different than the lilac, so again I watched to see what would happen. IMG_4909

Eventually small fruit began to form from the blossom and revealed itself as peaches.

1350

The peaches continued to grow and would soon be ripe.  I couldn’t wait to pick a peach fresh from my yard and enjoy every drippy, lucious bite.

UNTIL…the squirrels came back to claim their bounty. Most of the peaches ended up on the ground, partially eaten by the squirrels.  The least they could do is the eat the whole thing!

Peach with Squirrel damage

The squirrels were kind enough to leave a couple of peaches for me.

Peaches 2012

It’s a new year and the squirrels and I are plotting our strategies.  If peaches form, who will get there first?  The tale of the Peach Battle between Team Squirrel and Team Cathy continues.