Cakes · Cookies and Bars · New Favorite

Apricot Crumble Cake

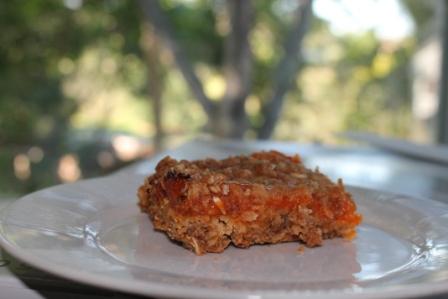
Fresh Apricots are tangy yet sweet and not something I purchase on a regular basis. Last year our CSA delivered a large bag of apricots week after week. This recipe was a delicious way to use the fresh apricots and have a chewy, moist dessert or breakfast treat.

IMG_6960

FRESH APRICOT BARS

2 lbs ripe Apricots
2/3 cup sugar
1 Tablespoon orange liqueur (such as Grand Marnier) or orange juice
1 cup flour
1/2 cup packed brown sugar
1/2 teaspoon Kosher or Sea Salt
1/4 teaspoon Baking Soda
1/2 cup cold unsalted butter, cut into small cubes
1 cup old fashioned oats

  • Preheat oven to 350°F. Butter a 2 quart baking dish.
  • Combine the apricots and sugar in a saucepan. Cook over medium heat until the sugar is dissolved and the apricots are soft (will vary tremendously depending on the ripeness of the apricots-very ripe apricots will only take minute or two). Stir in the orange liqueur.
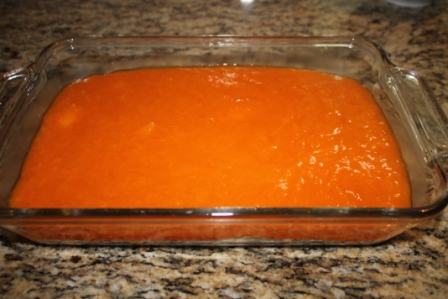
  • Puree the apricots in a blender or food processor until smooth. Pour into a bowl and set in freezer to chill while you make the crust.
  • In a bowl, whisk together the flour, brown sugar, salt, and baking soda. Pinch in the butter pieces into the flour mixture (or cut them into the flour with a pastry cutter), until it resembles coarse sand. Pinch in the oats until well combined.
  • Press 2/3rds of the crust mixture evenly into the bottom of the prepared baking dish. Spread the apricot puree over the crust bottom. Sprinkle the remaining crust over the top of the apricot puree.

IMG_6940

IMG_6950 IMG_6955

  • Bake for 1 hour or until the crust is golden brown.

IMG_6957

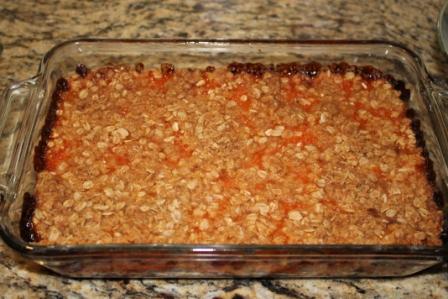
  • Allow to cool, then slice and serve. Store in the refrigerator.
Recipe Adapted from: WhiteOnRiceCouple.com.


Gluten Free · New Favorite · Salads · Vegan · Vegetarian

Winter Fruit Salad with Lemon Poppy Seed Dressing

Fresh fruit salad in winter is a real treat. This recipe is delicious, combining several fruits including apples, kiwi, blackberries, pomegranate, bananas and Mandarin oranges. The dressing is fresh and tasty, delivering a nice side to compliment any meal.
IMG_7698

WINTER FRUIT SALAD WITH LEMON POPPY SEED DRESSING

Dressing

1/4 cup olive oil
1/4 cup vegetable oil
3 Tbsp. granulated sugar
3 Tbsp. honey
3 Tbsp. fresh lemon juice
2 tsp. poppy seeds

  • Combine all ingredients and mix well.

Salad

8 mandarin oranges, peeled and segmented (I used Cuties)
4 apples, diced
4 ripe kiwis peeled and diced
4 bananas, peeled and diced
1 1/2 cup pomegranate arils (from about 1 large)
1-2 cups blackberries (I added to the recipe)

  • Combine all salad ingredients. Toss with dressing and serve immediately.

Recipe adapted from CookingClassy.com

Cakes · Family · New Favorite

Raspberry Lemon Cupcakes

Two of my favorite flavors…raspberry and lemon…together they are heaven. When we were planning older daughter Megan’s baby shower we made these cupcakes.  The cupcakes (which you cannot see) were divine and the icing tasted wonderful, although it didn’t look as wonderful as I would have liked. The icing had a lumpy look to it but not in taste or texture.

The theme of the shower surrounded children’s books so we purchased edible children’s book toppers on Etsy. Adorable!

I’ll make the cupcakes again but I’ll play with the icing to get it just right!

IMG_7154 IMG_7186

RASPBERRY LEMON CUPCAKES

Yield: 24 regular cupcakes

For the Cake:
2 1/4 cups cake flour
1 tablespoon baking powder
1/2 teaspoon salt
1 1/4 cups buttermilk
4 large egg whites
1 1/2 cups sugar
lemon zest from two large lemons
1/2 cup unsalted butter, at room temperature
1 teaspoon vanilla
1/2 teaspoon lemon extract

For the Frosting:
1/2 to 2/3 cup fresh raspberries (or frozen, thawed) (use 2 cups for 1.5x recipe of frosting)
1/2 cup salted butter, at room temperature
1/2 cup unsalted butter, at room temperature
1/2 cup shortening
1 tablespoon vanilla
3 cups powdered sugar
1-3 tablespoons milk, if needed

To Make the Cake:

  • Preheat the oven to 350˚F.  Position the rack to the center of the oven.  Line cupcake pans with paper liners.
  • In a medium bowl, sift together the flour, baking powder and salt; set aside.  In another medium bowl, whisk together the milk and egg whites until well blended.
  • Place the sugar and lemon zest in a large mixer bowl and rub together with your fingers until the zest has moistened all the sugar.  Use the paddle attachment to beat the butter in at medium speed for 3 minutes, until very light.
  • Add in the extracts and then one third of the flour mixture, while continuing to beat on medium speed.
  • Mix in half of the milk-egg mixture, then half of the remaining dry ingredients.  Beat in the rest of the milk and eggs until fully incorporated, then mix in the remaining of the dry ingredients.  Beat at medium speed for a full 2 minutes to aerate.  Evenly distribute the batter into the cupcake pans.
  • Bake for 18-22 minutes (for regular cupcakes) or 10-12 minutes (for miniature cupcakes).  The cupcakes are done when they pass the toothpick test and are springy to the touch.   Cool completely on a wire rack.

To Make the frosting:

  • Puree the raspberries in a blender and then push through a fine mesh strainer to discard the seeds; set aside. Cream together the butter and shortening in a large mixing bowl, with the paddle attachment.
  • Beat in the vanilla and most of the raspberry puree, until fully combined.
  • Stir in the sugar 1/2 cup at a time, mixing thoroughly after each addition, until reaching desired consistency.  Use more or less sugar as needed, and add more raspberry puree to taste.  If the frosting is too thick, beat in milk one tablespoon at a time.

Source:  My Baking Addiction, originally from Dorie Greenspan and Seeded at the Table 

Family Favorites · New Favorite · Sandwiches

Runza

I know Runzas are a staple to my Nebraska and Kansas friends but not something we grew up with in Iowa.  A few years ago I was watching the television show, Diners, Drive-Ins and Dives where they visit Lauer-Krauts  in Brighton, Colorado.  A friend and I made the trek to Brighton to try one of their krautburgers and they were delicious, but frankly, too far a drive when you have a craving.

This recipe was close to what we experienced and I decided to give it a try.  It was very good and I would love to try making them with either a mixture of fresh cabbage and sauerkraut or simply with sauerkraut.  Growing up in Iowa, Mom’s homemade sauerkraut was amazing and I now love all things kraut!

IMG_7620 IMG_7616

RUNZA

Makes 10 Runzas

Dough:

1/4 oz packet of dry yeast
3 tablespoons sugar
4 large eggs
3 1/2 cups bread flour
12 tablespoons salted butter
2 teaspoons salt

Filling:

1 pound lean ground beef
salt and pepper to taste
1 tablespoons salted butter
1 Vidalia onion, diced
3 cloves garlic, minced
1/2 teaspoon thyme
1 teaspoon rosemary
1 tablespoon canola oil
1/2 head cabbage, chopped

  • To make the dough, combine 3/4 cup of very warm water, a pinch of sugar, and the yeast in a bowl. Let it sit until it blooms. If you’ve never done this before, pop yourself some popcorn and sit back and enjoy the show. You’ll know what I mean when the “blooming” begins. Okay, maybe it’s not that cool…
  • Add 3 of your eggs and whisk with your yeast mixture.  Add 2 cups of your flour to the liquid and mix well with a wooden spoon.  Add the butter, the sugar, the remaining flour and salt and mix well.
  • Knead the dough on a floured surface for about 5 minutes.  Place the dough ball in a buttered bowl and let sit for one hour at room temperature.  Transfer to the refrigerator and let sit for at least an hour.
  • Remove the dough and divide into 10 equal portions. Roll into separate balls and let sit covered while you make the filling.
  • Speaking of the filling, get your ground beef sizzlin’ on a skillet.  Season as desired with salt and pepper.  Cook until lightly browned, then remove the beef from the skillet with a spoon and place it in a bowl, leaving most of the grease behind.  Add your butter to the skillet and begin sizzlin’ your onion.  Cook until translucent, about 10 minutes or so.  Add your garlic, thyme and rosemary and cook for an additional 2-3 minutes.  Add this whole mixture to the bowl with the beef.
  • Next, using the moisture still in your skillet, get the pan nice and hot.  Add your cabbage and stir constantly until the cabbage is lightly browned and translucent-ish.  It may seem like a lot of cabbage at first, but it shrinks down substantially.  Add the cabbage to the beef mixture.
  • Flatten your balls of dough with a rolling pin.  Each dough saucer should be about 8 inches in diameter.  Place 1/3 to 1/2 cup of filling in the center of each dough-saucer and pull the edges together and pinch to enclose the filling in the dough.  To avoid a thickened dough-seal, I actually cut off the excess dough with cooking shears.  If you don’t do something like this, you’ll find a doughy center as you take your first chomp.
  • Preheat the oven to 375° while the runzas sit and rise for a bit.  Brush some of the egg (your remaining egg of the 4 you originally had) on the top of each runza to give it a nice browning while in the oven.  Cook the runzas on a greased baking sheet for about 25 minutes or until golden brown.

Recipe from Highheelsandgrills.com 

New Favorite · Soups and Stews

Broccoli Cheddar Soup

Cold winter nights mean hearty soups in my kitchen. Broccoli Cheddar Soup is always a favorite when dining out but I’ve rarely made it.  This is a great recipe that has become a family favorite.

IMG_7524

BROCCOLI CHEDDAR SOUP

1 tablespoon + 4 tablespoons unsalted butter, divided
1 small/medium sweet yellow onion, diced small
1 clove garlic, peeled and minced finely
1/4 cup all-purpose flour
2 cups low-sodium vegetable or chicken stock
2 cups fat-free half-and-half (I used regular half-and-half)
3 cups broccoli florets, diced into bite-size pieces
2 large carrots, trimmed, peeled, and finely chopped
3/4 teaspoon salt, or to taste
3/4 teaspoon freshly ground black pepper, or to taste
1/2 teaspoon smoked paprika or regular paprika, optional and to taste
1/2 teaspoon dry mustard powder, optional and to taste
pinch cayenne pepper, optional and to taste
8 ounces grated extra-sharp cheddar cheese, with a small amount reserved for garnishing bowls

  • In a small saucepan, add 1 tablespoon butter, the diced onion, and sauté   over medium heat until the onion is translucent and barely browned, about 4 minutes. Stir intermittently.
  • Add the garlic and cook about 30 seconds, stirring constantly so it doesn’t burn. Remove from heat and set pan aside.
  • In a large heavy-bottom pot, add 4 tablespoons butter, flour, and cook over medium heat for about 3 to 5 minutes, whisking constantly, until flour is thickened. You are making a roux and it’s very important the mixture is thick or soup will never thicken properly later.
  • Slowly add the vegetable stock, whisking constantly.
  • Slowly add the half-and-half, whisking constantly.
  • Allow mixture to simmer over low heat for about 15 to 20 minutes, or until it has reduced and thickened some. Whisk intermittently to re-incorporate the ‘skin’ that inevitably forms, this is normal.
  • While mixture is simmering, chop the broccoli and carrots. After simmering 15 to 20 minutes, add the broccoli, carrots, and the onion and garlic you previously set aside.
  • Add the salt, pepper, optional paprika, optional dry mustard powder, and optional cayenne.  Stir to combine.
  • Allow soup to simmer over low heat for about 20 to 25 minutes, or until it has reduced and thickened some. Whisk intermittently to re-incorporate the ‘skin’ that inevitably forms, this is normal.
  • Optional: I used a Braun hand blender to blend the vegetables into a creamier consistency.
  • While soup simmers, grate the cheese. After simmering about 20 to 25 minutes, add most of the cheese, reserving a small amount for garnishing bowls. Stir in the cheese until melted and incorporated fully, less than 1 minute.
  • Transfer soup to bowls, garnish with reserved cheese, and serve immediately. Soup will keep airtight for 5 to 7 days in the fridge. Reheat gently in the microwave.

Recipe slightly adapted from Averiecooks.com  

Appetizers · Breads · New Favorite

Focaccia with Carmelized Onions, Pear and Blue Cheese

Pears have been plentiful this year and I had to find a savory recipe to use extra pears when I discovered this fantastic recipe.  The focaccia recipe itself is wonderful and worthy of a totally different set of toppings; however, it’s hard to beat pears and blue cheese.

This is a recipe I’ll make over and over and over…

IMG_7612

FOCACCIA WITH CARMELIZED ONIONS, PEAR AND BLUE CHEESE

1 cup warm water
1 package active dry yeast
1/2 teaspoon honey
2 1/2 cups all-purpose flour
1/2 cup plus 1 tablespoon extra-virgin olive oil
1 teaspoon kosher salt
1 large onion, thinly sliced
1 teaspoon light brown sugar
1 large Bosc pear, cored and sliced
1/2 cup crumbled blue cheese (I used Gorgonzola)

  • In a large bowl, combine the water, yeast and honey and let stand for 5 minutes. Stir in 1 cup of the flour and 1/4 cup of the oil; let stand for 5 minutes. Stir in the remaining flour and the salt and knead until smooth.
  • Transfer to an oiled bowl, cover with plastic and let stand for 1 hour. Meanwhile, in a skillet, heat 1 tablespoon of the oil. Add the onion, cover and cook over moderate heat, stirring occasionally, for 10 minutes. Add the sugar, cover and cook, stirring occasionally, until browned, 10 minutes. 
  • Preheat the oven to 450°. Oil a 9-by-13 inch rimmed baking sheet. Transfer the dough to the sheet and press it down to fit. Dimple the dough all over with your fingers and drizzle with 2 tablespoons of the olive oil. Let the dough rise until puffed, about 20 minutes. 

IMG_7600

  • Scatter the onions over the dough. Arrange the pear over the onions and sprinkle with the blue cheese. Drizzle the remaining 2 tablespoons of oil over the focaccia and bake for 20 minutes, until golden. Transfer to a rack to cool. Serve.

IMG_7601

Recipe from FoodandWine.com

Breakfast · New Favorite

OMG Scrambled Eggs…with Pesto, Bacon, Roasted Tomatoes & Peppers

OMG Scrambled Eggs were an experiment, a gamble that paid off.  ‘OMG’ was the first thought that came into my head when I took the first bite. Adding the coincidentally roasted fresh tomatoes and peppers was a fantastic addition.
I also made this recipe combining the tomatoes and peppers into the egg cups and loved them as well.
The recipe could be adapted easily to add more bacon, cheese, pesto or whatever floats your boat. Worth trying!  I may be dreaming of this tonight.

OMG SCRAMBLED EGGS

3 slices bacon, sliced into 1 inch pieces
1/4 cup chopped onion
1 bunch swiss chard (or kale) stemmed and chopped
1 dozen eggs, whisked
salt and pepper
2 tablespoons pesto
1/4 cup mozzarella cheese
roasted tomatoes and peppers (optional)
  • Sauté the bacon in a non-stick skillet until cooked about half way.
  • Add onions and cook through.  Drain most of the bacon fat off.
  • Add Swiss chard and cook until it wilts.
  • Add the eggs, salt and pepper, and pesto.
  • Stir the eggs often to assure they cook through.
  • Add cheese when eggs are about half way cooked.
Serve with warm roasted tomatoes and peppers.
MUFFIN EGG CUPS: Mix all ingredients together, including the chopped roasted tomatoes and peppers. Grease muffin tins and bake egg cups at 350 degrees for 12-15 minutes until done in the center and golden brown.
Family · Garden · Home · Italian Dishes · New Favorite · Pastas · Vegan · Vegetarian

Roasted Tomato, Sausage and Pesto Sauce

Fall brings the bounty of tomatoes, basil and much more. Older daughter, Megan, told me about a roasted tomato and pesto sauce she made. I tweaked it a bit to serve my tastes. I love the idea of adding pesto to a rich, red tomato sauce. It was delicious and definitely a new recipe for my collection.

ROASTED TOMATO AND PESTO SAUCE

1 pound Italian sausage, cooked and drained
3 cups roasted tomatoes and peppers, cooled and blended (recipe below)
1/2 cup chopped onion
1 tablespoon olive oil
3-4 garlic cloves, diced
Cube of pesto (about 1/3 cup)
26.5 ounce can San Marzano tomatoes, chopped or blended
1 cup water
1 tablespoon fresh, chopped basil
1 pound cooked pasta (I used bow tie pasta) and 1 cup of pasta water
Parmesan Cheese (optional)

  • Core and slice tomatoes. Halve and remove seeds from peppers.
  • Arrange the tomatoes and peppers on a heavy cookie sheet (I line with parchment paper).  Drizzle with Avocado oil and sprinkle with sea salt or kosher salt.
  • Roast at 400 degrees until the edges of the vegetables start to char and are cooked through.
  • Blend the mixture to a smooth consistency.
  • Cook and drain the sausage. Drain and set aside.
  • Sauté onions in olive oil and when almost cooked through, add the garlic. Continue to salute until garlic is cooked through.
  • Add roasted tomatoes and peppers, pesto, San Marzano tomatoes, water, basil and sausage.
  • Heat thoroughly.
  • Add 1 cup of pasta water to sauce. Stir.  Add drained, cooked pasta, and stir to mix thoroughly.
  • Serve with Parmesan cheese.
New Favorite · New Traditions · Vegetables

Roasted Stuffed Kobacha Squash (or Pumpkin)

Stuffed pumpkin (or in my case Kobacha Squash) was a novel idea I heard about from friends. I found this wonderful recipe and adapted it to use the Kobacha squash I’d recently purchased from Trader Joe’s.

It was a fun, and delicious, experiment and one I’ll try again, shaking it up with different ingredients. This is a great way to use leftover pumpkins from Halloween or Thanksgiving. A new tradition perhaps.

IMG_7582

ROASTED STUFFED KOBACHA (OR PUMPKIN)

1 pumpkin (I used Kobacha squash), about 3 pounds
Salt and freshly ground pepper
1/4 pound stale bread, thinly sliced and cut into 1/2-inch chunks
1/4 pound cheese, such as Gruyère, Emmenthal, cheddar, shredded
2-4 garlic cloves (to taste) coarsely chopped
4 slices bacon, cooked until crisp, drained, and chopped
About 1/4 cup snipped fresh chives or sliced scallions
1 tablespoon minced fresh thyme
1/3 cup heavy cream
Pinch of freshly grated nutmeg

  • Center a rack in the oven and preheat the oven to 350 degrees F.
  • Line a baking sheet with a silicone baking mat or parchment, or find a Dutch oven with a diameter that’s just a tiny bit larger than your pumpkin. If you bake the pumpkin in a casserole, it will keep its shape, but it might stick to the casserole, so you’ll have to serve it from the pot—which is an appealingly homey way to serve it. If you bake it on a baking sheet, you can present it freestanding, but maneuvering a heavy stuffed pumpkin with a softened shell isn’t so easy. However, since I love the way the unencumbered pumpkin looks in the center of the table, I’ve always taken my chances with the baked-on-a-sheet method, and so far, I’ve been lucky. (Note: I baked my squash in a round Pyrex casserole lined with parchment paper)

IMG_7561

  • Using a very sturdy knife—and caution—cut a cap out of the top of the pumpkin (think Halloween Jack-o-Lantern). It’s easiest to work your knife around the top of the pumpkin at a 45-degree angle. You want to cut off enough of the top to make it easy for you to work inside the pumpkin. Clear away the seeds and strings from the cap and from inside the pumpkin. Season the inside of the pumpkin generously with salt and pepper, and put it on the baking sheet or in the pot.
  • Toss the bread, cheese, garlic, bacon, and herbs together in a bowl. Season with pepper—you probably have enough salt from the bacon and cheese, but taste to be sure—and pack the mix into the pumpkin. The pumpkin should be well filled—you might have a little too much filling, or you might need to add to it. Stir the cream with the nutmeg and some salt and pepper and pour it into the pumpkin. Again, you might have too much or too little—you don’t want the ingredients to swim in cream, but you do want them nicely moistened. (It’s hard to go wrong here.)

IMG_7567

  • Put the cap in place and bake the pumpkin for about 2 hours—check after 90 minutes—or until everything inside the pumpkin is bubbling and the flesh of the pumpkin is tender enough to be pierced easily with the tip of a knife. Because the pumpkin will have exuded liquid, I like to remove the cap during the last 20 minutes or so, so that the liquid can bake away and the top of the stuffing can brown a little.
  • When the pumpkin is ready, carefully, very carefully—it’s heavy, hot, and wobbly—bring it to the table or transfer it to a platter that you’ll bring to the table.

IMG_7579

  • You have a choice—you can either spoon out portions of the filling, making sure to get a generous amount of pumpkin into the spoonful, or you can dig into the pumpkin with a big spoon, pull the pumpkin meat into the filling, and then mix everything up. I’m a fan of the pull-and-mix option. Served in hearty portions followed by a salad, the pumpkin is a perfect cold-weather main course; served in generous spoonfuls, it’s just right alongside the Thanksgiving turkey.
  • It’s really best to eat this as soon as it’s ready. However, if you’ve got leftovers, you can scoop them out of the pumpkin, mix them up, cover, and chill them; reheat them the next day.

Recipe Adapted from Epicurious.com

Breads · New Favorite

Fresh Pear Bread

Pears, pears, pears!  I’ve overrun with pears thanks to my CSA shares this fall. They have been absolutely delicious but more than I can eat.

This recipe was simple and resulted in a moist, delicious bread great for a breakfast treat with a cup of hot coffee, tea or hot chocolate.  Due to family tastes, I omitted the nuts, but it would be delicious with walnuts or pecans!

Fresh Pear Bread
Fresh Pear Bread

FRESH PEAR BREAD

3 eggs
1-1/2 cups sugar
3/4 cup vegetable oil
1 teaspoon vanilla extract
3 cups all-purpose flour
2 teaspoons baking powder
2 teaspoons ground cinnamon
1 teaspoon baking soda
1 teaspoon salt
4 cups finely chopped peeled ripe pears (about 4 medium)
1 teaspoon lemon juice
1 cup chopped walnuts (optional)
  • In a bowl, combine the eggs, sugar, oil and vanilla; mix well. Combine flour, baking powder, cinnamon, baking soda and salt; stir into the egg mixture just until moistened. Toss pears with lemon juice. Stir pears and walnuts into batter (batter will be thick).
  • Spoon into two greased 9-in. x 5-in. loaf pans. Bake at 350° for 55-60 minutes or until a toothpick inserted near the center comes out clean. Cool for 10 minutes before removing from pans to wire racks. Yield: 2 loaves.

Recipe from Taste of Home