New Favorite · New Traditions · Vegetables

Roasted Stuffed Kobacha Squash (or Pumpkin)

Stuffed pumpkin (or in my case Kobacha Squash) was a novel idea I heard about from friends. I found this wonderful recipe and adapted it to use the Kobacha squash I’d recently purchased from Trader Joe’s.

It was a fun, and delicious, experiment and one I’ll try again, shaking it up with different ingredients. This is a great way to use leftover pumpkins from Halloween or Thanksgiving. A new tradition perhaps.

IMG_7582

ROASTED STUFFED KOBACHA (OR PUMPKIN)

1 pumpkin (I used Kobacha squash), about 3 pounds
Salt and freshly ground pepper
1/4 pound stale bread, thinly sliced and cut into 1/2-inch chunks
1/4 pound cheese, such as Gruyère, Emmenthal, cheddar, shredded
2-4 garlic cloves (to taste) coarsely chopped
4 slices bacon, cooked until crisp, drained, and chopped
About 1/4 cup snipped fresh chives or sliced scallions
1 tablespoon minced fresh thyme
1/3 cup heavy cream
Pinch of freshly grated nutmeg

  • Center a rack in the oven and preheat the oven to 350 degrees F.
  • Line a baking sheet with a silicone baking mat or parchment, or find a Dutch oven with a diameter that’s just a tiny bit larger than your pumpkin. If you bake the pumpkin in a casserole, it will keep its shape, but it might stick to the casserole, so you’ll have to serve it from the pot—which is an appealingly homey way to serve it. If you bake it on a baking sheet, you can present it freestanding, but maneuvering a heavy stuffed pumpkin with a softened shell isn’t so easy. However, since I love the way the unencumbered pumpkin looks in the center of the table, I’ve always taken my chances with the baked-on-a-sheet method, and so far, I’ve been lucky. (Note: I baked my squash in a round Pyrex casserole lined with parchment paper)

IMG_7561

  • Using a very sturdy knife—and caution—cut a cap out of the top of the pumpkin (think Halloween Jack-o-Lantern). It’s easiest to work your knife around the top of the pumpkin at a 45-degree angle. You want to cut off enough of the top to make it easy for you to work inside the pumpkin. Clear away the seeds and strings from the cap and from inside the pumpkin. Season the inside of the pumpkin generously with salt and pepper, and put it on the baking sheet or in the pot.
  • Toss the bread, cheese, garlic, bacon, and herbs together in a bowl. Season with pepper—you probably have enough salt from the bacon and cheese, but taste to be sure—and pack the mix into the pumpkin. The pumpkin should be well filled—you might have a little too much filling, or you might need to add to it. Stir the cream with the nutmeg and some salt and pepper and pour it into the pumpkin. Again, you might have too much or too little—you don’t want the ingredients to swim in cream, but you do want them nicely moistened. (It’s hard to go wrong here.)

IMG_7567

  • Put the cap in place and bake the pumpkin for about 2 hours—check after 90 minutes—or until everything inside the pumpkin is bubbling and the flesh of the pumpkin is tender enough to be pierced easily with the tip of a knife. Because the pumpkin will have exuded liquid, I like to remove the cap during the last 20 minutes or so, so that the liquid can bake away and the top of the stuffing can brown a little.
  • When the pumpkin is ready, carefully, very carefully—it’s heavy, hot, and wobbly—bring it to the table or transfer it to a platter that you’ll bring to the table.

IMG_7579

  • You have a choice—you can either spoon out portions of the filling, making sure to get a generous amount of pumpkin into the spoonful, or you can dig into the pumpkin with a big spoon, pull the pumpkin meat into the filling, and then mix everything up. I’m a fan of the pull-and-mix option. Served in hearty portions followed by a salad, the pumpkin is a perfect cold-weather main course; served in generous spoonfuls, it’s just right alongside the Thanksgiving turkey.
  • It’s really best to eat this as soon as it’s ready. However, if you’ve got leftovers, you can scoop them out of the pumpkin, mix them up, cover, and chill them; reheat them the next day.

Recipe Adapted from Epicurious.com

New Traditions

Baked Risotto with Bacon and Kale…comfort food

Baked Risotto with Bacon and Kale (and many other yummy ingredients) is a comfort dish to love. My gal pal, Jan, told me about this dish and I had to try it.  It also helped that I had many of the ingredients on the ready.

I rarely make Risotto because I don’t enjoy standing over the stove, constantly stirring and adding liquid to the Arborio rice. This recipe eliminates that hassle. There is some prep work chopping, roasting, grating, etc. but I did that early in the day which made the final preparation a breeze.

Add this is the list…comfort food!

RISOTTO WITH BACON AND KALE

4 slices bacon, chopped coarsely
1 large onion, chopped
1 teaspoon kosher salt
1/2 teaspoon freshly ground black pepper
1 cup Arborio rice
3 cups low-salt chicken broth (plus 1/2 cup+ to add later in preparation)
3 tablespoons fresh lemon juice (about 1 large lemon)
3 medium curly kale leaves, stemmed and chopped into 1-inch pieces (about 3 cups)
1 roasted carrot
1 roasted parsnip
1 roasted shallot
1/2 cup freshly grated Parmesan

  • Preheat oven to 400 degrees.  Peel and chop the carrot, parsnip and shallot. Place on baking sheet and drizzle with olive oil and sprinkle with salt.  Roast for 10 minutes or until cooked through. Remove from oven and set aside.
  • Increase oven temperature to 425 degrees.
  • In a large, heavy saucepan or braising pan, cook the bacon over medium-high heat until crisp.  Drain on paper towels.
  • Add the chopped onions, salt and pepper.  Reduce the heat to medium-low and cook until tender, about 5 minutes.  Add the rice and stir for 2 minutes.  Add 3 cups broth and the lemon juice. Increase the heat and bring the mixture to a boil, stirring occasionally.
  • Cover with a tight lid and bake in the oven for 20 to 25 minutes.  (Note: my dish was done at 20 minutes so watch closely.)
  • Remove the pan from the oven and return it to the stove, over medium-low heat. Remove the lid and stir in the chicken, kale, roasted vegetables and 1/2 cup chicken broth.  Stir until the kale is wilted, about 5 minutes, adding extra broth, as needed, until the Risotto is creamy.  Stir in the cooked bacon and cheese.  Ladle into bowls and serve.

Recipe slightly adapted from Giada De Laurentiis Risotto with Bacon and Kale


New Favorite

Mini Snickerdoodle Cupcakes

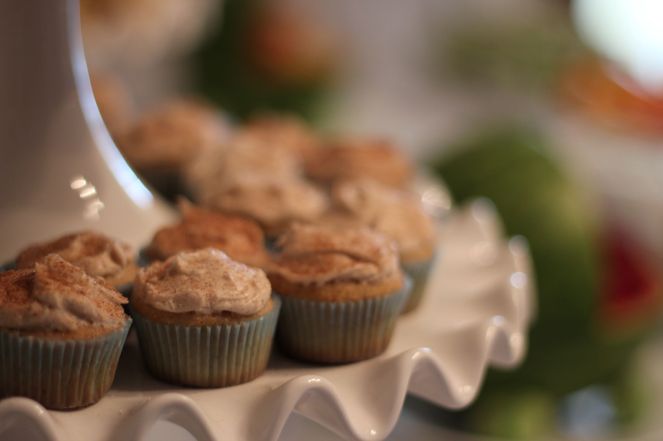
Our baby shower treats of last Saturday focused on baby-sized treats, including Mini Snickerdoodle Cupcakes.  Who doesn’t love a Snickerdoodle cookie…so why not a cupcake?  They could easily be adapted to a full-size cupcake without a problem.  They are yummy, yummy in the tummy as I will soon say to my first Grandbaby.

IMG_2822

MINI SNICKERDOODLE CUPCAKES

1 1/2 cups flour
1 1/2 cups cake flour (not self-rising), sifted
1 tablespoon baking powder
1/2 teaspoon salt
1 tablespoon ground cinnamon, plus 1/2 teaspoon for dusting
1 cup (2 sticks) unsalted butter, room temperature
1 3/4 cups sugar, plus 2 tablespoons for dusting
4 large eggs, room temperature
2 teaspoons pure vanilla extract
1 1/4 cups milk

Cinnamon Frosting

6 cups powdered sugar
2 teaspoons ground cinnamon
2/3 cup butter or margarine, softened
1 tablespoon vanilla
2 to 4 tablespoons milk (or more to achieve desired consistency)

Garnish

2 teaspoons granulated sugar
1/2 teaspoon ground cinnamon

Makes 98+ mini muffins.

  • Preheat oven to 350 degrees.  Line standard muffin tins with paper liners.  Sift together both flours, baking powder, salt and 1 tablespoon cinnamon.
  • With an electric mixer on medium-high speed, cream butter and sugar until pale and fluffy.  Add eggs, one at a time, beating until each is incorporated, scraping down sides of bowl as needed.  Beat in vanilla.  Reduce speed to low.  Add flour mixture in three batches, alternating with two additions of milk, and beating until combined after each.
  • Divide butter evenly among lined cups, filling each three-quarters full.
  • Bake rotating tins halfway through, until a cake tester inserted in centers comes out clean, about (10-15 minutes). (Cathy’s Note: Each oven varies greatly with mini cupcakes, so do a test run.)
  • Transfer tins to wire racks to cool completely before removing cupcakes. Cupcakes can be stored up to 2 days at room temperature, or frozen up to 2 months in airtight containers.
  • Frost mini cupcakes and sprinkle with cinnamon sugar.
  • Cupcakes are best eaten the day they are frosted.  Keep at room temperature until ready to serve.

Cupcake recipe adapted from:  Martha Stewart
Icing recipe from:  Betty Crocker