Book Club · Casseroles · New Traditions · Vegetables

Quinoa with Roasted Butternut Squash, Pine Nuts, Feta

Quinoa with roasted butternut squash, caramelized onions, pine nuts and feta…what’s not to like! I often try new recipes to share with others so my Book Club buddies were once again Guinea Pigs.  This recipe takes a while to prepare but well worth the effort!

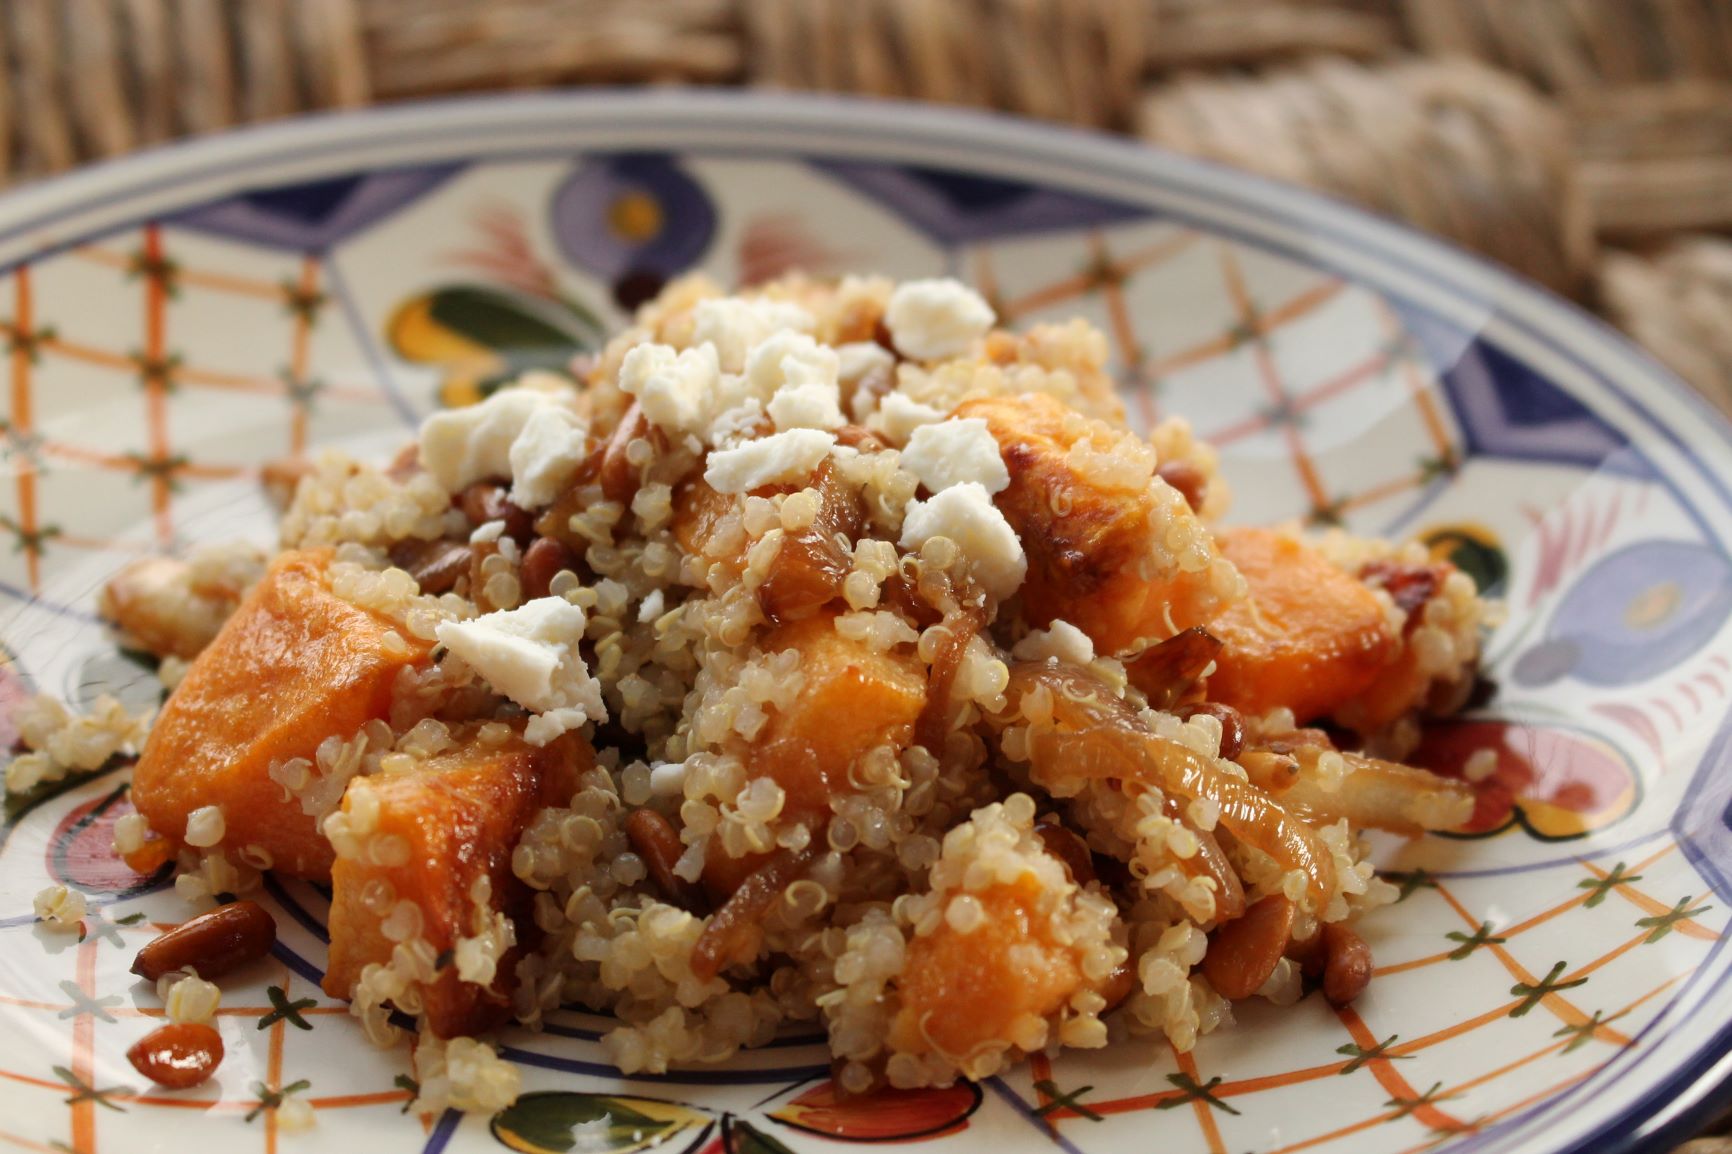
QUINOA WITH ROASTED BUTTERNUT SQUASH, PINE NUTS & FETA

2 1/2 cups cooked quinoa
2 large onions, sliced
2 pounds cubed butternut squash
3 tablespoons olive oil
1 T. balsamic vinegar
salt
French Vinaigrette salad dressing (add generous amounts of dressing to individual portions)
1/2 cup Feta cheese
1/2 cup pine nuts, toasted

  • Preheat the oven to 400 F. Line the baking sheet with aluminum foil and grease with 1 tablespoon of olive oil.
  • Peel the squash and slice it into 3/4 inch cubes, about 2 pounds. Toss the squash cubes in a large bowl with 2 tablespoons olive oil and generously sprinkle with salt.
  • Put butternut squash on the greased baking sheet and roast for about 30 minutes, until soft. Flip the squash cubes over midway through baking. Cool slightly before adding to the salad.
Caramelize the Onions:  
  • Heat 2 tablespoons olive oil on high heat in a large skillet.  When oil is heated, add onions and cook on high heat for about 10 minutes, constantly string with wooden spoon. The onions will start to brown, but not brown.
  • Reduce heat to medium and continue cooking for 10 additional minutes, continuing to stir as onions brown even more. Add a pinch of salt over the onions.
  • Continue cooking the onions for 10 more minutes on medium to low heat, stirring occasionally to make sure the onions don’t stick to the pan.  Add a bit of water if the onions begin o stick.  Total cooking time is 30 minutes.
  • Remove the onions from the heat and sprinkle onions with a small amount of balsamic vinegar to deglaze the pan. Using the wooden spoon, mix the onions scraping the bottom of the pan and coating onions with 1 tablespoon balsamic vinegar.
Assembling the salad:
  • In a large bowl, combine cooked quinoa, roasted butternut squash, caramelized onions, and mix with the dressing. Add the dressing only before the serving, and add as much as you want to individual portions, as both quinoa and butternut squash tend to be on a dry side, and this dressing (when generously applied) fixes this beautifully!
  • Top each individual serving with Feta cheese and toasted pine nuts.

Note: This salad keeps very well refrigerated for up to a week, but only without dressing. Add the dressing before serving.

New Favorite · New Traditions · Vegetables

Roasted Stuffed Kobacha Squash (or Pumpkin)

Stuffed pumpkin (or in my case Kobacha Squash) was a novel idea I heard about from friends. I found this wonderful recipe and adapted it to use the Kobacha squash I’d recently purchased from Trader Joe’s.

It was a fun, and delicious, experiment and one I’ll try again, shaking it up with different ingredients. This is a great way to use leftover pumpkins from Halloween or Thanksgiving. A new tradition perhaps.

IMG_7582

ROASTED STUFFED KOBACHA (OR PUMPKIN)

1 pumpkin (I used Kobacha squash), about 3 pounds
Salt and freshly ground pepper
1/4 pound stale bread, thinly sliced and cut into 1/2-inch chunks
1/4 pound cheese, such as Gruyère, Emmenthal, cheddar, shredded
2-4 garlic cloves (to taste) coarsely chopped
4 slices bacon, cooked until crisp, drained, and chopped
About 1/4 cup snipped fresh chives or sliced scallions
1 tablespoon minced fresh thyme
1/3 cup heavy cream
Pinch of freshly grated nutmeg

  • Center a rack in the oven and preheat the oven to 350 degrees F.
  • Line a baking sheet with a silicone baking mat or parchment, or find a Dutch oven with a diameter that’s just a tiny bit larger than your pumpkin. If you bake the pumpkin in a casserole, it will keep its shape, but it might stick to the casserole, so you’ll have to serve it from the pot—which is an appealingly homey way to serve it. If you bake it on a baking sheet, you can present it freestanding, but maneuvering a heavy stuffed pumpkin with a softened shell isn’t so easy. However, since I love the way the unencumbered pumpkin looks in the center of the table, I’ve always taken my chances with the baked-on-a-sheet method, and so far, I’ve been lucky. (Note: I baked my squash in a round Pyrex casserole lined with parchment paper)

IMG_7561

  • Using a very sturdy knife—and caution—cut a cap out of the top of the pumpkin (think Halloween Jack-o-Lantern). It’s easiest to work your knife around the top of the pumpkin at a 45-degree angle. You want to cut off enough of the top to make it easy for you to work inside the pumpkin. Clear away the seeds and strings from the cap and from inside the pumpkin. Season the inside of the pumpkin generously with salt and pepper, and put it on the baking sheet or in the pot.
  • Toss the bread, cheese, garlic, bacon, and herbs together in a bowl. Season with pepper—you probably have enough salt from the bacon and cheese, but taste to be sure—and pack the mix into the pumpkin. The pumpkin should be well filled—you might have a little too much filling, or you might need to add to it. Stir the cream with the nutmeg and some salt and pepper and pour it into the pumpkin. Again, you might have too much or too little—you don’t want the ingredients to swim in cream, but you do want them nicely moistened. (It’s hard to go wrong here.)

IMG_7567

  • Put the cap in place and bake the pumpkin for about 2 hours—check after 90 minutes—or until everything inside the pumpkin is bubbling and the flesh of the pumpkin is tender enough to be pierced easily with the tip of a knife. Because the pumpkin will have exuded liquid, I like to remove the cap during the last 20 minutes or so, so that the liquid can bake away and the top of the stuffing can brown a little.
  • When the pumpkin is ready, carefully, very carefully—it’s heavy, hot, and wobbly—bring it to the table or transfer it to a platter that you’ll bring to the table.

IMG_7579

  • You have a choice—you can either spoon out portions of the filling, making sure to get a generous amount of pumpkin into the spoonful, or you can dig into the pumpkin with a big spoon, pull the pumpkin meat into the filling, and then mix everything up. I’m a fan of the pull-and-mix option. Served in hearty portions followed by a salad, the pumpkin is a perfect cold-weather main course; served in generous spoonfuls, it’s just right alongside the Thanksgiving turkey.
  • It’s really best to eat this as soon as it’s ready. However, if you’ve got leftovers, you can scoop them out of the pumpkin, mix them up, cover, and chill them; reheat them the next day.

Recipe Adapted from Epicurious.com

Family · Family Favorites · Home · My Roots

Halloween Memories

Halloween on the farm was a far different experience than my current city experience. Childhood costumes were simple, always with a hot plastic or rubber mask. Note our fancy trick or treat bags! We couldn’t run from house to house but instead our parents drove us to our neighbors farms.  We collected wonderful home-made goodies while our parents visited for a while.  At the end of the night, we visited 6 to 8 houses but came home with luscious home-made popcorn balls, cookies, caramel apples, and full size candy bars.

Halloween on the Farm about 1959

My children never experienced the wonders of home-made goodies, ruined by the scare of Halloween candy tampering.  None-the-less, they had a wonderful time running from house to house in our suburban neighborhood yelling ‘trick or treat’ and collecting their Halloween bounty. Masks were not a favorite (thank goodness) but costumes were pretty traditional and fun. Our AT&T office hosted a family Halloween party letting the kids gather treats at each office and cubicle. Good times!

Sarah Mom Megan Halloween 1990

Fast forward to 2015 and grandson, Evan’s, Halloween experience.  His favorite character today is from the movie FROZEN and we were fortunate enough to find the darling OLAF costume on Amazon.com.

Evan as Olaf

Evan has been to his first corn maze and is in awe of the amazing (and sometimes scary) Halloween decorations. He’ll be out gathering treats in the neighborhood and celebrating with his little friends.  As his little 3 year old girlfriend says, they’ll be out ‘Candy Tricking’.  Love this age!

Next Halloween we’ll have a baby girl in our family joining the Halloween fun. We’ll anxiously await the arrival of ‘lil pumpkin in November.

Wishing you all a safe and wonderful Halloween!

Appetizers · Family Favorites · Garden · New Favorite · Vegan · Vegetarian

Fresh Corn and Tomatillo Salsa

My garden continues to produce plenty of tomatillos and when paired with fresh sweet corn, cilantro and seasonings, it makes a wonderful salsa. I’ve also used it to top my favorite Papusas from the Farmer’s Market. It wold also be wonderful paired with chicken or fish. A new favorite!

CORN AND TOMATILLO SALSA

4 ears fresh corn kernels
2 seeded and finely chopped jalapeno peppers
4 cups husked, chopped tomatillos
1/2 cup chopped green bell pepper
1/2 cup chopped onion
2 tablespoons fresh lime juice
2 tablespoons water
3 tablespoons fresh, chopped cilantro
tortilla chips

  • In a large skillet, combine the corn kernels and jalapeño peppers. Cook and stir for 10 minutes, until the jalapeños are soft.
  • Add the tomatillos, green pepper, onions, lime juice, water and coriander to the corn and jalapeño mixture. Bring to a boil. Reduce heat and simmer for 5 minutes.
  • Remove from heat. Cool. Stir in cilantro.
  • Cool salsa in the refrigerator until ready to eat.
  • Serve with tortilla chips

Recipe adapted from:  http://allrecipes.com/recipe/19686/corn-and-tomatillo-salsa/?internalSource=search%20result&referringContentType=search%20results

Family Favorites · Garden · Vegetables · Vegetarian

Zucchini Fritters

Zucchini and rabbits have a lot in common. They multiply…and multiply…and multiply.  My zucchini plant has done well this year, keeping my daughters and I supplied in plenty of zucchini for salads, pastas, breads and, one of my favorites, Zucchini Fritters.

I’ve made these for years but with the remodel, the recipe disappeared. I found this recipe online which sounded almost exactly like my tried and true recipe. It’s easy and delicious, a bit like latkes.

ZUCCHINI FRITTERS

4 cups shredded zucchini
2/3 cup all-purpose flour
2 large eggs, lightly beaten
1/3 cup sliced scallions (green and white parts)
Vegetable oil
Sour cream, for serving (optional)

  • Place the shredded zucchini in a colander set over a bowl and sprinkle the zucchini lightly with salt. Allow the zucchini to stand for 10 minutes. Using your hands, squeeze out as much liquid from the zucchini as possible. Transfer the zucchini to a large bowl.
  • Add the flour, eggs, sliced scallions, 1/4 teaspoon salt and 1/8 teaspoon pepper to the bowl, stirring until the mixture is combined. Line a plate with paper towels.
  • Liberally coat the bottom of a large sauté pan with vegetable oil and place it over medium-high heat. Once the oil is hot, scoop 3-tablespoon mounds of the zucchini mixture into the pan, pressing them lightly into rounds and spacing them at least 2 inches apart. Cook the zucchini fritters for 2 to 3 minutes, then flip them once and cook an additional 2 minutes until golden brown and cooked throughout.

  • Transfer the zucchini fritters to the paper towel-lined plate and immediately sprinkle them with salt. Repeat the scooping and cooking process with the remaining zucchini mixture.
  • Serve the zucchini fritters topped with sour cream (optional) and sliced scallions.

Recipe from Justataste.com 

Family · Family Favorites · Pastas

Microwave Mac & Cheese…endorsed by my two year old Grandson

My Grandson, Evan, loves Mac & Cheese. I’m not fond of the boxed variety and I didn’t want to make a huge batch since I typically don’t typically eat gluten.

I tried this recipe and was pleased with the results. He ate every bite! My taste test confirms it was delicious. It’s easy, cheaper than boxed, and so much better!

Microwave Mac ‘N Cheese

1/2 cup macaroni
1/2 cup milk
1/2 finely grated cheddar cheese

  • Combine macaroni and milk in an oversized, microwavable container (I used a pryex 2 cup measuring cup).  Microwave for 1 minute on high.  Stir the ingredients and cooked another minute and stir again. Continue this process until noodles are cooked through.
  • Remove from the microwave and stir in cheese until melted.

Enjoy!

Appetizers · Family Favorites · Garden · Gluten Free · New Traditions · Vegan · Vegetarian

Tomatillo Salsa Fresh from the Garden

Last year was the first time I ever planted tomatillos plants in my garden. While my tomatoes struggled last year, the tomatillos went crazy and they are even crazier this year given all of the summer rain in Colorado.

My first try at tomatillos salsa went the easy – route and it was delicious. I froze a few bags for winter enjoyment, too! I plan to branch out this year and try a few other recipes, too!

GREEN TOMATILLO SALSA

8 ounces (5-6 medium) tomatillos, husked and rinsed
1 jalapeno (or 2 serranos), stemmed
5-6 sprigs fresh cilantro (thick stemmed removed), roughly chopped
1/4 cup water
1/4 cup finely chopped onion
salt to taste

  • Chop the tomatillos and the jalapeño.
  • In a blender or food processor, combine the tomatillos, jalapeño, cilantro and 1/4 cup water. Process to puree, then scrape into a serving dish.
  • Stir in the chopped onion and salt.
Family Favorites · My Roots · Vegetables · Vegetarian

Fresh New Potatoes and Peas

Fresh New Potatoes and Peas were a summer treat on the Iowa farm.  My Mother would dig potatoes and shell peas from her large summer garden.  I cannot verify the origin of this recipe but Mom always said it had Dutch or Pennsylvania Dutch roots.

While I do not grow potatoes in my garden, I prepared with red potatoes from the grocery store and peas from my CSA weekly bounty.Fresh New Potatoes and Peas

This recipe can easily be prepared with frozen peas as well.  It’s a wonderful side dish with steak, hamburgers, or fish. My oldest daughter, Megan, suggested it would be great with a little Parmesan cheese.  I’ll be trying that next time!

New Potatoes and Peas

FRESH NEW POTATOES AND PEAS

1 1/2 quarts new potatoes, peeled and cubed
2 cups new peas, cook until done
1 cup sweet cream
1 tablespoon butter
1 teaspoon salt
1/4 cup flour
1/2 cup grated carrots (optional)
salt and pepper

  • Cover potatoes, peas, and carrots with water and cook until tender. Drain.
  • Combine cream and flour until smooth. Add to potatoes and peas and add butter, salt and sugar.
  • Cook and stir over medium-low heat until thickened.
Desserts · Gluten Free · Holidays · New Traditions

Patriotic Brownie Fruit Dessert…Gluten Free or Not

Krusteaz’s Double Chocolate Gluten-Free Brownie mix is an absolute favorite of mine, first discovered at Costco many moons ago.  It’s delicious and even lovers of gluten will love them.

This mix was the perfect base for a patriot, 4th of July dessert with fresh berries and a cream cheese base.  This recipe can easily be cut in half and baked in a round or square pan.

The dessert is best served the day it is made but leftovers brownies can be good for 1-2 days.

PATRIOTIC BROWNIE FRUIT DESSERT

2 packages Double Chocolate Krusteaz gluten-free brownie mix (I bought a large box at Costco) and ingredients stated on the box (water, vegetable oil, egg)
16 ounces cream cheese, softened
2/3 cup sugar
1 teaspoon vanilla
4 cups fresh strawberries, sliced
2 cups fresh blueberries
2 cups fresh red raspberries
1 cup apple jelly

  • Make brownies according to package directions and bake in greased jelly roll or sheet pan as directed. Let cool completely.
  • Beat together softened cream cheese, sugar and vanilla until smooth.
  • Spread mixture over cooled, baked brownies.
  • Top with berries.
  • Still jelly until smooth and brush over berries
  • Refrigerate dessert until ready to serve.
Family · Family Favorites · Holidays · Home · Kitchen

Kitchen Memories

Kitchen Memories started to flood back to me as I looked at my kitchen for the last time before the cabinets were removed.  So many conversations took place in my kitchen with our girls from babyhood to teenage years to adult years.  Meals were prepared for many loved ones, some of which are now gone.

IMG_6246
Kitchen 2015 after the cabinets over the island were removed.

When we first moved into our Smurf blue house in 1988, the kitchen had brown, patterned kitchen carpet, one of the worst ideas on the planet. The Cherry Cabinets were quite nice and the Columbine (Colorado’s State Flower) tile was fitting of the ‘country’ craze at the time.

This kitchen became the heart of our home. Weekday mornings were frantic as Karl and I prepared for work so the girls would often gather on the floor of the kitchen as I prepared breakfast and our lunches.

As I look at the kitchen for the last time, a stream of memorable movies play in my head, including:

  • Homework, Science experiments, crafting
  • Holiday meal preparations
  • Meal preparation while the kids often sat on the counter to chat and share
  • My mother, when visiting, making homemade egg noodles on my kitchen counter to freeze for later use
  • Making our Christmas favorite Kringla for the holidays
  • Birthday Celebrations
  • Christmas parties & Mother’s Day Coffee
  • Dying Easter Eggs

Sarah and Megan dye Easter Eggs 1991

  • Teaching the girls to bake

Megan and Sarah bake a cake 1991

  • Rescuing animals or playing with our own pets

Daddy has a bird

  • Running Circle through the house (Gamma Stout and Sarah)

1992 003

  • Preparing flowers for the Megan (top) and Sarah’s (second) weddings

megan and cathy do flowers 1580

  • Evan’s 2nd birthday, the last event in the old kitchen.

IMG_6407

So here we go…out with the old and in with the new! I’m soooo ready…